background image

1. Create a Monnit User Account and Setup Sensor Network  

If this is your first time using the iMonnit online system site, you will need to create a new 

account. If you have already created an account you can skip to the “Logging into the 

Online System” section. The following instructions will guide you through the account 

creation process.

1. In a web browser, navigate to 

https://www.imonnit.com

.

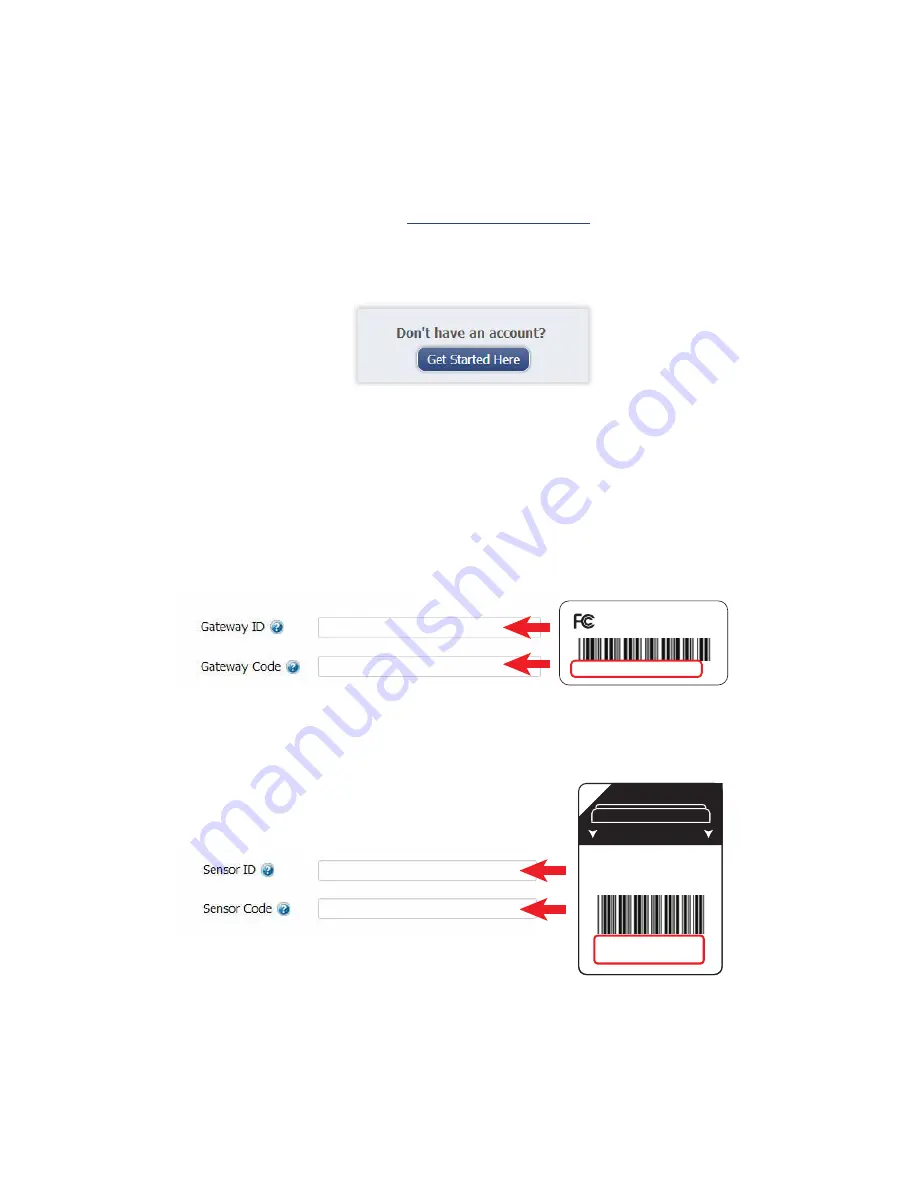
2. Click the “Get Started Here” button to create an account.

3. Follow the on-screen instructions to enter your account and contact  
    information

4. After entering your account and contact information, you will be prompted to  

    create your first sensor network. Simply enter a name for this network.

5. Add the information from your MonnitLink

 gateway then click the  

   “Assign Gateway” button.

ID: ZTL-RFUSB1   

IC: 9794A-RFUSB1


ID: ####  Code: XXXXXX

6a. Add the information from your first Monnit wireless sensor then click the 


     “Assign Sensor” button.

+

_

Back of         Sensor  

Peel

Contains: FCC ID: ZTL-RFSC1

IC: 9794A-RFSC1

Sensor ID: ######

Sensor Code: XXXXXX

6b. On the next screen, enter a name for the wireless sensor and use the 
      drop down to tell us how you are going to be using the wireless sensor. 

      (This allows us to suggest settings for your sensor.) When finished, click 

      the “Continue” button.

PAGE 2

Summary of Contents for Wireless Sensors and Ethernet Gateway

Page 1: ...ser account with assigned wireless gateways and sensors Plug an Ethernet cable with internet connectivity into the gateway Plug the power supply into a power outlet then connect to the gateway Once al...

Page 2: ...mation 4 After entering your account and contact information you will be prompted to create your first sensor network Simply enter a name for this network 5 Add the information from your MonnitLink ga...

Page 3: ...wn custom notification If you choose to create your own notification it will be available for any similar sensors that are added to your account in the future Or create your own custom notification he...

Page 4: ...es there is a problem A flashing green light indicates radio traffic from the sensors 2 Ethernet Gateway Controls RP SMA Antenna Connector Ethernet Port Power Plug Control Button Back Panel Using the...

Page 5: ...Wireless Sensors Important Make sure your sensors are at least 3ft away from Ethernet Gateway Peel back the black sticker cover of the battery slot and slide the coin cell battery into the sensor as s...

Page 6: ...fications and show all sent notifications Manage Manage networks sensors and gateways Reports Printable account and sensor network reports Sensor Maps Visual maps to help you track sensor placement Su...

Page 7: ...r view for the selected sensor Select a tab to change between Chart Displays a graphical view of the selected sensor s data Notifications Allows you to manage notifications for the sensor History Disp...

Page 8: ...ary configurations for the sensor Mousing over the question mark icon by each setting will provide an explanation of that setting When you have finished making changes press the Save button at the bot...

Page 9: ...ater present temp sensor trigger alert when temp is above 70F etc If creating an application specific notification you will need to choose what sensor type you are creating the alert for The system wi...

Page 10: ...ype General notifications such as battery status can be assigned to any or all sensors 5 Exporting Sensor Data Clicking on the Export tab within the sensor data window allows you to export sensor data...

Page 11: ...another network Add a device to the network Create a new network Remove device from network Edit network information Clear sensor history and data Click to Manage Select which network to view Note So...

Page 12: ...an find additional information on using Monnit Wireless Sensors including product documentation and video tutorials on the Monnit website at http www monnit com support Information to Users The Monnit...

Reviews: