●
Always measure a resistor separately, otherwise the measure-
ment will be inaccurate. For this measurement, the resistor must
be soldered out of the circuit, if necessary.
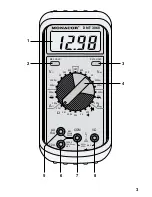
1) Connect the red test lead to jack “V
Ω
” (8) and the black test
lead to jack “COM” (7).
2) For resistance measurements set the rotary switch (4) to one of
the “
Ω
” ranges. For continuity tests set the rotary switch to posi-
tion .
3) Hold the test tips to the resistor resp. to the corresponding
measuring points and read the measuring value on the display
(1). With continuity test the buzzer will sound if the resistance is
below 100
Ω
.
Note: In the lowest measuring range “200
Ω
”, the resistance of the
two test leads may lead to inaccurate results. To obtain an exact
measuring value, short-circuit the test tips and then subtract the
test lead resistance shown on the display from the actual measur-
ing value.
5.4 Diode test
●
The unit is overload-protected up to 500 V~/
. In spite of this
protection do not measure within a circuit if it carries voltage!
●
Always measure a diode separately, otherwise the measure-
ment will be inaccurate. For this measurement, the diode must
be soldered out of the circuit, if necessary.
1) Connect the red test lead to jack “V
Ω
” (8) and the black test
lead to jack “COM” (7).
2) Set the rotary switch (4) to position “
”.
3) Hold the test tips to the diode. If the diode is measured in for-
ward direction (black test lead to the cathode, red test lead to
the anode), the display (1) will show the forward voltage up to
1.999 V. If the diode is measured in reverse direction, “OL” will
be displayed.
If both in forward and reverse direction the display reads “OL”,
the diode is interrupted.
In case of short circuit of the diode, a value close to 0 V will be
displayed.
GB
16


