background image

Hand Crimp Tool for 2.50mm (.098”) / 3.00mm (.118”) Pitch Wire-to-Board Female Crimp Terminal 

Doc No: ATS-638235200 

Release Date: 06-17-10 

UNCONTROLLED COPY


Page 3 of 7 

Revision: A 

Revision Date: 06-17-10 

RELEASE 

LOCATOR BUTTON 

TERMINAL 

Figure 3 

LOCATOR 

PUSHED THRU 

TOOLING 

TERMINAL 

LOCATOR 

BUTTON 

PUSHED IN 

LOCATOR 

PRE-STRIPPED 

WIRE 

TERMINAL 

Figure 5 

TERMINAL 

WIRE AGAINST 

THE WIRE 

STOP 

WIRE 

WIRE STOP IS 

PART OF 

THE LOCATOR 


3.


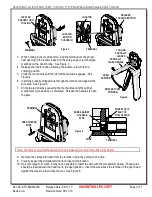
While holding in the locator button, load the terminal into the proper 
nest opening in the locator, based on the wire gauge or terminal type 
markings on the hand tooling.  See Figure 3. 

4.


Release the locator button, allowing the locator to return to the 
crimping position. 

5.


Close the tool handle until the first ratchet position engages.  See 
Figure 4. 

6.


Insert the properly stripped wire through the terminal and against the 
wire stop.  See Figure 5. 

7.


Crimp the terminal by squeezing the tool handles until the ratchet 
mechanism cycle has bee n completed.  Release the handles to open 
the jaws. 


Note: The tamper proof ratchet action will not release the tool until it has been fully closed. 

 
8.


Remove the crimped terminal from the terminal locator by pulling on the wire. 

9.


Visually inspect the crimped terminal for proper crimp location. 

10.


On some large O.D. wires, it may not be possible to insert the wire with the tool partially closed.  Those wires 
should be inserted with the hand tool in the open position.  Insert the wire above the terminal in the punch and 
against the wire stop then close the tool.  See Figure 6.  

PARTIALLY 

CLOSE HANDLE 

TOOLING 

PARTIALLY 

CLOSED 

Figure 4 

FIRST RATCHET 

POSITION 

OPEN 

POSITION 

Summary of Contents for 63823-5200

Page 1: ...A IPCA620 Class 2 compliant as indicated This tool is RoHS compliant however RoHS compliant is not required SCOPE Products 2 50mm 098 3 00mm 118 Pitch Wire to Board Female Crimp Terminal 16 20 AWG Ter...

Page 2: ...2 19 8 50350 20 0 50 2 60 102 2 20 087 58 8 13 2 OPERATION CAUTION Install only Molex terminals listed above with this tool Do not crimp hardened objects as damage can occur to the tool or die Open t...

Page 3: ...until the first ratchet position engages See Figure 4 6 Insert the properly stripped wire through the terminal and against the wire stop See Figure 5 7 Crimp the terminal by squeezing the tool handle...

Page 4: ...ull away from the hand tool The top locator hooks should slip out of the top slots easily See Figure 7A 4 To reinstall the new locator make sure the hand tool is in the open position 5 Press the red i...

Page 5: ...oil Do not oil excessively The tool was engineered for durability but like any other equipment it needs cleaning and lubrication for a maximum service life of trouble free crimping Light oil such as 3...

Page 6: ...damaged tools This tool is designed for hand use only Any clamping fixturing or use of handle extensions voids this warranty CAUTION Molex crimp specifications are valid only when used with Molex term...

Page 7: ...17 10 UNCONTROLLED COPY Page 7 of 7 Revision A Revision Date 06 17 10 RATCHET RELEASE LEVER 2 Figure 13 1 3 PARTS LIST Item Number Order Number Description Quantity REF 63823 5200 Hand Crimp Tool Fig...

Reviews: