background image

Mojix

®

 STAR 1000 System User Manual

15

Figure 11: Power Supply – showing wall mount

2.2.1.2. Platform Mount 

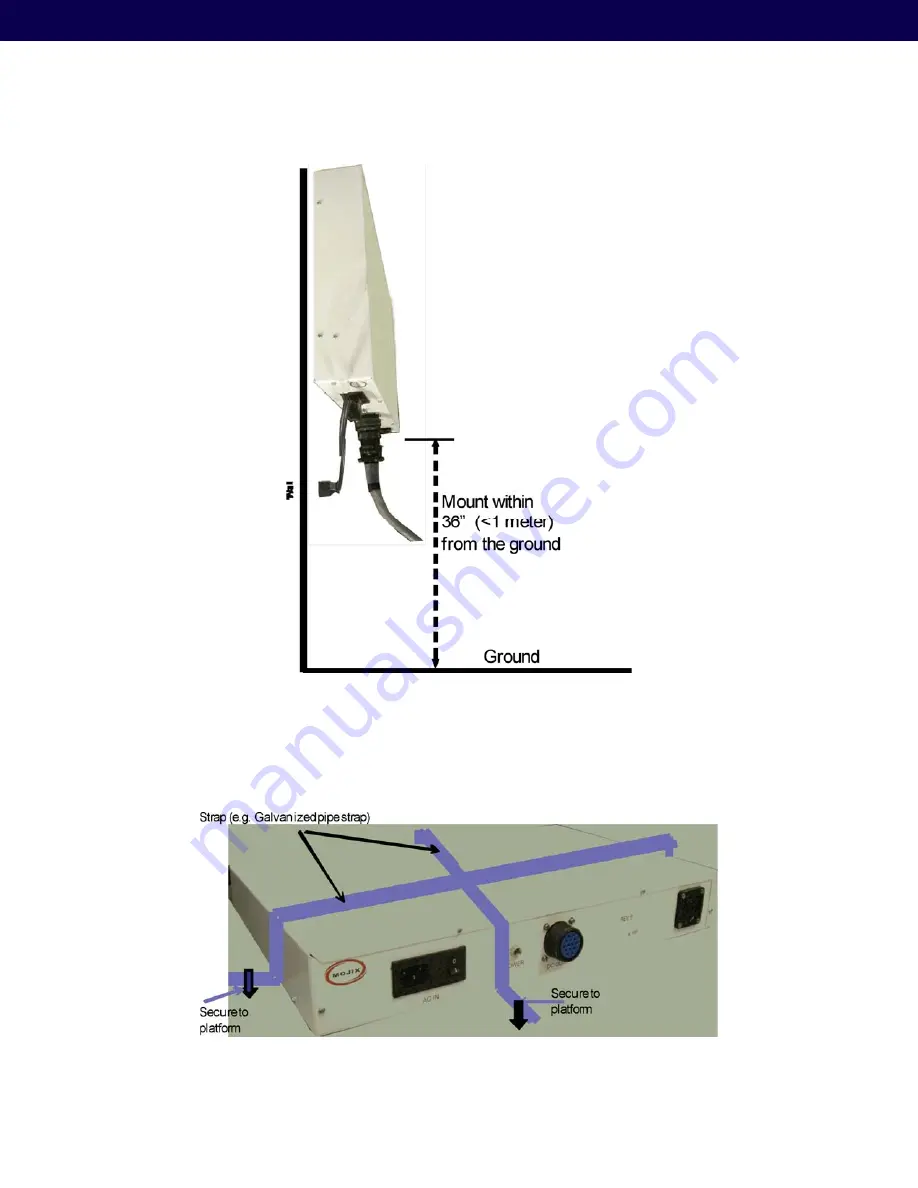
When mounting the power supply on a platform, it shall be strapped and secured, as shown in Figure 12. Additionally, 
ensure that the connectors are facing out for easy access. 

Figure 12: Power supply platform mount

Summary of Contents for STAR 1000

Page 1: ...System User Manual January 2009 Mojix Incorporated 11075 Santa Monica Blvd Suite 350 Los Angeles CA 90025 Web www mojix com Tel 877 886 6549 E mail service mojix com Mojix STAR 1000...

Page 2: ...contained in this document may not be used without the prior written consent of Mojix or their respective owners Portions features and or functionality of Mojix s products are protected under Mojix p...

Page 3: ...3 1 ENODE POSITIONING 17 3 2 ENODE CABLING 17 3 3 4 PORT ENODE CABLING 18 4 EMUX INSTALLATION 19 4 1 ABOUT INSERTION LOSS 19 4 2 EMUX SPECIFICATIONS 19 5 MASTER CONTROLLER INSTALLATION 21 5 1 MASTER C...

Page 4: ...owered directly by its power supply and in turn powers each Mojix eNode Each eNode is connected to the STAR by coaxial cable and receives supply voltage command and control signals and baseband RF ove...

Page 5: ...r Controller Technical Speci cations Network Interface Ethernet 10 100 1000 Base T Operating System Linux Logical interface TCP IP Interface HTTP Application Programming Interface IP Addressing Static...

Page 6: ...e Mojix STAR Receiver able to manage a mixed population of single and multi port eNodes as well as sensors in support of numerous concurrent business processes 1 2 STAR Receiver Centralized Read and C...

Page 7: ...y number of STAR 1000 systems and includes interfaces to the enterprise middleware In a larger enterprise deployment multiple STAR domains would exist in various locations and would require one or mor...

Page 8: ...l described including installation and operational guidelines Also described will include the user interfaces as well as hardware con guration procedures The required equipment for installation of the...

Page 9: ...ns such as racking shelves walls and staged product c AC power drops d Network drops e Targeted interrogation spaces f Orientation and pointing of the unit with respect to the interrogation spaces The...

Page 10: ...and construction Best industry practice is recommended a For example toggle bolts or Molly bolts would be the rst choice on hollow walls Lead lag shields would be recommended on solid cast concrete or...

Page 11: ...0015 000 Hex Nut 25 20 MCM 91841A029 5 2 302 0012 000 U Bolt Assembly 2 MCM 3042T31 4 4 301 0015 000 Screw Hex Head Cap 25 20X 75 MCM 92240A540 3 1 309 0002 000 Mounting Support 2 2 309 0001 000 Moun...

Page 12: ...1 000 Screw Phillips Pan Head 6 32X 625 9 40 300 0005 000 Flat Washer 6 8 20 300 0003 000 Lock Washer 6 7 6 300 0004 000 Screw Phillips Pan Head 6 32X0 25 6 4 301 0002 000 Female Screw Locks 4 40X 312...

Page 13: ...re 9 STAR Receiver Pole Mount 2 2 1 STAR power supply installation Recommended installation of the power supply is platform mounting where the unit is secured at on a platform co located within 20 fee...

Page 14: ...o use drywall mounts Molly Bolts are preferred for that purpose these or toggle bolts offer a pull down force more than 4X the industry standard and are highly recommended in areas prone to seismic ac...

Page 15: ...pply showing wall mount 2 2 1 2 Platform Mount When mounting the power supply on a platform it shall be strapped and secured as shown in Figure 12 Additionally ensure that the connectors are facing ou...

Page 16: ...nput from STAR power supply Ethernet connector RJ 45 TX RF coaxial connector to eNode or eMux N Type connector see Section 2 2 for details Table 3 STAR Receiver cabling speci cations Power Supply Spec...

Page 17: ...s highly dependent on tag manufacturer tag placement tag orientation and the content of the tagged material Typical tags receive suf cient power to turn on at greater than 30 feet 9 1 meters of the eN...

Page 18: ...n Comment RF input connector SMA connector RF output connector SMA connector Antenna 1 output connector R SMA connector Antenna 2 output connector R SMA connector Antenna 3 output connector R SMA conn...

Page 19: ...eMux s 4 1 About Insertion Loss The STAR puts out a signal of 22 dBm Approximate insertion loss of terminated LMR240 coaxial cable at 915 MHz is 7 5 dBm per 100 ft Approximate insertion loss of wired...

Page 20: ...igure 18 eMux Physical Diagram Mojix eNode Multiplexer Speci cations Parameter Speci cation Signals Present at Input Output DC RF and Control RF Frequency Range 902 928 MHz RF Signal Level Max 20 dBm...

Page 21: ...ytes Processor 3 0 GHz Intel Xeon Dual Core Please note that this hardware is currently only available through Mojix as a turnkey appliance 5 2 MCON Deployment overview The MCON is connected to the ST...

Page 22: ...255 0 0 Default Gateway 169 254 1 1 Recommended to connect MCON using loopback crossover cable directly to a windows PC for rst time setup This will ensure that MCON defaults to the IP address above...

Page 23: ...rk settings the user must be connected to the STAR from the same LAN segment and not over a WAN connection Enter the following commands in this order 1 gateway Gateway ip address Ex 192 168 1 1 2 netm...

Page 24: ...ers are Mozilla Firefox and Microsoft Internet Explorer To launch the Web GUI enter the MCON IP address in the URL eld of the browser Not all screens are described in this version of documentation The...

Page 25: ...2 1 Hardware Button The Hardware Button launches the con guration interface for the STAR Figure 23 STAR Receiver Setup and Con guration This interface shows a con guration menu frame on the left and c...

Page 26: ...face showing tag reads 6 2 3 Network Button The Network Button launches an interface to con gure network settings for the STAR and MCON and was discussed early in Section 6 1 2 and shown in Figure 19...

Page 27: ...y be used by advanced users 6 2 6 dbPlot Button The dbPlot Button launches a Java application that provides various graphical diagnostic functions Figure 27 dbPlot graphical diagnostics 6 2 7 Topology...

Page 28: ...d to excite tags In newer systems an eMux Button on the Web GUI allows for remote calibration by simply pressing the Calibration Button once all hardware has been connected and powered on This process...

Page 29: ...n x y and z The two angles that describe the beam boresight of both reader and eNodes must also be entered These angles can be seen in Fig 1 and are de ned as follows coazDeg coazimuth angle in degree...

Page 30: ...zontally pointed star boresightRollDeg Roll angle in degrees of the reader If the power cord is down the roll is 180deg If up 0 deg 180 0 Table 10 STAR Receiver Location Con guration Parameters Proper...

Page 31: ...origin the direction it points as the x axis STAR Receiver parameters posXFt posYFt posZFt boresightCoazDeg boresightElevDeg are all zero 2 Use walls as axes best for using laser range nder only valid...

Page 32: ...t following gure illustrates interrogation spaces and targeted locations for installing eNodes i e labeled one through seven The gure below shows the eNodes and their associated pointing angles as wel...

Page 33: ...the gure below This information is used for placing the eMuxes to maximize power distribution across all eNodes Keep in mind that cable runs need to run from eNode to eNode but may also have to run up...

Page 34: ...user will need to establish an SSH connection TCP port 22 with the MCON The rst time a user connects with the MCON the user will be asked to agree to accept a host key for the connection that will be...

Page 35: ...IP address or select DHCP Once the changes are made select Ok and Quit out of the setup utility The user will once again be presented with a command prompt For the new network changes to take place t...

Page 36: ...the command prompt sudo service vncserver start Now the user can run a VNC Client and connect to the MCON using the following connection address and session number format ip of MCON 9 This indicates t...

Page 37: ...by clicking on the Terminal icon on the desktop With the terminal window open enter the following command to launch Mojo Mojo STAR ip This will launch the Mojo application and the user will be present...

Page 38: ...s to be accepted Note when the value is accepted it will appear in parenthesis to the left of the text entry box Once the eNodes are entered the user can return to the Mac tab and click on the Start A...

Page 39: ...ads away from the MySQL database and to the Mojo interface for display Unselecting the box will return tag reads to the database The EPC display area at the bottom of the Mojo screen shows active tag...

Page 40: ...40 Figure 45 Select Statements Figure 46 Access Statements Figure 47 Inventory Programs...

Page 41: ...t the coax cable planned as the input to the eMux to a spectrum analyzer 1 Be sure to connect the spectrum analyzer through a DC Block Warning failure to use a DC Block could signi cantly damage the s...

Page 42: ...anned to branch from the eMux 1 Connect coaxial cables intended as outputs to the eMux output ports The most challenging branch from an insertion loss perspective should be attached to the port with t...

Page 43: ...l or may include a battery for increased read range or to power an onboard processor Beam Powered Tag A tag whose internal circuitry is energized by converting a portion of the reader s RF signal beam...

Page 44: ...intelligence to execute anti collision functions so a reader can read many tags in its eld virtually at once Also referred to as chip die or device Interference Any emissions in the electromagnetic sp...

Page 45: ...astic label Source Tagging The integration of tags into product packaging at the source or point of manufacture Speci cation An RFID speci cation describes all the operating parameters of a system inc...

Page 46: ...sing 6 Distance 18 46 elevation 30 31 elevDev 30 eMux 7 8 16 20 21 29 34 42 43 44 45 eNode 3 4 6 7 8 16 18 19 20 26 29 30 31 32 33 34 38 39 42 44 45 46 EPC 6 40 44 45 Ethernet 6 7 8 16 22 31 ETSI 18 e...

Page 47: ...4 RFID tag 4 6 44 46 rotation 31 save 24 screen 25 36 38 40 46 sensors 6 44 Service De nition Language 23 46 service loop 14 session 24 25 37 settings 23 24 27 36 setup 23 30 35 36 SFTP 35 signal 4 6...

Page 48: ...generates uses and can radiate radio frequency energy and if not installed and used in accordance with the instructions may cause harmful interference to radio communications However there is no guara...

Reviews: