background image

35

5.

Dial                    to conference the two
lines
together with your extension.  The display
will show:

13.2


Conferencing One (1) Outside Line

and Two (2) Stations

While on a call on the first line;

1. 


Press  

.  The first line is placed on

Hold and the handset display shows:

2. 


Press  

.

3. 


Dial the intercom number for the other
internal party. Your handset display will
show:

4. 


Press  

.  The display will show:

Summary of Contents for DCTS-900

Page 1: ...DCTS 900 Wireless Handset USER S MANUAL...

Page 2: ...el Systems Inc has made every effort to ensure the technical accuracy of this manual Features and technical data are subject to change without notice Copyright 1997 MobiCel Systems Inc All Rights Rese...

Page 3: ...OSE THE UNIT TO RAIN OR MOISTURE IMPORTANT SAFETY INSTRUCTIONS When using your telephone equipment basic safety precautions should always be followed to reduce the risk of fire electrical shock and in...

Page 4: ...or short out parts that could result in a risk of fire or electric shock 11 To reduce the risk of electric shock do not disassemble this product Contact qualified service personnel when some service o...

Page 5: ...e battery pack in a fire Refer to the Installation section concerning proper battery disposal 3 Do not open or mutilate the battery pack Released electrolyte is corrosive and may cause damage to the e...

Page 6: ...g the Identification 15 10 Setting the Ringer and Receive Volume 17 11 Assigning CO Line Ringing 18 12 Adjusting the Ringer Tone Setting 19 PROGRAMMING 1 Flash 21 2 Speed Dial 22 BASIC OPERATION 1 Mak...

Page 7: ...ut of Range Signal 40 23 Using a Headset 40 CALLER ID OPERATION 1 Setting the Area Code 42 2 Receiving a Call 44 3 Reviewing a Call 46 4 Dialing a Telephone Number 48 5 Erasing a Call 48 6 Storing a C...

Page 8: ...such as conference speed dialing intercom and paging Each handset has a display and various buttons as shown below Feature Buttons MEM for programming CID for caller ID review ICM intercom button HLD...

Page 9: ...2 FNC function button FNC 1 backspace FNC 2 pause FNC 3 conference FNC 4 do not disturb DND There are feature buttons on both sides of the handset...

Page 10: ...station identification ringer volume etc Other Symbols Row 1 Ear Shape indicates headset operation Row 3 line status General information shown on the display n The numbers you are dialing when you mak...

Page 11: ...will be displayed briefly to the left of the Line 4 Status when the button is pressed 3 The Features Your DCTS 900 system provides many features such as Four 4 CO Line PBX Capacity Tone Pulse Dialing...

Page 12: ...5 4 What s Included With Your Handset Handset Battery Charger Wall Mounting Fast Charger Screws Anchors Power Adapter For Charger Nickel Metal Hydride Battery User s Manual...

Page 13: ...one company 5 2 DCTS 900 Wired Console The following features are provided with the wired console telephone Handsfree Speakerphone Supertwist 2 x 16 Dot Matrix Liquid Crystal Display Four 4 CO Lines w...

Page 14: ...one 1 to seven 7 cell units wired together to accommodate a maximum of sixty 60 wireless handset users 3 Installing The Antenna Place the antenna into the hole at the top of the handset Screw the ant...

Page 15: ...hat all cords are positioned to prevent tripping and rubbing which could create a potential electrical hazard 4 2 Wall Mounting Directly on the Wall You will want to ensure the following n The locatio...

Page 16: ...devices into the wall 2 inches apart horizontally allowing approximately 1 5 inch between the wall and screw heads for mounting the charger Ensure that the screws are secure 2 Plug the AC power cord...

Page 17: ...et The red lamp located at the front of the charger will briefly light and then turn off Note Use only the AC power adapter provided with the charger 5 Ensure that all cords are positioned to prevent...

Page 18: ...he handset battery compartment so it is not in use Note When the battery is removed from the handset all programmable memory is retained 1 Remove the battery cover located on the back side of the hand...

Page 19: ...g used To Charge the Battery The fast charger will fully charge the battery in less than 2 1 2 hours 1 Place the handset in the charging unit so the display and buttons are facing you The charger lamp...

Page 20: ...or in high humidity n Only use the battery intended to be used with the wireless handset n Do not dispose of the battery in a fire This may result in battery leakage or the battery may becoming hot a...

Page 21: ...ay be prohibited Do not handle a damaged or leaking Nickel Metal Hydride battery 7 Standby Mode Once you have installed the battery and it is charged the handset remains in the standby idle mode All f...

Page 22: ...lay turns on 9 Setting the Identification Default Setting 11 It is strongly recommended that you change the handset identification ID from the default setting on all handsets prior to complete system...

Page 23: ...xx is the handset ID number 4 Dial a two digit intercom station number 11 70 For instance if you dial 12 the display will show 5 Press You will hear confirmation tone and the programming mode is term...

Page 24: ...de or during CO Line or intercom ringing While the handset is in the Standby mode the display will show the current ringer volume level setting For instance if the volume is set to the middle level th...

Page 25: ...left side of the handset during an intercom or CO line call service will not be disrupted 11 Assigning CO Line Ringing Default Setting All Lines Ring You may turn off the ringing of any of the lines a...

Page 26: ...ging off for CO line 1 5 Press The display will show Repeat Steps 1 through 5 above to program the ringing for all four 4 lines When you perform step 3 press twice to program CO line 2 three times to...

Page 27: ...ial a number 1 4 for a different ringing sound You will briefly hear the ringing sound which you have selected and the display will also indicate which type you selected For instance if you selected t...

Page 28: ...ay be changed by any handset The Flash time setting is adjustable from 0 1 second to 2 seconds 1 Press 2 Dial 3 Press until the display shows 4 Dial the desired flash time 1 for 0 1 second 2 for 0 2 s...

Page 29: ...ore the number The display will show 3 Dial the telephone number up to 16 digits to be stored To store a pause Press FNC and dial 2 To store a flash Press FLS Dial to store a pulse to tone switchover...

Page 30: ...s 14 2 Storing the Last Number Redial Contents 1 Press 2 Dial the bin location where you wish to store the number 3 Press 4 Press 14 3 Erasing the Contents of a Speed Dial Bin 1 Press 2 Dial the bin l...

Page 31: ...24 5 Press to erase the memory You will hear confirmation tone and the display shows...

Page 32: ...th must be available to make a call 1 1 If a cell unit is available 1 Press a line button 2 Dial the telephone number The display will show 3 Press to hang up when you ve completed your call 1 2 If a...

Page 33: ...owing priority 1 Ringing Intercom Calls 2 Transferred Calls 3 CO Line Calls 4 Hold Recall Calls When you directly press the line button to answer a call you override the answer priority 3 Making an In...

Page 34: ...the call is ringing at your station the display will show 3 When the person you called answers your handset display will show 4 Press to end the call Note If you dial an intercom number that has not b...

Page 35: ...ou are calling will not receive any indication of the intercom call 3 3 Calling a Telephone in Do Not Disturb If the person you are calling has their telephone in DND your handset display will show No...

Page 36: ...he intercom call Your handset will display 5 Placing a Call on Hold While on a call 1 Press The display will briefly show 2 Wait for 8 seconds or press if you want to make an intercom call without tra...

Page 37: ...ll has been placed on Hold for 1 minute the system sends a brief reminder tone to all of the handsets The display will show Press the line button corresponding to the holding line The display will sho...

Page 38: ...the number is automatically redialed 3 Press to end the call 8 Muting a Call The Mute feature turns off the telephone microphone so the distant party cannot hear you or to block out background noise...

Page 39: ...tions When activated you will not hear incoming ringing While the telephone is idle 1 Press The display shows 2 Dial to activate DND The display shows Note Follow Steps 1 and 2 above to also deactivat...

Page 40: ...r RF link path to transfer ringing to another party 11 Receiving a Transferred Call If you are not using your telephone you will hear transfer ringing and your handset display will show Note If you ar...

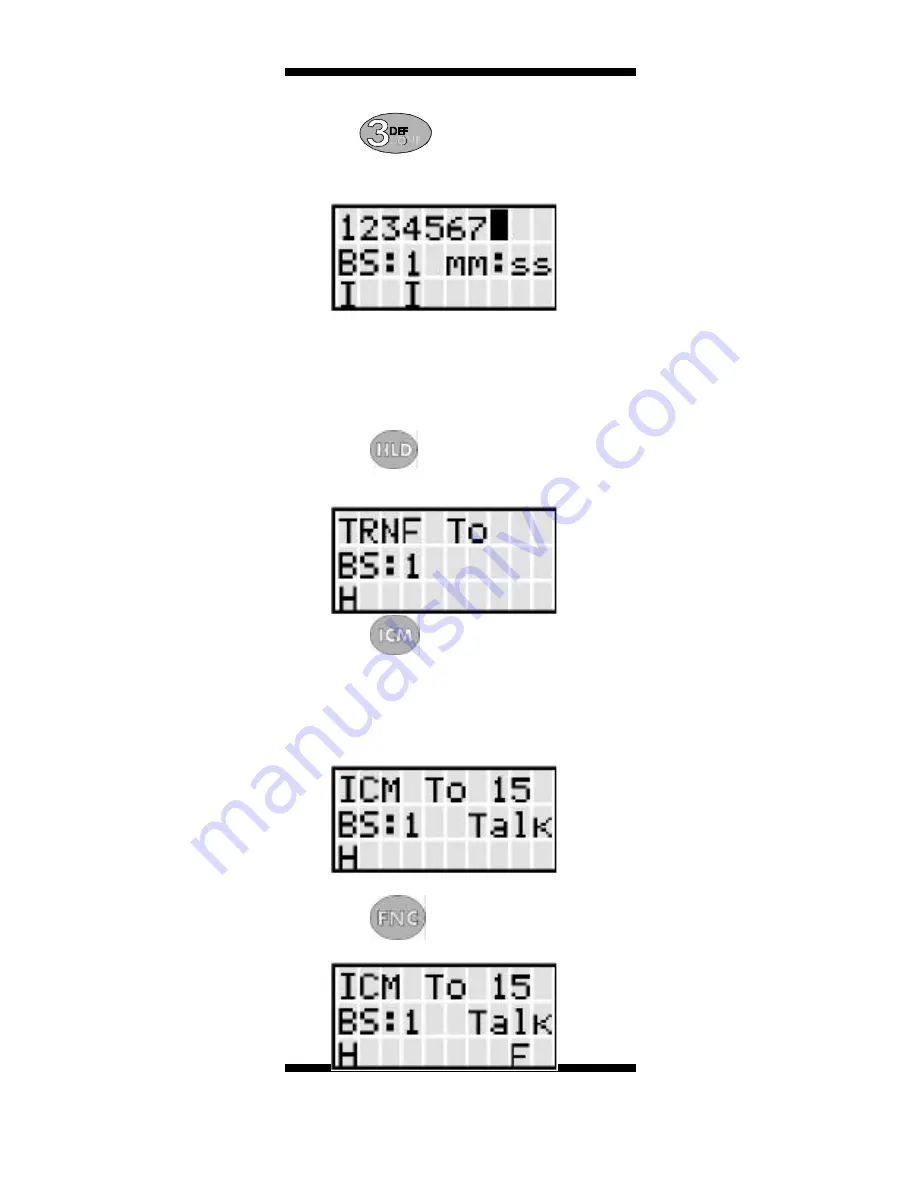
Page 41: ...ling line or press any key on the keypad 13 Conferencing A three way conference call may consist of two 2 outside lines or one 1 outside line and two 2 stations 13 1 Conferencing Two 2 Outside Lines W...

Page 42: ...w 13 2 Conferencing One 1 Outside Line and Two 2 Stations While on a call on the first line 1 Press The first line is placed on Hold and the handset display shows 2 Press 3 Dial the intercom number fo...

Page 43: ...ess to obtain new dial tone Dial the new telephone number or service code 15 Using the Pause Feature You may use the Pause feature to insert a delay in a dialing sequence which may be needed to access...

Page 44: ...Dialing a Number Stored in Speed Dial 1 Press a line button 2 Press 3 Dial the bin location where the number is stored The telephone automatically dials the number and the display shows 16 2 Reviewin...

Page 45: ...a line 1 Dial the telephone number in pulse mode 2 Dial to change to the tone dialing mode 3 Dial the remaining numbers to be dialed in the tone mode The display will show Note When you hang up the t...

Page 46: ...om the cell unit or if you hear noise on the channel you can handoff the outside call to another cell unit for better voice quality and extended coverage Press the button on the right side of the hand...

Page 47: ...utomatically reconnect you with the outside caller However if you do not move back into range within the 15 seconds the call will be disconnected Whenever an Out of Range situation occurs move closer...

Page 48: ...or in the Talk mode 1 Press The display will show 2 Dial to activate the headset The display will show 23 2 To Disable the Headset 1 Press 2 Dial to deactivate the headset Note To adjust the headset v...

Page 49: ...1 Setting the Area Code Default empty When you receive a local call from a person with your same home area code the telephone will not store the area code This feature will enable you to redial the ca...

Page 50: ...ode For example let s use 123 as the area code to be programmed 5 Press The display shows 1 2 To Erase the Programmed Area Code 1 Press The display shows 2 Dial The display shows 3 Press or until the...

Page 51: ...caller ID information When a call is received the display will show the name and number of the caller and the date and time the call is received Some telephone companies send both the name and number...

Page 52: ...name of the caller L1 is the ringing line number 2 2 Receiving a Number Only Call The display will show 2 3 Receiving a Blocked Call Sometimes a caller will prevent his her number from being displaye...

Page 53: ...ately 2 seconds for the call to be displayed 3 Dial any key or press to review the telephone number and date and time the call was received The time is displayed in 24 hour format i e 3 pm is displaye...

Page 54: ...ringing simultaneously you may review the caller ID information for each line The display will first show the caller ID information for Line 1 or if you are currently on a line press to review the cal...

Page 55: ...this feature Refer to section 1 in the Caller ID Operation section to program the area code 1 Press 2 Press to display the most recent call received 3 Press until the desired telephone number is displ...

Page 56: ...1 Refer to section 3 of the Caller ID Operation section to display the call that you want to store 2 Press 3 Dial the bin location 0 9 where you wish to store the number 4 Press The display will show...

Page 57: ...00 Wired Console Using the Handset Let s assume that your handset is station 12 and you want to page DCTS 900 Wired Telephone Station 15 1 Press 2 Dial the intercom number You will hear tone ringing 3...

Page 58: ...51 1 2 To Voice Page All DCTS 900 Wired Consoles Using the Handset 1 Press 2 Dial If the intercom path is available your handset will display If the intercom path is busy your handset will display...

Page 59: ...U 60 DCTS 900 Handsets 12 Executive Speakerphones 1 Inter Cell Intercom Link 4 CO PBX Centrex Lines DCU Capacity 2 RF Talk Links 4 CO PBX Centrex Lines 2 Intra Cell Intercom Links 60 DCTS 900 Handsets...

Page 60: ...tion Memory Flash CO Line 1 2 3 4 Hold Xfer Dial Keys 12 Keys continuous DTMF Talk Time 8 hours Standby Time 7 days Dimensions case 154 mm tall 57 mm wide 36 mm deep Weight 6 1 oz without battery 8 9...

Page 61: ...Ring Tone MEM t 1 4 MEM n Flash Timing MEM t 0 9 MEM n Area Code MEM t area code MEM Remember to continue to press t until the desired programming field is displayed To program Code Sequence n Erase M...

Page 62: ...55 BATTERY CHARGER WALL MOUNTING TEMPLATE...

Page 63: ...56 Mobicel Systems Inc PHD9400A...

Reviews: