3
2. Installation diagram & parts
1. Safety precautions
1.3. Before electric work
Caution:
• Be sure to install circuit breakers. If not installed, electric shock may result.
IMPORTANT
Make sure that the current leakage breaker is one compatible with higher
harmonics.
Always use a current leakage breaker that is compatible with higher har-
monics as this unit is equipped with an inverter.
The use of an inadequate breaker can cause the incorrect operation of in-
verter.
• For the power lines, use standard cables of sufficient capacity. Otherwise, a
short circuit, overheating, or fire may result.
1.4. Before starting the test run
Caution:
• Turn on the main power switch more than 12 hours before starting operation.
Starting operation just after turning on the power switch can severely dam-
age the internal parts. Keep the main power switch turned on during the op-
eration season.
• Before starting operation, check that all panels, guards and other protective
parts are correctly installed. Rotating, hot, or high voltage parts can cause
injuries.
• When installing the power lines, do not apply tension to the cables. If the
connections are loosened, the cables can snap or break and overheating or
fire may result.
• Be sure to ground the unit. Do not connect the ground wire to gas or water
pipes, lighting rods, or telephone grounding lines. If the unit is not properly
grounded, electric shock may result.
• Use circuit breakers (ground fault interrupter, isolating switch (+B fuse), and
molded case circuit breaker) with the specified capacity. If the circuit breaker
capacity is larger than the specified capacity, breakdown or fire may result.
• Do not touch any switch with wet hands. Electric shock may result.
• Do not touch the refrigerant pipes with bare hands during operation. The
refrigerant pipes are hot or cold depending on the condition of the flowing
refrigerant. If you touch the pipes, burns or frostbite may result.
• After stopping operation, be sure to wait at least five minutes before turning
off the main power switch. Otherwise, water leakage or breakdown may re-
sult.
1.5. Using R410A refrigerant air conditioners
Caution:
• Use C1220 copper phosphorus, for copper and copper alloy seamless pipes,
to connect the refrigerant pipes. Make sure the insides of the pipes are clean
and do not contain any harmful contaminants such as sulfuric compounds,
oxidants, debris, or dust. Use pipes with the specified thickness. (Refer to
page 6) Note the following if reusing existing pipes that carried R22 refriger-
ant.
- Replace the existing flare nuts and flare the flared sections again.
- Do not use thin pipes. (Refer to page 6)
• Store the pipes to be used during installation indoors and keep both ends of
the pipes sealed until just before brazing. (Leave elbow joints, etc. in their
packaging.) If dust, debris, or moisture enters the refrigerant lines, oil dete-
rioration or compressor breakdown may result.
• Use ester oil, ether oil, alkylbenzene oil (small amount) as the refrigeration oil
applied to the flared sections. If mineral oil is mixed in the refrigeration oil, oil
deterioration may result.
• Do not use refrigerant other than R410A refrigerant. If another refrigerant is
used, the chlorine will cause the oil to deteriorate.
• Use the following tools specifically designed for use with R410A refrigerant.
The following tools are necessary to use R410A refrigerant. Contact your
nearest dealer for any questions.
Tools (for R410A)
Gauge manifold
Flare tool
Charge hose
Size adjustment gauge
Gas leak detector
Vacuum pump adapter
Torque wrench
Electronic refrigerant charging scale
• Be sure to use the correct tools. If dust, debris, or moisture enters the refrig-
erant lines, refrigeration oil deterioration may result.
• Do not use a charging cylinder. If a charging cylinder is used, the composi-
tion of the refrigerant will change and the efficiency will be lowered.
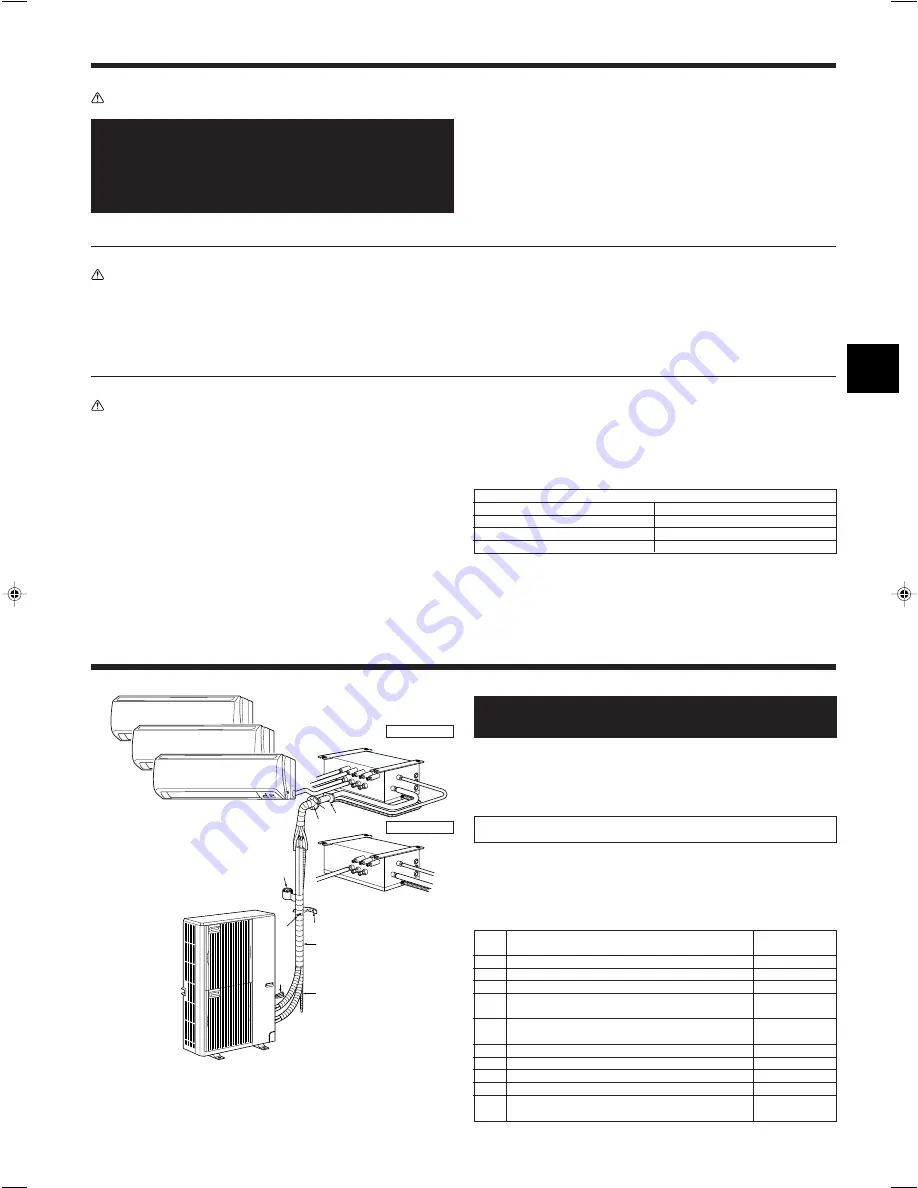
2.1. Before installation (Fig. 2-1)
This installation manual is only for the outdoor unit installation. In install-
ing the indoor units and branch box, refer to the installation manual at-
tached to each unit.
Any structural alterations necessary for the installation must comply with the local
building code requirements.
This diagram is intended to show the configuration of accessories.
For actual installation, the outdoor unit is to be turned 180°.
Units should be installed by licensed contractor according to local code require-
ment.
Note:
The dimensions given along the arrows above are required to guarantee the air
conditioner’s performance. Install the unit in as wide a place as possible for
later service or repairs.
Parts to be locally procured
A
Branch box/outdoor unit connecting wire
1
(3-core, Refer to 7.3. External wiring procedure)
B
Extension pipe
1
C
Wall hole sleeve
1
D
Wall hole cover
1
E
Pipe fixing band
(The quantity depends on the pipe length.)
2 to 7
F
Fixing screw for
E
4
×
20 mm
2 to 7
(The quantity depends on the pipe length.)
G
Piping tape
1
H
Putty
1
I
Drain hose (hard PVC pipe VP16)
1
J
Refrigeration oil
1
K
Power supply cord
(2-core, Refer to 7.3. External wiring procedure)
1
Fig. 2-1
K
A
H
I
B
C
D
E
F
G
Branch box
5-branches type
3-branches type
Outdoor unit
Summary of Contents for MXZ-8A140VA
Page 1: ......


