


After cleaning and periodically
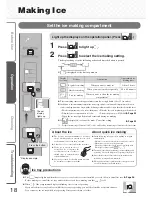
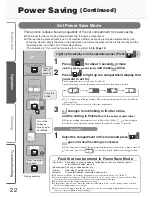
Step
Step
3
Before Use
Operation
Cleaning
Troubleshooting
Cleaning
31
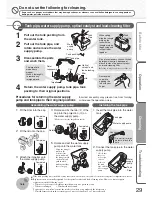
water.
detergent (neutral).
the plastic parts.
scouring powder, powdered soap,
water, or similar substances.
caps and cases) to split,
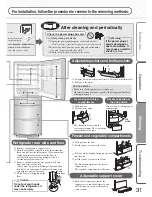
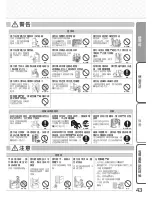
Check the power plug and cord
For safety, clean periodically.
Unplug the power plug from the socket and check it.
• Check for damage or abnormal heating on the power plug and cord.
Remove any dust from the power plug and surrounding
area, and then wipe with a dry cloth.
Firmly insert the power plug into the socket.
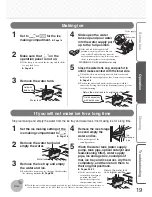
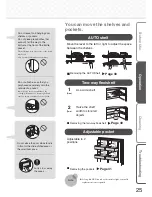
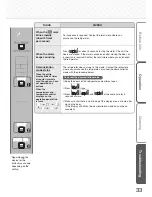
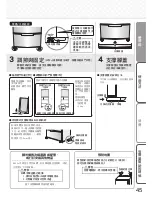
Fully pull out.
Lift out to the front.
Lift up the left and right of the pocket alternately. (The pockets are fi rmly installed.)
Pull out to the front.
•
Make sure that the pockets are securely set.
(Incorrect setting may cause a pocket to disengage and fall out,
causing an injury.)
Wipe off any dirt, dripping or
condensation.
Drip
gutters
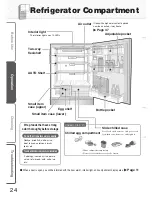
Shelf installation
* The illustration represents the
versa compartment. The ice making
compartment is the same.
Warning
If the power plug or
cord is damaged or
dust accumulates, it
may cause an electric
shock or a fi re.
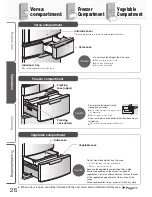
Fully pull out the door.
Lift the upper case out to the front.
Pull out while slightly lifting up the door,
and then tilt.
Lift the lower case out to the front.
* The illustration represents the freezer
compartment.
The vegetable compartment is the same.
Freezer and vegetable compartments
Adjustable pockets and bottle pockets
Ice making and versa
compartments
Recessed portion of
the drip gutters
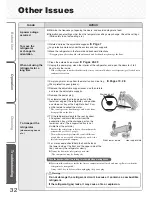
Remove the adjustable support cover.
Turn the adjustable supports to raise them from the
fl oor, and pull out the refrigerator. (We recommend
laying out protective material on the fl oor to
prevent the fl oor from being damaged.Also, be
careful not to injure yourself.)
Remove the dust from the rear panels, walls and
fl oor, and wipe off any dirt.
(These areas are prone to buildup of dust and black
dirt due to air convection. Periodical cleaning will
also improve power effi ciency.)
Check for water dripping on the
fl oor.
Refrigerator rear side and fl oor
For installation, follow the procedure in reverse to the removing methods.
Adjustable support cover
Push the left and right sides of the
support covers inward alternately, and
pull the support covers to the front to
remove them.
Caution
Do not put your hands
under the refrigerator. It
may cause injury.
Grime
and dust
Summary of Contents for MR-BX52W-BR-ML
Page 39: ...Memo...
Page 40: ...58 60 ECO 63 58 ECO 3 24...
Page 42: ...42 44 45 44 44 44 44 45 70...
Page 43: ...43...
Page 44: ...2 10 1 44 5cm 24 10 2 50 60 2...
Page 45: ...3 4 45 2 3mm 100kg R600a 1 2...
Page 46: ...46 62 63 48 49 62 64 64 64 65 56 57...
Page 47: ...30 47 3 9 0 6 9 5 22 16 54 55 3 3...
Page 48: ...ECO 30 61 48 3 58 ECO ECO 58 60 50 51 56 52 53 53 52 60 30...
Page 49: ...1 4 60 1 2 3 4 5 60 2 49 3 71 71 1 1...
Page 50: ...30 5 50 1 56 2 5 72 6 16 9 5 17 8 3 19 6 1 21 5 0 22 3...
Page 51: ...51 2 3 53 1 52 5 7 9 12 15 18 2 72 6...
Page 52: ...52 2 30 2 1 1 1 56 2 1 2...
Page 53: ...30 53 1 60 2 2 1 3 3 12 2 3 1 1 54 55...
Page 54: ...1 2 54 80 70 1 2 100 400g 2 5 15 30 1...
Page 55: ...7 24 1 2 3 5 15 50 51 55 53 1 2 1 1cm 250cc 2 1 300g 60 100g 2 3...
Page 56: ...2 60 80 1 1 10 12 80 140 10 24 66 56 1 2 1 10 12 ECO 58 60 1...
Page 57: ...1 57 3 1 56 5 66 4 2 66 2 3 66 4 5 66 67 1 56...
Page 58: ...58 ECO 60 1 30 ECO 1 1 2 3 0 1 0 3 4 1 ECO ECO ECO 30 30 ECO Eco Mode ECO ECO 3 24...
Page 59: ...59 ECO 30 30 ECO ECO ECO...
Page 60: ...60 10 0 2 5 57 1 3 2 1 1 2 3 30 3...
Page 61: ...61 1 3 1 3 1 3 48 ECO 3 3...
Page 62: ...3 3 62 10 LED 75 49...
Page 63: ...63 LED 68 68 69 1 2...
Page 64: ...64 49...
Page 65: ...65 60 66 67 49 80 140 1 2L...
Page 66: ...66 2 3 2 2 56 1 6 56 4 3 5 1 60 1 2 3 4 1 2...
Page 67: ...2 3 67 1 4 5 2 3 1 2 1 2 3 4...
Page 68: ...2 1 68 10 4 4 4 4 3 2 4 3...
Page 69: ...3 69...
Page 70: ...70 1 45 2 3 66 67 57 66 3cm 30 2 2...
Page 71: ...71 2 5 1 1 5 5...
Page 74: ...74 24 30 50 60 48 66 67 62 71 4 5 24 44 58 60 60 66 4 5 24 66 57 67 66 60 56...
Page 75: ...75 61 53 45 5 30 60 1 4 5 49 55 53 53...
Page 76: ...76 1 2 1 2 100 58...
Page 77: ...Memo...
Page 78: ...Memo...
Page 79: ...Memo...


