


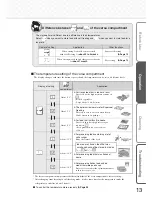


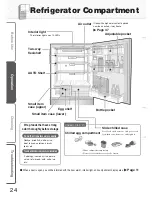


Display
of setting
Settings
Application
Approximate ice
making time
Regular ice making
When you want to make ice
About 2 hours
Quick ice making
When you want to make ice quickly
60 to 80 minutes
Stop ice making
When you want to clean the ice making
compartment
*1
−
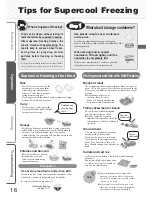
Ice tray precautions
The ice cube size and the number of ice cubes
in one batch depends on various factors, such
as the amount of water in the water tank.
About 10 to 12 ice cubes can be made each time.
If the ice is stored in the ice
storage box for a long time, the
ice cubes may join together or
shrink (due to a phenomenon
called sublimation).
If you try to crush ice that has joined together,
be careful not to injure your hands.
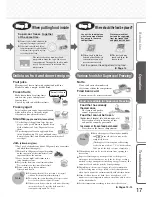
In the following cases, quick ice making is stopped
automatically.
• When the ice storage box is full (about 80 to 140 ice cubes)
• When there is no water in the water tank
• When about 10 hours have passed in quick ice making mode
(The display changes from
to
)
The sound of the refrigerator running gets louder during quick
ice making, because the refrigerator is operating at high speed.
It may take more than 24 hours to make ice immediately after
installation, even in quick ice making mode.
When quick ice making is performed, the ice may split or crack
because the freezing is performed quickly.
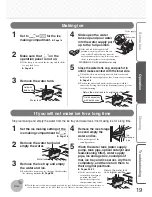
About the ice
About quick ice making
The
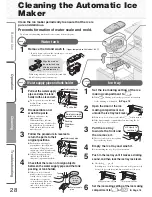
display lights up when the ice tray or ice tray lock lever is not installed correctly. (How to install ice tray:
Page 28
)
Before making ice, install the ice tray and lock the ice lock lever, making sure that
is off.
When
of the compartment display is blinking, the ice tray is operating.
If you unlock the ice tray lock lever while the ice tray is operating, you will be alerted by a repetitive buzzer.
Do not remove the ice tray while it is operating. It may cause injury or failure.
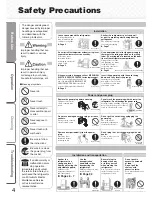
Before Use
Operation
Cleaning
Troubleshooting
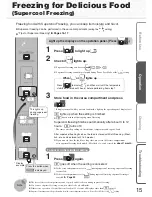
Operation
18
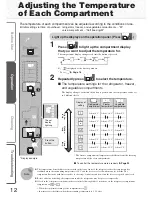
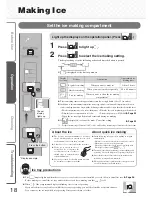
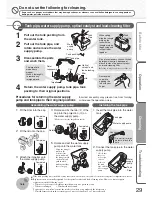
1
Press
to light up .
2
Press
to select the ice making setting.
The display changes in the following order each time the button is pressed.
is displayed at the time of purchase.
The ice making time is the approximate time for a single batch (10 to 12 ice cubes).
In addition to the surrounding temperature, water type, and water volume and temperature in the water
tank, ice making times may vary with the following conditions, and be longer than those described above.
• When the ambient temperature is low, such as during winter • When the doors are frequently opened and closed
• When the freezer compartment is set to low •
When the refrigerator is set to ECO MODE
Page 20
• When the ice tray is pulled out and reinserted during ice making
If
is displayed, ice cannot be made. Cancel the setting.
Page 22
* Display example
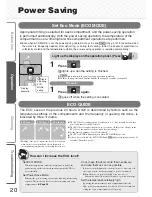
Press the button.
Light up the displays on the operation panel. (Press
.)
*1:
For short term storage of frozen food. Not to be used for long term storage of frozen food or ice cream.
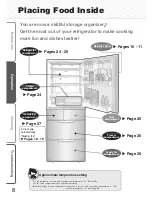
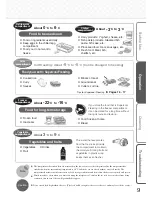
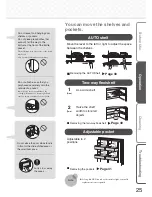
Set the ice making compartment
Making Ice
The set
display
lights up.
Summary of Contents for MR-BX52W-BR-ML
Page 39: ...Memo...
Page 40: ...58 60 ECO 63 58 ECO 3 24...
Page 42: ...42 44 45 44 44 44 44 45 70...
Page 43: ...43...
Page 44: ...2 10 1 44 5cm 24 10 2 50 60 2...
Page 45: ...3 4 45 2 3mm 100kg R600a 1 2...
Page 46: ...46 62 63 48 49 62 64 64 64 65 56 57...
Page 47: ...30 47 3 9 0 6 9 5 22 16 54 55 3 3...
Page 48: ...ECO 30 61 48 3 58 ECO ECO 58 60 50 51 56 52 53 53 52 60 30...
Page 49: ...1 4 60 1 2 3 4 5 60 2 49 3 71 71 1 1...
Page 50: ...30 5 50 1 56 2 5 72 6 16 9 5 17 8 3 19 6 1 21 5 0 22 3...
Page 51: ...51 2 3 53 1 52 5 7 9 12 15 18 2 72 6...
Page 52: ...52 2 30 2 1 1 1 56 2 1 2...
Page 53: ...30 53 1 60 2 2 1 3 3 12 2 3 1 1 54 55...
Page 54: ...1 2 54 80 70 1 2 100 400g 2 5 15 30 1...
Page 55: ...7 24 1 2 3 5 15 50 51 55 53 1 2 1 1cm 250cc 2 1 300g 60 100g 2 3...
Page 56: ...2 60 80 1 1 10 12 80 140 10 24 66 56 1 2 1 10 12 ECO 58 60 1...
Page 57: ...1 57 3 1 56 5 66 4 2 66 2 3 66 4 5 66 67 1 56...
Page 58: ...58 ECO 60 1 30 ECO 1 1 2 3 0 1 0 3 4 1 ECO ECO ECO 30 30 ECO Eco Mode ECO ECO 3 24...
Page 59: ...59 ECO 30 30 ECO ECO ECO...
Page 60: ...60 10 0 2 5 57 1 3 2 1 1 2 3 30 3...
Page 61: ...61 1 3 1 3 1 3 48 ECO 3 3...
Page 62: ...3 3 62 10 LED 75 49...
Page 63: ...63 LED 68 68 69 1 2...
Page 64: ...64 49...
Page 65: ...65 60 66 67 49 80 140 1 2L...
Page 66: ...66 2 3 2 2 56 1 6 56 4 3 5 1 60 1 2 3 4 1 2...
Page 67: ...2 3 67 1 4 5 2 3 1 2 1 2 3 4...
Page 68: ...2 1 68 10 4 4 4 4 3 2 4 3...
Page 69: ...3 69...
Page 70: ...70 1 45 2 3 66 67 57 66 3cm 30 2 2...
Page 71: ...71 2 5 1 1 5 5...
Page 74: ...74 24 30 50 60 48 66 67 62 71 4 5 24 44 58 60 60 66 4 5 24 66 57 67 66 60 56...
Page 75: ...75 61 53 45 5 30 60 1 4 5 49 55 53 53...
Page 76: ...76 1 2 1 2 100 58...
Page 77: ...Memo...
Page 78: ...Memo...
Page 79: ...Memo...


