Page 13
MODELS: LT-55154 / LT-40164 / LT-46164 / LT-55164 / LT-46265 / LT-55265
PWB-MAIN Replacement
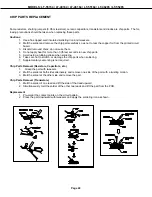
1. Remove screws (A), (B) and nut (C).
2. Turn the assembly over and remove screws (D).
3. Before removing the PWB-MAIN, separate the Plastic Escutcheon from the Terminal Frame by gently prying
the point shown with a flat blade screwdriver.
NOTE: VLP43+ & VLP43++ models—When replacing the PWB-MAIN, transfer the WLAN-MODULE from the
original to the replacement PWB.
4. After replacement perform the SET SCREEN SIZE procedure in the Service Procedures section.
5. VLP43+, VLP43++ I
f the customer has calibrated the ISF (ADV) video settings, he may have the data
backed up to a USB memory device. If so, perform the RESTORE ISF SETTING
procedure in the Service
Procedures section. If no backup memory is available, this step is not necessary.
IMPORTANT REPLACEMENT NOTE: If the customer has subscribed to VUDU (Internet program provider), the
original PWB
must
be returned to Mitsubishi. The customer should be instructed to contact VUDU to re-activate
their account after the replacement PWB has been installed.
C
A
A
B
B
D
Gently pry the Plastic Escutch-
eon from the Terminal Frame
before removing the PWB.
Summary of Contents for Unisen LT-40164
Page 2: ......
Page 51: ...Page 51 MODELS LT 55154 LT 40164 LT 46164 LT 55164 LT 46265 LT 55265 CIRCUIT BLOCK DIAGRAMS ...
Page 52: ...Page 52 MODELS LT 55154 LT 40164 LT 46164 LT 55164 LT 46265 LT 55265 ...
Page 54: ...Page 54 MODELS LT 55154 LT 40164 LT 46164 LT 55164 LT 46265 LT 55265 ...
Page 55: ...Page 55 MODELS LT 55154 LT 40164 LT 46164 LT 55164 LT 46265 LT 55265 ...

