background image

10

1 2 3 4 5 6

8. Special Functions

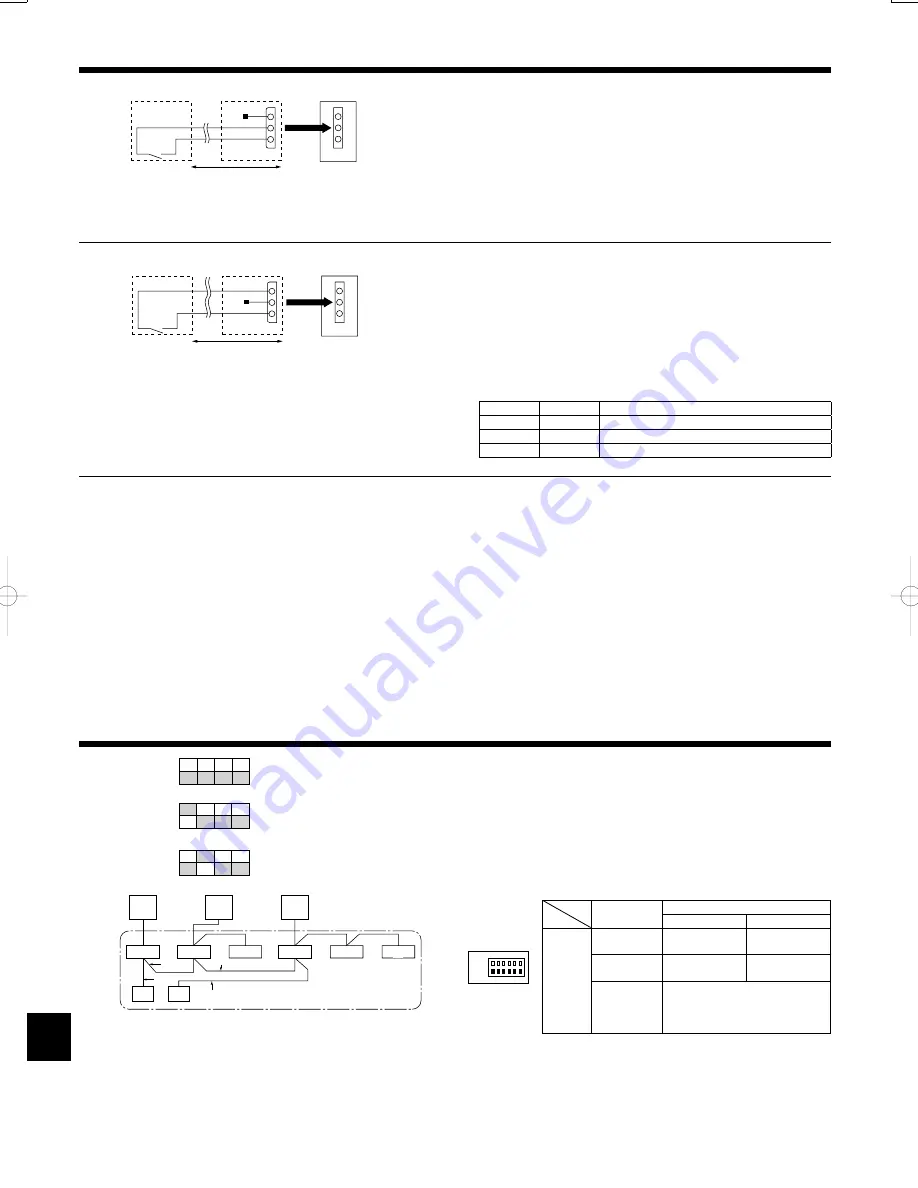
8.1. Low noise mode (on-site modifi cation) (Fig. 8-1)

By performing the following modifi cation, operation noise of the outdoor unit can be
reduced by about 3-4 dB.
The low noise mode will be activated when a commercially available timer or the
contact input of an ON/OFF switch is added to the CNDM connector (option) on the
control board of the outdoor unit.
•  

The ability varies according to the outdoor temperature and conditions, etc.

1

  Complete the circuit as shown when using the external input adapter  

(PAC-SC36NA). (Option)

2

  SW1 ON: Low noise mode


SW1 OFF: Normal operation

A

 Circuit diagram example (low noise 

mode)

B

 On-site arrangement

C

 External input adapter (PAC-SC36NA)

D

 Outdoor unit control board

E

 Max. 10 m

8.3. Refrigerant collecting (pump down)

Perform the following procedures to collect the refrigerant when moving the indoor
unit or the outdoor unit.

1

  Supply power (circuit breaker).

 *  

When power is supplied, make sure that “CENTRALLY CONTROLLED” is not 
displayed on the remote controller. If “CENTRALLY CONTROLLED” is dis-
played, the refrigerant collecting (pump down) cannot be completed normally.

2

  After the gas stop valve is closed, set the SWP switch on the control board of the 

outdoor unit to ON. The compressor (outdoor unit) and ventilators (indoor and 
outdoor units) start operating and refrigerant collecting operation begins. LED1 
and LED2 on the control board of the outdoor unit are lit.

 *  

Only set the SWP switch (push-button type) to ON if the unit is stopped. How-
ever, even if the unit is stopped and the SWP switch is set to ON less than 
three minutes after the compressor stops, the refrigerant collecting operation 
cannot be performed. Wait until compressor has been stopped for 3 minutes 
and then set the SWP switch to ON again.

*  Set the refrigerant address using the DIP switch of the outdoor unit.

1

  Wiring from the Remote Control

This wire is connected to TB5 (terminal board for remote controller) of the indoor 
unit (non-polar).

2

 When a Different Refrigerant System Grouping is Used.

Up to 16 refrigerant systems can be controlled as one group using the slim MA re-
mote controller.

Note:
In single refrigerant system (twin/triple), there is no need of wiring 

2

.

A

 Outdoor unit

B

 Indoor unit

C

  Master remote controller

D

  Subordinate remote controller

E

  Standard 1:1 (Refrigerant address = 00)

F

  Simultaneous twin (Refrigerant address = 01)

G

  Simultaneous triple (Refrigerant address = 02)

E

 SW 1 - 3 ~ 6

F

 SW 1 - 3 ~ 6

G

 SW 1 - 3 ~ 6

 Red

A

B

C

D

E

SW1

CNDM

3

1

Fig. 8-1

3

  Because the unit automatically stops in about 2 to 3 minutes after the refrigerant 

collecting operation (LED1 and LED2 are lit), be sure to quickly close the gas 
stop valve. When LED1 and LED2 are lit and the outdoor unit is stopped, open 
the liquid stop valve completely, and then repeat step 

2

 after 3 minutes have 

passed.

 *  

If the refrigerant collecting operation has been completed normally (LED1 and 
LED2 are lit), the unit will remain stopped until the power supply is turned off.

4

  Turn off the power supply (circuit breaker).

*  Note that when the length of the extension piping is long, it may no be pos-

sible to perform a pump-down operation.When performing the pump-down 
operation,make sure that the low pressure is lowered to near 0 MPa( gauge).

9. System control (Fig. 9-1)

Fig. 9-1

SW1
Function table

 <SW1>

Function

Operation according to switch setting

ON

OFF

SW1
function 
settings

1 Compulsory 

defrosting

Start

Normal

2 Error history 

clear

Clear

Normal

3
4
5
6

Refrigerant 
system ad-
dress setting

Settings for outdoor unit addresses 
0 to 15

TB1

A

G

F

A

A

E

B

B

B

B

B

B

D

C

TB1

TB1

TB4

TB5

TB4

TB5

TB4

TB4

TB5

TB4

TB4

1

1

2

 ON
 OFF

 ON
 OFF

 ON
 OFF

3    4    5    6

3    4    5    6

3    4    5    6

 Brown

 Orange

 ON
 OFF

2

A

  Circuit diagram example (Demand 

function)

B

  On-site arrangement

C

 External input adapter (PAC-SC36NA)

D

 Outdoor unit control board

E

 Max. 10 m

8.2. Demand function (on-site modifi cation) (Fig. 8-2)

By performing the following modifi cation, energy consumption can be reduced to 0
–100% of the normal consumption.
The demand function will be activated when a commercially available timer or the
contact input of an ON/OFF switch is added to the CNDM connector (option) on the
control board of the outdoor unit.

1

  Complete the circuit as shown when using the external input adapter  

(PAC-SC36NA). (Option)

2

  By setting SW 7-1 and SW 7-2 on the control board of the outdoor unit, the ener-

gy consumption (compared to the normal consumption) can be limited as shown 
below.

SW7-1

SW7-2

Energy consumption (SW2 ON)

OFF

OFF

0% (Stop)

ON

OFF

50%

OFF

ON

75%

 Red

A

B

C

D

E

SW2

CNDM

3

1

 Brown

 Orange

Fig. 8-2

Summary of Contents for PUHZ-BP HA

Page 1: ...R INSTALLER Air Conditioners PUHZ BP HA INSTALLATION MANUAL For safe and correct use read this manual and the indoor unit installation manual thoroughly before installing the air conditioner unit English ...

Page 2: ...the outdoor unit must be firmly attached If the cover panel is mounted incorrectly and dust and moisture enter the unit electric shock or fire may result When installing or moving the air conditioner use only the specified refrig erant R410A to charge the refrigerant lines Do not mix it with any other refrigerant and do not allow air to remain in the lines Air enclosed in the lines can cause press...

Page 3: ...xed in the refrigeration oil oil deterioration may result Do not use refrigerant other than R410A refrigerant If another refrigerant is used the chlorine will cause the oil to deteriorate Use a vacuum pump with a reverse flow check valve If the vacuum pump oil flows backward into the refrigerant lines refriger ant oil deterioration may result Use the following tools specifically designed for use w...

Page 4: ...uides for upward airflow 3 Obstacles at front only Fig 2 14 When using an optional air outlet guide the clearance for BP125 BP250 models is 1000 mm or more 4 Obstacles at front and rear only Fig 2 15 When using an optional air outlet guide the clearance for BP125 BP250 models is 1000 mm or more When using an optional air outlet guide installed for upward airflow the clearance is 500 1000 mm or mor...

Page 5: ...aks after connections are completed Apply refrigerating machine oil over the entire flare seat surface C Fig 4 1 Use the flare nuts for the following pipe size D Fig 4 1 When bending the pipes be careful not to break them Bend radii of 100 mm to 150 mm are sufficient Make sure the pipes do not contact the compressor Abnormal noise or vibration may result 1 Pipes must be connected starting from the...

Page 6: ...door unit model Use the appropriate method to open the stop valves 1 Gas side Fig 4 6 1 Remove the cap pull the handle toward you and rotate 1 4 turn in a counter clockwise direction to open 2 Make sure that the stop valve is open comletely push in the handle and rotate the cap back to its original position 2 Liquid side Fig 4 7 1 Remove the cap and turn the valve rod counterclockwise as far as it...

Page 7: ...eaker E Earth For Heater For Heater For Heater For Heater For Power BP170 BP250 only Fig 6 1 BP170 BP250 Note If the protective sheet for the electrical box is removed during servicing be sure to reinstall it F Power supply terminal block L1 L2 L3 N G Indoor outdoor connection terminal block S1 S2 S3 H Service panel I Clamp Clampthe cables so that they do not contact the center of the service pane...

Page 8: ...it power supply 5 Min 4 Indoor unit Outdoor unit Cable length 50 m 3 4 Polar Cable length 80 m 3 6 Polar Indoor unit Outdoor unit earth 1 Min 2 5 Remote controller Indoor unit 2 0 3 Non polar Circuit rating Outdoor unit L1 N L2 N L3 N AC 220 230 240 V Indoor unit Outdoor unit S1 S2 AC 220 230 240 V Indoor unit Outdoor unit S2 S3 DC 24 V Remote controller Indoor unit DC 12 V 2 1 3 4 4 4 1 A breaker...

Page 9: ... 1 MΩ the compressor is faulty or the resis tance dropped due the accumulation of refrigerant in the compressor 3 After connecting the wires to the compressor the compressor will start to warm up after power is supplied After supplying power for the times indicated below measure the insulation resistance again The insulation resistance drops due to accumulation of refrigerant in the com pressor Th...

Page 10: ...here is no need of wiring 2 A Outdoor unit B Indoor unit C Master remote controller D Subordinate remote controller E Standard 1 1 Refrigerant address 00 F Simultaneous twin Refrigerant address 01 G Simultaneous triple Refrigerant address 02 E SW 1 3 6 F SW 1 3 6 G SW 1 3 6 Red A B C D E SW1 CNDM 3 1 Fig 8 1 3 Because the unit automatically stops in about 2 to 3 minutes after the refrigerant colle...

Page 11: ...11 Fig 2 11 Fig 2 13 Fig 2 14 Fig 2 16 Fig 2 17 Fig 2 10 Fig 2 6 Fig 2 7 Fig 2 8 Fig 2 12 Fig 2 15 Fig 2 18 Fig 2 9 ...

Page 12: ...00 8310 JAPAN BH79D068K03 Printed in Japan Please be sure to put the contact address telephone number on this manual before handing it to the customer This product is designed and intended for use in the residential commercial and light industrial environment ...

Reviews: