background image

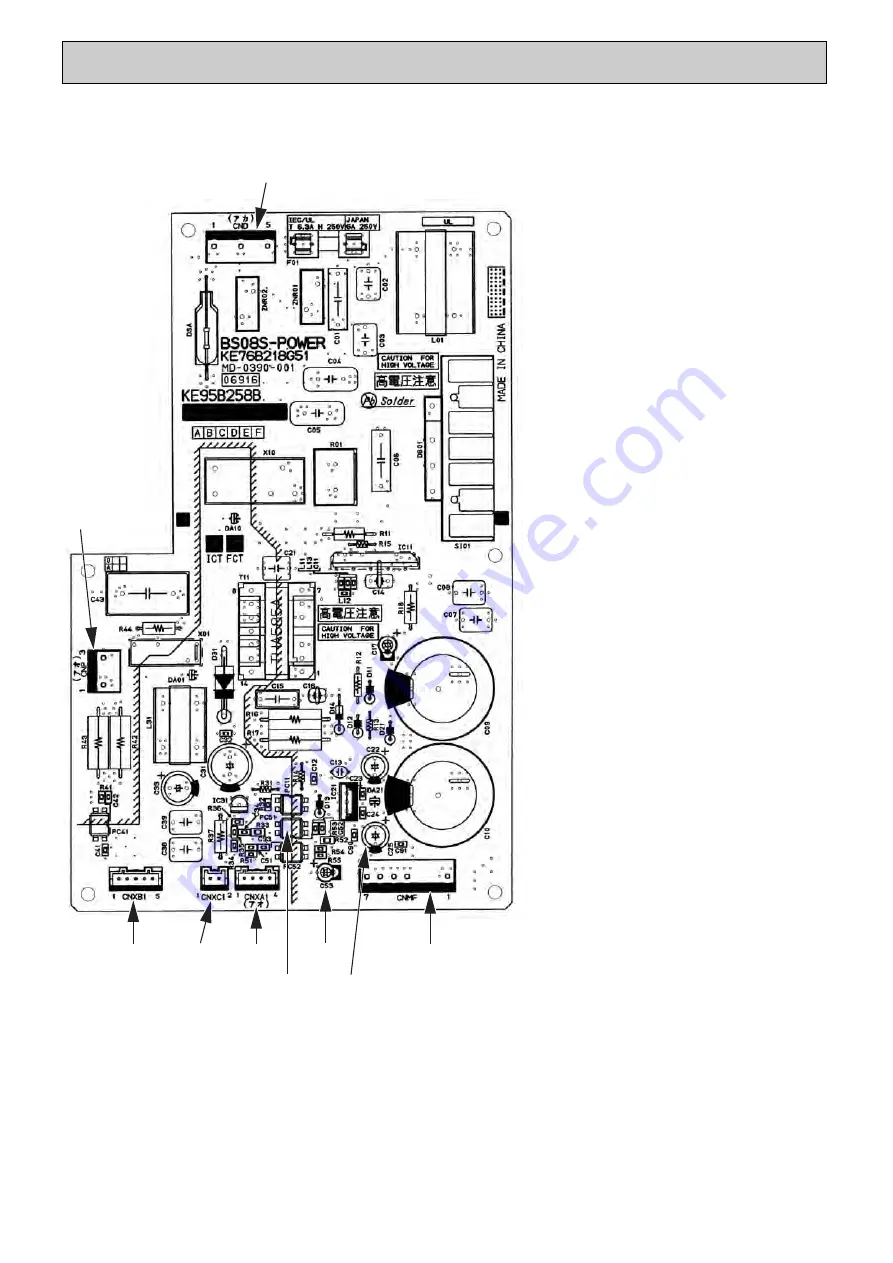
CND

Power supply voltage (220 - 240VAC)

CNMF Fan motor output

1 - 4: 310 - 340 VDC
5 - 4: 15 VDC
6 - 4: 0 - 6.5 VDC
7 - 4: Stop 0 or 15 VDC
         Run 7.5 VDC

                     (0 - 15 pulse)

CNP

Drain-up mechanism output (200VAC)

CNXA1

Connect to the indoor controller board

CNXB1

Connect to the indoor controller board

CNXC1

Connect to the indoor controller board

CNXA2

Connect to the indoor power board

CNXB2

Connect to the indoor power board

CNXC2

Connect to the indoor power board

(*1)

   V

FG

Voltage on the (-) side of PC51 and  
C25
(Same with the voltage between 7 (+) 
and 4 (-) of CNMF)

   V

CC

Voltage between the C25 pins 15 
VDC
(Same with the voltage between 5 (+) 
and 4 (-) of CNMF)

   V

sp

Voltage between the C53 pins
0VDC (with the fan stopped)
1 -  6.5VDC (with the fan in operation)
(Same with the voltage between 6 (+) 
and 4 (-) of CNMF)

CND

CNP

CNXB1

CNXC1 CNXA1

CNMF

PC51

(*1)

C25

(*1)

C53

(*1)

42

9-5. TEST POINT DIAGRAM

9-5-1. Power supply board

HWE16130.qxd  17.4.3  13:15  Page 42

Summary of Contents for PEAD-M140JA

Page 1: ...CTIONS 7 3 SPECIFICATION 11 4 FAN PERFORMANCE AND CORRECTED AIR FLOW 14 5 SOUND PRESSURE LEVELS 21 6 OUTLINES DIMENSIONS 28 7 WIRING DIAGRAM 31 8 REFRIGERANT SYSTEM DIAGRAM 32 9 TROUBLESHOOTING 33 10 DISASSEMBLY PROCEDURE 47 CONTENTS INDOOR UNIT SeriesPEAD R32 R410A 2017 SPLIT TYPE HEAT PUMP AIR CONDITIONERS NOTE This manual describes only service data of the indoor units ...

Page 2: ...tc If dirt dust or moisture enters into refrigerant cycle that can cause deterioration of refrigerant oil or malfunction of com pressor If large amount of mineral oil enters that can cause deterio ration of refrigerant oil etc Ventilate the room if refrigerant leaks during operation If refrigerant comes into contact with a flame poisonous gases will be released Make sure that the inside and outsid...

Page 3: ...ase of brazing the refrigerant pipes 12 When performing brazing work be sure to ventilate the room sufficiently Make sure that there are no hazardous or flammable materials nearby When performing the work in a closed room small room or similar location make sure that there are no refriger ant leaks before performing the work If refrigerant leaks and accumulates it may ignite or poisonous gases may...

Page 4: ...efrigerantion Equipment Where electrical components are being changed they shall be fit for the purpose and to the correct specification At all times the manufacturer s maintenance and service guidelines shall be followed If in doubt consult the manufacturer s technical department for assistance The following checks shall be applied to installations using flammable refrigerants The charge size is ...

Page 5: ... be used However for flammable refrigerants it is important that best practice is followed since flammability is a considera tion The following procedure shall be adhered to remove refrigerant purge the circuit with inert gas evacuate purge again with inert gas open the circuit by cutting or brazing The refrigerant charge shall be recovered into the correct recovery cylinders For appliances contai...

Page 6: ...ylinders ensure that only appropriate refrig erant recovery cylinders are employed Ensure that the correct number of cylinders for holding the total system charge are available All cylinders to be used are designated for the recovered refrigerant and labelled for that refrigerant i e special cylinders for the recovery of refrigerant Cylinders shall be complete with pressure relief valve and associ...

Page 7: ...re performance of 5 09MPa G or over 3 Electronic weighing scale 4 Gas leak detector Use the detector for R134a R407 R410A or R32 5 Adaptor for reverse flow check Attach on vacuum pump 6 Refrigerant charge base 7 Refrigerant cylinder R32 or R410A refrigerant Cylinder with syphon 8 Refrigerant recovery equipment Electronic weighing scale Unit Tool name Specifications PART NAMES AND FUNCTIONS 2 Indoo...

Page 8: ...ure See the Installation Manual Note All icons are displayed for explanation 5 6 1 2 3 4 Press to turn ON OFF the indoor unit 1 ON OFF button This lamp lights up in green while the unit is in operation It blinks while the remote controller is starting up or when there is an error Press to save the setting Main display Press to change the operation mode Main menu Press to move the cursor down Press...

Page 9: ...nay High power Weekly timer Restriction Maintenance Initial setting ON OFF timer Auto OFF timer Temp range Operation lock Manual vane angle Main Sub Timer Main display Contrast Display details Auto mode Administrator password Language selection Service Input maintenance info Function setting Check Self check Maintenance password Remote controller check Test run Clock Auto descending panel Menu str...

Page 10: ...ock selected functions The locked functions cannot be operated Initial setting Main Sub When connecting 2 remote controllers one of them needs to be designated as a sub controller Clock Use to set the current time Main display Use to switch between Full and Basic modes for the Main display The initial setting is Full Contrast Use to adjust screen contrast Initial setting Display details Make the s...

Page 11: ...Mid High m3 min CFM External static pressure Pa Booster heater kW Operation control Thermostat Sound pressure level Low Mid High dB A Field drain pipe O D mm in Dimensions W mm in D mm in H mm in kg lbs INDOOR UNIT Weight 35Pa 50Pa 70Pa 100Pa 150Pa PEAD M35JA L Cooling 0 09 0 07 0 64 0 53 Heating 0 07 0 53 Single phase 50Hz 220 240V Galvanized sheets Plate fin coil Sirocco fan 1 0 085 10 0 12 0 14...

Page 12: ... Low Mid High m3 min CFM External static pressure Pa Booster heater kW Operation control Thermostat Sound pressure level Low Mid High dB A Field drain pipe O D mm in Dimensions W mm in D mm in H mm in kg lbs INDOOR UNIT Weight 35Pa 50Pa 70Pa 100Pa 150Pa PEAD M71JA L Cooling 0 17 0 15 1 28 1 17 Heating 0 15 1 17 Single phase 50Hz 220 240V Galvanized sheets Plate fin coil Sirocco fan 2 0 121 17 5 21...

Page 13: ...n control Thermostat Sound pressure level Low Mid High dB A Field drain pipe O D mm in Dimensions W mm in D mm in H mm in kg lbs INDOOR UNIT Weight 35Pa 50Pa 70Pa 100Pa 150Pa PEAD M140JA L Cooling 0 39 0 37 2 60 2 49 Heating 0 37 2 49 Single phase 50Hz 220 240V Galvanized sheets Plate fin coil Sirocco fan 2 0 244 32 0 39 0 46 0 1130 1377 1624 35 50 70 100 150 Remote controller built in 33 37 43 34...

Page 14: ...AD M35JA L External static pressure 70Pa 220 240V 50Hz 0 10 20 30 40 50 60 70 80 90 7 9 11 13 15 17 19 21 Airflow rate m 3 min External static pressure Pa Middle Low High Limit Rated point PEAD M35JA L External static pressure 100Pa 220 240V 50Hz 0 10 20 30 40 50 60 70 80 90 100 110 120 7 9 11 13 15 17 19 21 Airflow rate m3 min External static pressure Pa Middle Low High Limit Rated point PEAD M35...

Page 15: ...atic pressure 70Pa 220 240V 50Hz 0 10 20 30 40 50 60 70 80 90 100 9 1 4 1 9 Airflow rate m3 min External static pressure Pa Middle Low High Limit Rated point 10 15 20 PEAD M50JA L External static pressure 100Pa 220 240V 50Hz 0 10 20 30 40 50 60 70 80 90 100 110 120 130 9 1 4 1 9 Airflow rate m3 min External static pressure Pa Middle Low High Limit Rated point 10 15 20 PEAD M50JA L External static ...

Page 16: ...al static pressure 70Pa 220 240V 50Hz 0 10 20 30 40 50 60 70 80 90 10 15 20 25 30 Airflow rate m3 min External static pressure Pa Middle Low High Limit Rated point PEAD M60JA L External static pressure 100Pa 220 240V 50Hz 0 10 20 30 40 50 60 70 80 90 100 110 120 10 15 20 25 30 Airflow rate m3 min External static pressure Pa Middle Low High Limit Rated point PEAD M60JA L External static pressure 15...

Page 17: ... static pressure 70Pa 220 240V 50Hz 0 10 20 30 40 50 60 70 80 90 100 10 15 20 25 30 Airflow rate m3 min External static pressure Pa Middle Low High Limit Rated point PEAD M71JA L External static pressure 100Pa 220 240V 50Hz 0 10 20 30 40 50 60 70 80 90 100 110 120 130 10 15 20 25 30 Airflow rate m3 min External static pressure Pa Middle Low High Limit Rated point PEAD M71JA L External static press...

Page 18: ...re 70Pa 220 240V 50Hz 0 10 20 30 40 50 60 70 80 90 100 110 120 10 15 20 25 30 35 40 45 Airflow rate m3 min External static pressure Pa Middle Low High Limit Rated point PEAD M100JA L External static pressure 100Pa 220 240V 50Hz 0 10 20 30 40 50 60 70 80 90 100 110 120 130 140 150 10 15 20 25 30 35 40 45 Airflow rate m 3 min External static pressure Pa Middle Low High Limit Rated point PEAD M100JA ...

Page 19: ... 50Hz 0 10 20 30 40 50 60 70 80 90 100 110 120 130 140 150 15 20 25 30 35 40 45 Airflow rate m3 min External static pressure Pa Middle Low High Limit Rated point PEAD M125JA L External static pressure 100Pa 220 240V 50Hz 0 10 20 30 40 50 60 70 80 90 100 110 120 130 140 150 160 170 180 15 20 25 30 35 40 45 Airflow rate m3 min External static pressure Pa Middle Low High Limit Rated point PEAD M125JA...

Page 20: ...z 0 10 20 30 40 50 60 70 80 90 100 110 120 130 140 150 15 20 25 30 35 40 45 Airflow rate m3 min External static pressure Pa Middle Low High Limit Rated point PEAD M140JA L External static pressure 100Pa 220 240V 50Hz 0 10 20 30 40 50 60 70 80 90 100 110 120 130 140 150 160 170 180 190 15 20 25 30 35 40 45 Airflow rate m3 min External static pressure Pa Middle Low High Limit Rated point PEAD M140JA...

Page 21: ...65 0 70 0 63 125 250 500 1k 2k 4k 8k NC 60 NC 50 Approximate minimum audible limit on continuous noise NC 40 Octave band center frequencies Hz NC 20 NC 30 High Middle Low 0 0 5 0 10 0 15 0 20 0 25 0 30 0 35 0 40 0 45 0 50 0 55 0 60 0 65 0 70 0 63 125 250 500 1k 2k 4k 8k NC 60 NC 50 Approximate minimum audible limit on continuous noise NC 40 Octave band center frequencies Hz NC 20 NC 30 High Middle...

Page 22: ...500 1k 2k 4k 8k NC 60 NC 50 Approximate minimum audible limit on continuous noise NC 40 Octave band center frequencies Hz NC 20 NC 30 High Middle Low 0 0 5 0 10 0 15 0 20 0 25 0 30 0 35 0 40 0 45 0 50 0 55 0 60 0 65 0 70 0 63 125 250 500 1k 2k 4k 8k NC 60 NC 50 Approximate minimum audible limit on continuous noise NC 40 Octave band center frequencies Hz NC 20 NC 30 High Middle Low 0 0 5 0 10 0 15 ...

Page 23: ...500 1k 2k 4k 8k NC 60 NC 50 Approximate minimum audible limit on continuous noise NC 40 Octave band center frequencies Hz NC 20 NC 30 High Middle Low 0 0 5 0 10 0 15 0 20 0 25 0 30 0 35 0 40 0 45 0 50 0 55 0 60 0 65 0 70 0 63 125 250 500 1k 2k 4k 8k NC 60 NC 50 Approximate minimum audible limit on continuous noise NC 40 Octave band center frequencies Hz NC 20 NC 30 High Middle Low 0 0 5 0 10 0 15 ...

Page 24: ...500 1k 2k 4k 8k NC 60 NC 50 Approximate minimum audible limit on continuous noise NC 40 Octave band center frequencies Hz NC 20 NC 30 High Middle Low 0 0 5 0 10 0 15 0 20 0 25 0 30 0 35 0 40 0 45 0 50 0 55 0 60 0 65 0 70 0 63 125 250 500 1k 2k 4k 8k NC 60 NC 50 Approximate minimum audible limit on continuous noise NC 40 Octave band center frequencies Hz NC 20 NC 30 High Middle Low 0 0 5 0 10 0 15 ...

Page 25: ... 500 1k 2k 4k 8k NC 60 NC 50 Approximate minimum audible limit on continuous noise NC 40 Octave band center frequencies Hz NC 20 NC 30 High Middle Low 0 0 5 0 10 0 15 0 20 0 25 0 30 0 35 0 40 0 45 0 50 0 55 0 60 0 65 0 70 0 63 125 250 500 1k 2k 4k 8k NC 60 NC 50 Approximate minimum audible limit on continuous noise NC 40 Octave band center frequencies Hz NC 20 NC 30 High Middle Low 0 0 5 0 10 0 15...

Page 26: ... 500 1k 2k 4k 8k NC 60 NC 50 Approximate minimum audible limit on continuous noise NC 40 Octave band center frequencies Hz NC 20 NC 30 High Middle Low 0 0 5 0 10 0 15 0 20 0 25 0 30 0 35 0 40 0 45 0 50 0 55 0 60 0 65 0 70 0 63 125 250 500 1k 2k 4k 8k NC 60 NC 50 Approximate minimum audible limit on continuous noise NC 40 Octave band center frequencies Hz NC 20 NC 30 High Middle Low 0 0 5 0 10 0 15...

Page 27: ... 500 1k 2k 4k 8k NC 60 NC 50 Approximate minimum audible limit on continuous noise NC 40 Octave band center frequencies Hz NC 20 NC 30 High Middle Low 0 0 5 0 10 0 15 0 20 0 25 0 30 0 35 0 40 0 45 0 50 0 55 0 60 0 65 0 70 0 63 125 250 500 1k 2k 4k 8k NC 60 NC 50 Approximate minimum audible limit on continuous noise NC 40 Octave band center frequencies Hz NC 20 NC 30 High Middle Low 0 0 5 0 10 0 15...

Page 28: ...2 ø2 9 Refrigerant piping Flare connection liquid 2 1 Refrigerant piping Flare connection gas Drain pump Control box Terminal block Indoor Outdoor connecting line Terminal block Remote controller transmission line Drain pipe O D ø32 Spontaneous draining Suspension bolt hole 4 14x30 Slot Drain pipe O D ø32 40 Kx L 1 M K J 6 J 112 11 N ø2 9 112 Actual length 65 0 10 Less than 300mm Less than 700mm a...

Page 29: ...0JAL PEAD M100 125JAL PEAD M71JAL PEAD M60JAL PEAD M35 50JAL 1400 1600 1454 1654 1500 1700 1360 1560 14 16 1000 1000 F 858 800 G 1058 1700 1500 1000 H 1200 54 54 54 J 49 370 320 260 K 330 5 5 4 L 4 1480 1280 780 M 990 12 12 10 N 10 1 2 57 78 210 18 G 21 250 33 122 24 57 10 100 A C 23 643 Suspension bolt pitch 30 20 178 Duct 40 23 10 32 700 732 136 67 356 100 217 15 2xE ø2 9 Suspension bolt hole 4 ...

Page 30: ...w for the maintenance inspection and replacement of the motor fan drain pump heat exchanger and electric box in one of the following ways Select an installation site for the indoor unit so that its maintenance access space will not be obstructed by beams or other objects 1 When a space of 300 mm or more is available below the unit between the unit and the ceiling Fig 1 Create access door 1 and 2 4...

Page 31: ... A LED REMOTE CONTROLLER SUPPLY INDOOR CONTROLLER BOARD INDOOR CONTROLLER BOARD CONNECTOR REMOTE SWITCH LED TRANSMISSION INDOOR OUTDOOR FLOAT SWITCH ARRESTER FS ACL ZNR01 02 X01 F01 TB6 DSA CN41 CN51 CN90 CN105 CN2L CN2A NAME SW1 SW5 SW2 CN32 I B I B SYMBOL SYMBOL NAME SWE TH1 INTAKE AIR TEMP THERMISTOR TH2 PIPE TEMP THERMISTOR LIQUID TH5 COND EVA TEMP THERMISTOR LED1 LED2 LED3 CONNECTOR LOSSNAY C...

Page 32: ...emperature Liquid Distributor with strainer 50 Thermistor TH5 Cond Eva temperature Thermistor TH1 Room temperature Refrigerant flow in cooling Refrigerant flow in heating Strainer 50 Strainer 50 Heat exchanger Refrigerant GAS pipe connection Flare Refrigerant LIQUID pipe connection Flare ...

Page 33: ... below before investigating details Judge what is wrong and take a corrective action according to 9 3 SELF DIAGNOSIS ACTION TABLE Conduct troubleshooting and ascertain the cause of the trouble according to 9 4 TROUBLESHOOTING OF PROBLEMS 1 2 Reset check code logs and restart the unit after finishing service 3 There is no abnormality in electrical component controller board remote controller etc 1 ...

Page 34: ...rect operation For description of each LED LED1 2 3 provided on the indoor controller refer to the following table LED1 power for microcomputer Indicates whether control power is supplied Make sure that this LED is always lit LED2 power for remote controller Indicates whether power is supplied to the remote controller This LED lights only in the case of the indoor unit which is connected to the ou...

Page 35: ...mpressor overcurrent interruption When compressor locked Abnormal high discharging temperature 49C worked insufficient refrigerant Abnormal high pressure 63H worked Overheating safeguard operation Abnormal temperature of heat sink Outdoor unit fan protection stop Compressor overcurrent interruption Abnormal of power module Abnormality of super heat due to low discharge temperature Abnormality such...

Page 36: ...roller LED 3 communication between indoor and outdoor units AUTO RESTART FUNCTION Indoor controller board This model is equipped with the AUTO RESTART FUNCTION When the indoor unit is controlled with the remote controller the operation mode set temperature and the fan speed are memorized by the indoor controller board The auto restart function sets to work the moment the power has restored after p...

Page 37: ...ics refer to P1 above 2 Check contact failure of connector CN44 on the indoor controller board Refer to 9 5 2 Turn the power on again and check restart after inserting connector again 4 Check pipe liquid temperature with remote controller in test run mode If pipe liquid temperature is extremely low in cooling mode or high in heating mode refrigerant circuit may have defective 5 Check pipe liquid t...

Page 38: ...tor is defective Indoor controller board is defective 5 Defective outdoor fan control 6 Overcharge of refrigerant 7 Defective refrigerant circuit clogs 8 Bypass circuit of outdoor unit is defective Cooling or drying mode 1 Check clogging of the filter 2 Remove shields 4 Refer to 9 8 DC Fan motor FAN MOTOR INDOOR CONTROLLER BOARD 5 Check outdoor fan motor 67 Check operating condition of refrigerant...

Page 39: ...s not the above mentioned problem of 1 3 4 Diagnose remote controllers a When RC OK is displayed Remote controllers have no problem Turn the power off and on again to check If abnormality generates again replace indoor controller board b When RC NG is displayed Replace remote controller c When RC E3 is displayed d When ERC 00 06 is displayed c d Noise may be causing abnormality If the unit is not ...

Page 40: ...troller circuit board to transmit signals Error Code Abnormal point and detection method Cause Countermeasure Fb Indoor controller board Abnormal if data cannot be read normally from the nonvolatile memory of the indoor controller board 1 Defective indoor controller board 1 Replace indoor controller board E1 or E2 Remote controller control board 1 Abnormal if data cannot be read normal ly from the...

Page 41: ...is defective 2 LED2 on indoor controller board is blinking When LED1 on indoor controller board is also blinking Connection failure of indoor outdoor unit connecting wire When LED1 is lit 1 Mis wiring of remote controller wires Under twin triple indoor unit system 2 or more indoor units are wired together 2 Refrigerant address for outdoor unit is wrong or not set Under grouping control system ther...

Page 42: ...nect to the indoor power board CNXB2 Connect to the indoor power board CNXC2 Connect to the indoor power board 1 VFG Voltage on the side of PC51 and C25 Same with the voltage between 7 and 4 of CNMF VCC Voltage between the C25 pins 15 VDC Same with the voltage between 5 and 4 of CNMF Vsp Voltage between the C53 pins 0VDC with the fan stopped 1 6 5VDC with the fan in operation Same with the voltage...

Page 43: ...nser evaporator temperature CN4F Float thermistor CN20 Thermistor Inlet temperature CN3C Indoor outdoor transmission 0 24VDC CN90 Wireless remote controller CNXA2 Connect to the indoor controller board CNXB2 Connect to the indoor controller board CNXC2 Connect to the indoor controller board CNXA1 Connect to the indoor power board CNXB1 Connect to the indoor power board CNXC1 Connect to the indoor ...

Page 44: ...stor Regulator Hall IC Motor winding Power device Pre driver Vm Power supply for motor Vcc Power supply for control Vsp Speed command voltage PG Pulse output for rotation GND 9 7 Thermistor 0 10 20 30 40 50 20 10 0 10 20 30 40 50 Thermistor for lower temperature Temperature Resistance K Thermistor Characteristic graph Room temperature thermistor TH1 Pipe temperature thermistor TH2 Condenser evapor...

Page 45: ...tor CNMF Measure the voltage in the indoor controller circuit board TEST POINT 1 VDC between 1 and 4 of the fan connector VDC DC310 340V TEST POINT 2 VCC between 5 and 4 of the fan connector VCC DC15V Wiring recovery Replace drain pump DP Replace indoor controller board Replace the fan motor Replace indoor controller board I B Replace fan motor MF Replace indoor controller board Replace the fan mo...

Page 46: ...s no jumper JP1 because these models have the cond eva temperature thermistor TH5 Marks in the table below Jumper wire Short Open Without TH5 With TH5 Model JP1 Factory shipment Service parts Indoor controller board type JP3 Service board MODELS PEAD M35JA L PEAD M50JA L PEAD M60JA L PEAD M71JA L PEAD M100JA L PEAD M125JA L PEAD M140JA L The figure at left shows that the switches 1 through 5 are s...

Page 47: ... the cover A to remove it 2 Thermistor Intake air 1 Remove the control box cover according to the procedure in section 1 1 Pull out the thermistor holder B and thermis tor C on the control box A Fig 1 Fig 2 B C Fig 3 DISASSEMBLY PROCEDURE 10 Exercise caution when removing heavy parts ...

Page 48: ...ilter and the bottom plate 1 Push up the tab on the filter and pull out the filter in the direction of the arrow 1 2 Remove the fixing screws on the bottom plate D E to remove it 2 Removing the drainpan 1 Pull out the drain pan in the direction of the arrow 2 D E Fig 4 Fig 5 ...

Page 49: ...ng the Heat exchanger cover 1 Remove the four fixing screws on the heat exchanger cover F to remove it 3 Removing the thermistor 1 Remove the thermistor G from the thermistor holder H on the copper tube Thermistor size Liquid pipe ø8mm Condenser evaporator ø6mm F Fig 6 G H Fig 7 Exercise caution when removing heavy parts ...

Page 50: ... case fixing screws to take the top half of the fan casing off Fig 11 Exercise caution when removing heavy parts 2 Removing the fan casing bottom half 1 Squeeze the tabs on the fan casing to remove it in the direction of arrow 2 Fig 9 5 Fan and fan motor 1 Removing the filter and the bottom plate 1 Push down the tab on the filter and pull out the filter in the direction of the arrow 1 2 Remove the...

Page 51: ...heat exchanger cover according to the procedure in section 4 2 3 Removing the cover 1 Remove the five fixing screws on the cover K to remove it 4 Removing the Heat exchanger 1 Remove the fixing screws on the heat exchanger L to remove it K Fig 12 L Fig 13 Exercise caution when removing heavy parts ...

Page 52: ...New publication effective Mar 2017 Specifications subject to change without notice www MitsubishiElectric com HWE16130 ...

Page 53: ...r Inverter Single Phase Product Information Sheet PEAD M R32 Standard Inverter Single Phase Product Information Sheet PEAD M35 140JA Declaration of Conformity PEAD M35 140JA Installation Manual PEAD M35 140JA Operation Manual PEAD M35 140JA Parts List PEAD M35 140JA Service Manual HWE16130 ...

Page 54: ......

Reviews: