- 15 -
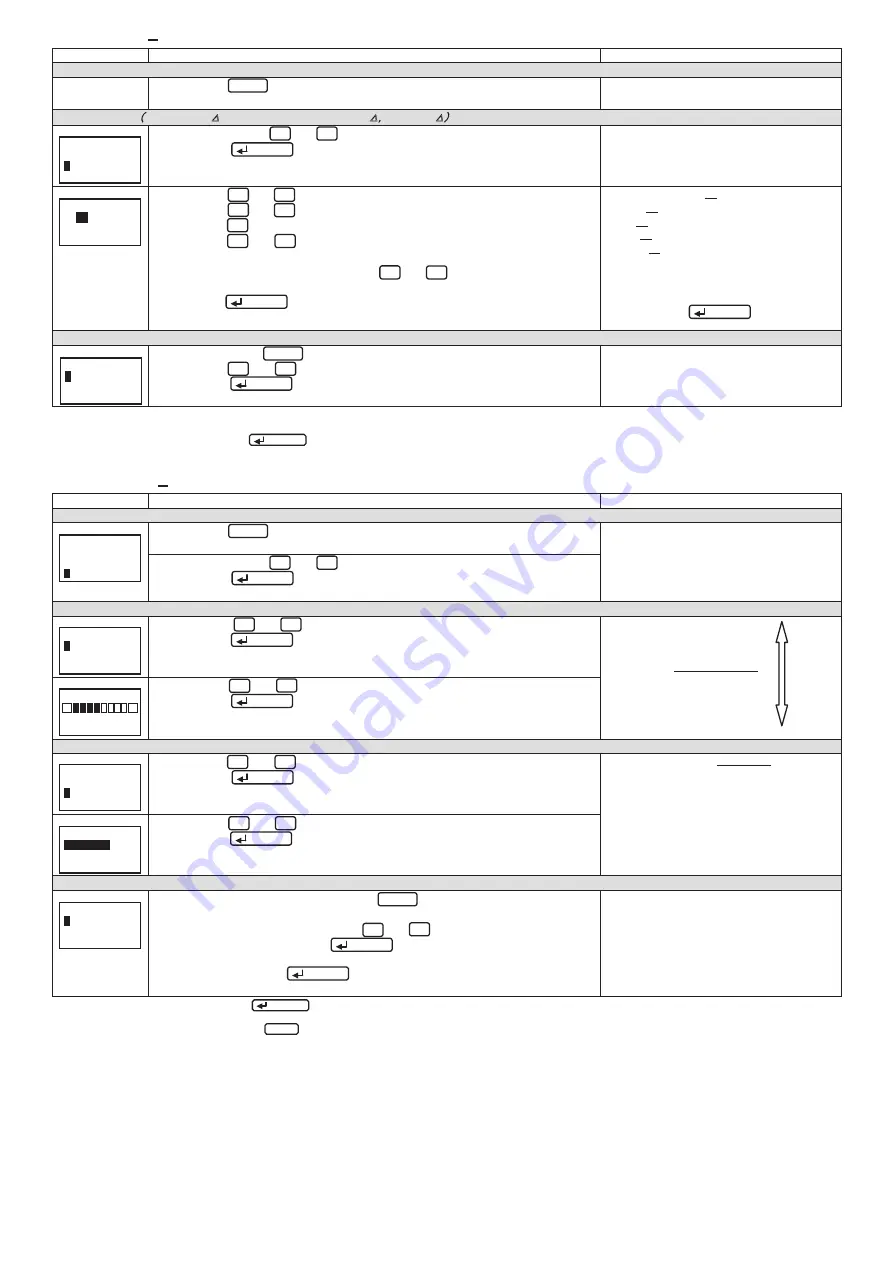
7.3.2 Clock setup
-
the settings for the clock.
Screen
Operation
Note
1 Transition to the setup mode
(
1
)
Push the Setup key in operation mode.
(
2
)
2-1 will be displayed.
2 Clock setup
(
EMU2-HM1-
△
, EMU2-VS1-P, EMU2-RD
□
-
△
,
MDU2-
□
-
△
)
2-1.
(
1
)
In 2-1,
Push the
▲
or
▼
key, and move the cursor to the “Clock”.
(
2
)
Push the
/ Phase key.
(
3
)
2-2 will be displayed.
2-2.
(
1
)
Push the
▲
or
▼
key , and move the cursor to the “Year”.
(
2
)
Push the
+
or
-
key, and change the set value.
(
3
)
Push the
▼
key, and move the cursor to the “Month”.
(
4
)
Push the
+
or
-
key, and change the set value.
(
5
)
In a similar way, change the “Day”,“Hour”,“Minute”.
note 1
(
6
)
After setting all of the items, push the
▲
or
▼
key, and move the
cursor to the ”OK”.
(
7
)
Push the
/Phase
key, and clock setting changed.
Note 2
[Year]
:
00
⇔
01
⇔
02
⇔
03
⇔
04
⇔
…
⇔
99
⇔
[Month]
:
01
⇔
02
⇔
03
⇔
04
⇔
…
⇔
12
⇔
[Day]
:
01
⇔
02
⇔
…
⇔
29
⇔
30
⇔
31
⇔
[Hour]
:
00
⇔
01
⇔
…
⇔
12
⇔
13
⇔
…23
⇔
[Minute]
:
00
⇔
01
⇔
…
⇔
59
⇔
note 1
:
Setting range of day will change depending
on the setting of the year and month.
note 2
:
It becomes “00” second when thetiming of
pushing the
/Phase
key at the clock
setup screen.
3 to exit the the setup mode
3-1.
(
1
)
In 2-1, Push the
Setup
key.
(
2
)
Push the
▲
or
▼
key, and move the cursor to the ”2 Not Save”.
Note 1
Push the
/ Phase key.
(
3
)
Return to the operation mode, and it will be displayed electric energy screen.
Note 1
:
If change the measurement settings and
the d
isplay settings,select the ”1 Save”.
*In case of the model EMU2-BM1-B, EMU2-PM1-P, because it does not have a clock function, can not clock set.
*Setting for clock can only be in the display unit is set to master.
(
Setting for clock can not be in the display unit is set to slave.
)
*If you change a settings, please push the
/ Phase key and be sure to determine changes. If without determine, the changes will be discarded.
*The underline means the default of setting. After you have been set, even if a power failure occurs does not disappear setting.
7.3.3 Display setup
-
Setup about display such as LCD contrast or backlight lighting pattern.
Screen
Operation
Note
1 Transition to the setup mode
1-1.
(
1
)
Push the Setup key in operation mode.
(
2
)
1-1 will be displayed.
(
1
)
In 1-1,
Push the
▲
or
▼
key, and move the cursor to the “3 Display”.
(
2
)
Push the
/ Phase key.
(
3
)
2-1 will be displayed.
2 Setup the LCD contrast
2-1.
(
1
)
Push the
▲
or
▼
key, and move the cursor to the ”1 Contrast”.
(
2
)
Push the
/ Phase key.
(
3
)
2-2 will be displayed.
[Contrast]
:■□□□□□□□⇔
■■□□□□□□⇔
■■■□□□□□⇔
■■■■□□□□⇔
■■■■■□□□⇔
■■■■■■□□⇔
■■■■■■■□⇔
■■■■■■■■
2-2.
(
1
)
Push the
+
or
-
key, and change the LCD contrast value.
(
2
)
Push the
/ Phase key.
(
3
)
2-1 will be displayed.
3 Setup the backlight
3-1.
(
1
)
Push the
▲
or
▼
key, and move the cursor to the “2 Backlight”.
(
2
)
Push the
/ Phase key.
(
3
)
3-2 will be displayed.
[Backlight]
:
Auto OFF
⇔
Always ON
Auto OFF: If 5 minute has passed since the
last key operation, backlight will
be OFF automatically. There are
any key operation, backlight wll
be lighted again.
Always ON: Backlight is always lighted.
3-2.
(
1
)
Push the
▲
or
▼
key , and select the backlight condition.
(
2
)
Push the
/ Phase key.
(
3
)
3-1 will be displayed.
4 Save the settings
4-1.
(
1
)
After setting all of the items, push the Setup key.
(
2
)
4-1 will be displayed.
(
3
)
When save the settings,
push the
▲
or
▼
key, move the cursor to
the “1 Save”, and Push the
/ Phase key.
(
4
)
After completing the settings saving, “Completed” message will be
displayed. Push the
/Phase key.
(
5
)
Return to the operation mode, and it will be displayed electric energy screen.
1 Save
→
Save settings and return to
the operation mode.
2 Not Save
→
Discard the changes and
return to the operation mode.
3 Cancel
→
Continue the setup.
*If you change a settings, please push the
/ Phase key and be sure to determine changes. If without determine, the changes will be discarded.
*The underline means the default of setting. After you have been set, even if a power failure occurs does not disappear setting.
*If you want to set the other circuit, push the Circuit key on the "Setup" screen (1-1), select the circuit, make the setting.
[Setup]
1
Measure
2
Clock
3
Display
[Setup]
1
Measure
2
Clock
3
Display
[Display]
1
Contrast
2
Backlight
0
Back
[Display]
1
Contrast
2
Backlight
0
Back
[Backlight]
Auto OFF
Always ON
Quit Setup
1
Save
2
Not Save
3
Cancel
Pale
Dark
[Contrast]
+
-
[Clock]
20
03
/01/01
00:00
OK
Quit Setup
1
Save
2
Not Save
3
Cancel


