


22
•••••••••••••••••••••••••••••••••••••••••••••••••••••••••••••••••••••••••••••••••••••••••••••••••••••••••••••••••••••••••••••••••••••••••••••
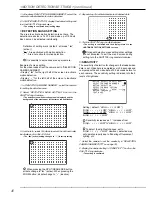
Basic Operations (continued)
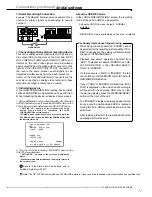
7. Turn the JOG dial clockwise to reverse display “GRADE”
and turn the SHUTTLE ring clockwise.
• The background of the “GRADE” setting turns red and
flashes.
4
1
2
3
<RECORD SETTING> ALARM PLUS
NO.PPS GRADE A-PPS A-GRADE
0.333P STD 1.667P STD
1.667P STD 1.667P STD
1.667P STD 1.667P STD
1.667P STD 1.667P STD
When the setting item is flashing, the menu
screen cannot be cleared even when pressing the
SET UP button.
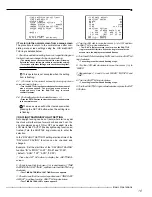
8. Turn the JOG dial to select “HIGH” and turn the SHUTTLE
ring clockwise.
• The setting is confirmed and flashing stops.
4
1
2
3
<RECORD SETTING> ALARM PLUS
NO.PPS GRADE A-PPS A-GRADE
0.333P
HIGH
1.667P STD
1.667P STD 1.667P STD
1.667P STD 1.667P STD
1.667P STD 1.667P STD
About <ESTD TIME>
• The remaining recordable time is displayed as <ESTD TIME>
depending on the “PPS” and “GRADE” settings. (The time
will not change when changing the alarm recording settings.)
For details concerning the estimated recordable time,
see page 66.
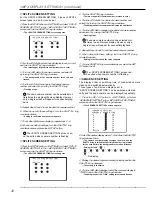
9. When the setting is complete, turn the SHUTTLE ring
counterclockwise.
• The cursor moves to the camera number on the left.
• When continuing with other camera number settings, turn
the JOG dial to move the cursor to the desired camera number
and repeat steps 4 - 8 to perform settings.
4
1
2
3
<RECORD SETTING> ALARM PLUS
NO.PPS GRADE A-PPS A-GRADE
>> 0.333P HIGH
1.667P STD
1.667P STD 1.667P STD
1.667P STD 1.667P STD
1.667P STD 1.667P STD
10. Turn the SHUTTLE ring counterclockwise or press the SET
UP button to return to the normal screen.
11. Press the REC/STOP button.
• REC/STOP button lights and recording starts.
12. To stop recording, press the REC/STOP button for more
than 1 second.
• Recording stops and the REC/STOP button turns off.
REC/STOP
■
Basic playback
This unit allows recorded video to be played back using
various methods. The basic playback described here is
the most common method for playback.
1. Press the PLAY button within the door on the front of the
unit.
• Recorded contents of the HDD are played back.
• After turning the power on, the oldest recorded video is
played back first. Otherwise, playback resumes at the position
of the previous playback.
STOP
PAUSE
REV. PLAY PLAY
When the “HDD REPEAT PLAY” setting in the
“HDD SETTINGS” is set to “OFF”, playback is
stopped when reaching the end of the physical HDD
or recorded section. When the “HDD REPEAT PLAY”
setting is set to “ON”, recorded video data is played
back repeatedly (
see “HDD REPEAT PLAY”,
page 43).
1-1. Changing the playback device.
• The default setting of the playback device is HDD.
• When changing the playback device to Compact Flash Card,
press the SEARCH button twice (
see page 58) to display
the <SEARCH SELECTION> screen and select “CFC”
(Compact Flash Card) in “PLAYBACK DEVICE”.
2. To pause playback, press the PAUSE button.
• To resume playback, press the PAUSE button again or press
the PLAY button.
3. To stop playback, press the STOP button.
• During HDD playback/pause, playback will start the next
time from the paused position.
• During CFC playback/pause, playback will start the next time
from the oldest recorded video on the media.
■
Basic search
This unit displays a menu of most used search functions
simply by pressing the SEARCH button.
♦
TIME DATE SEARCH
Various search functions are available for
searching the start point of video clips. In this section, the
most common search method referred to as time/date
search is explained. With this method, searching is possi-
ble by date, hour, minute, second and specified camera
number.
Example : Search a scene recorded on the HDD with
time/date stamp of 03/03/2003 9:25:40pm (21:25:40)
using camera number “
3
”.
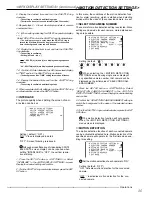
1. Press the SEARCH button to display the <TIME DATE
SEARCH> screen.
• The default setting of the search menu displayed when
pressing the SEARCH button is “TIME DATE SEARCH”.
<TIME DATE SEARCH>
>>01-01-2003 00:00:00
EXECUTE(FORWARD)
START 02-02-2003 00:00:00
END 04-04-2003 12:30:15
PUSH SEARCH KEY FOR
SEARCH SELECTION
2. Check to see that the cursor is next to the search date and
turn the SHUTTLE ring clockwise twice.
• The display reverses in color when the SHUTTLE ring is
turned the first time. When the ring is turned for the second
time, the display turns red and flashes.
3. Turn the JOG dial to display “03” for “MONTH” and turn the
SHUTTLE ring clockwise.
• Setting is confirmed and flashing stops.
4. Turn the JOG dial to reverse display “DAY” and turn the
SHUTTLE ring clockwise.
• The background of the setting item changes to red and
flashes.
Summary of Contents for DX-TL900U
Page 75: ...75 Specifications ...
Page 76: ...872C276A8 PRINTED IN MALAYSIA ...


