background image

22

Copying the recorded data (continued)

 Field Reverse 

Click to display a still picture one 

fi

 eld before.

 Stop 

Click to stop playback. Audio, if recorded, is played back 
after the stop when [Not Synchro.] is selected and the 
audio command has been enabled.

 Field Advance 

Click to display a still picture one 

fi

 eld after.

 Playback 

Click to playback the picture in the forward direction.

 Forward Search 

Click to playback the picture in the forward direction with 
a higher speed than normal playback. The speed changes 
from X1 to X2, X4, X8 and back to X1 at every press of 
this button during playback.

 to 

  Camera 

(These buttons are displayed when the 

 button 

located on the lower right of the Forward Search button 
is pressed.) Click to display the picture of the camera 
corresponding to the number of the button. The indicator 
turns green for the camera number which is being 
displayed, and it turns black for the camera number which 
is not being displayed. The picture is not displayed even 
when the indicator turns green if the data has not been 
copied for that camera number.

Refresh Speed 

(This slider is displayed when the 

 button located on the 

lower right of the Camera button is pressed.) Drag with 
the mouse to adjust the playback speed. When setting 
to [Fast], it may disrupt the operation depending on the 
performance of the personal computer used. Use this 
setting with the proper picture playback speed suitable to 
the personal computer used.
The playback speed slider may not be changed at a 
constant interval when the data which is additionally 
copied is played back.

Output 

(This is displayed when the 

 button located on the 

lower right of the Refresh Speed slider is pressed.)
[Not Synchronized playback] 
Put a checkmark to [Output] on the FSMPlayerLite panel 
and select a playback channel from the drop-down menu. 
Then select [Not Synchro.] in the [Playback] field. Play 
back the copied data and stop at a point where you want 
to hear the audio. The audio data around the stop point 
are played back. You can change the duration of audio 
playback in 3 levels using the slide bar on the right side. 
The actual duration of audio playback varies depending 
on the frame rate of the recorded picture. Adjust the 
duration for every data to be played back.
[Synchronized playback] 
Select [Synchro.] in the [Playback] field. You can play 
back simultaneously the audio and picture of the data 
downloaded in blocks via network or the data copied 
together with audio by a recorder. Only one playback 
channel is displayed in this case. Audio is not played back 
during other than normal playback (such as fast-forward 
playback and reverse playback). The [LipSync] slide bar 
should be adjusted according to the PC to be used and 
the recording status of data to be played back. In some 
cases, there may not be found an optimum position where 
the picture and audio synchronize with each other.

 Playback software

When copying the data to CD/DVD or USB memory, the 
needed PC playback software is automatically copied on to 
the disc. Refer to the following for using the software.

 System requirements

•  OS: Microsoft Windows 2000 or Windows XP.
•  CPU: IBM PC/AT compatible with an Intel Pentium series 

processor of at least 500 MHz.

•  RAM: 256 MB or more.
•  HDD: System drive with unused space of at least 200 MB.
•  Display device: XGA (1024 pixels x 768 pixels) or higher.

 Starting up the application software

step

1.

  Load the CD/DVD/USB memory which has been 

used for copy to the personal computer.

step

2.

  Double-click the icon of the disc to open.


step

3.

  Start up the application software.

•  Double-click the “FSM Player Lite.exe.”  The 

application software starts up and the operation 
panel appears.

  When the picture cannot be loaded, use the 

[Folder] command in the [File] menu to select 
the picture folder to be played back.

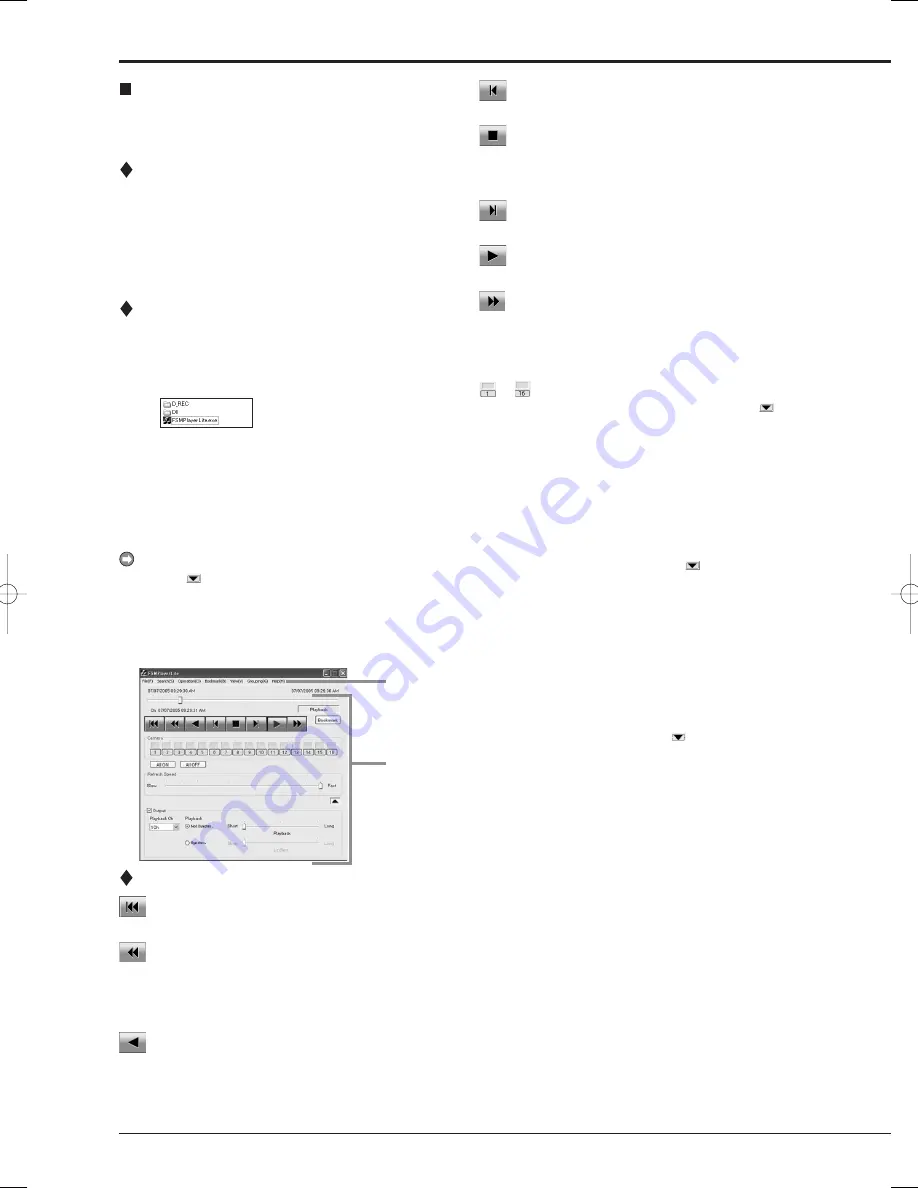
 You can open the FSMPlayerLite panel in 4 stages by 

clicking 

 on the right side. In the 

fi

 rst stage, you can 

select playback, search and bookmark operations. In the 
second stage, you can select a camera to display. In the 
third stage, you can adjust playback speed (reducing 
only) and in the fourth stage, you can make various set-
tings for audio playback.

 Operational panel

 Rewind

Click to jump to the head of the recording data.

 Reverse Search

Click to playback the picture in the reverse direction with 
a higher speed than normal playback. The speed changes 
from X1 to X2, X4, X8 and back to X1 at every press of 
this button during reverse playback.

 Reverse Playback

Click to playback the picture in the reverse direction.

Menu

Operational
Panel

Summary of Contents for DX-TL4709U

Page 1: ...1 DIGITAL RECORDER USERʼS MANUAL MODEL DX TL4709U THIS INSTRUCTION MANUAL IS IMPORTANT TO YOU PLEASE READ IT BEFORE USING YOUR DIGITAL RECORDER ...

Page 2: ...RTS INSIDE REFER SERVICING TO QUALIFIED SERVICE PERSONNEL RISK OF ELECTRIC SHOCK DO NOT OPEN WARNING The lightning flash with arrowhead symbol within an equilateral triangle is intended to alert the user to the presence of uninsulated dangerous voltage within the product s enclosure that may be of sufficient magnitude to constitute a risk of electric shock The exclamation point within an equilater...

Page 3: ...ui peuvent être suffisamment importantes pour conduire au risque d électrocution Le point d exclamation au sein d un triangle équilateral a pour objet de tirer l attention de l utilisateur sur le fait qu il y a des instructions de mise en service et d entretien de réparation dans les fiches descriptives de l appareil qui doivent obligatoirement être respectées AVERTISSEMENT AFIN D ÉVITER TOUT RISQ...

Page 4: ...ensure reliable operation of the product and to protect it from overheating and these openings must not be blocked or covered This product should never be placed near or over a radiator or heat register This product should not be placed in a built in installation such as a bookcase or rack unless proper ventilation is provided or the manufacturer s instructions have been adhered to 10 Power Source...

Page 5: ... result in fire electric shock or other hazards 19 Safety Check Upon completion of any service or repairs to this product ask the service technician to perform safety checks to determine that the product is in safe operating conditions 20 Heat The product should be situated away from heat sources such as radiators heat registers stoves or other products including amplifiers that product heat 21 Th...

Page 6: ...ng use Heavy objects should never be placed on the unit WHEN NOT IN USE When not in use always eject the disc and turn OFF the MAIN switch CABINET CARE Never use petroleum based cleaners Clean with a soft cloth moistened with soap and water and wipe dry PVC cables or leads should not be left in contact with the cabinet surface for long periods INSTALLATION LOCATION For excellent performance and la...

Page 7: ... 6 Inconvenience or damages arising out of breakdown in this unit or inability to display or record pictures due to natural disaster including earthquake and storm 7 Inconvenience damages or claims arising out of breakdown in this unit or loss of recorded video data due to impact or vibration to the built in HDD or an environmental factor such as temperature at the installation site 8 Demand for d...

Page 8: ...adhesive Store the disc in the specified casing avoiding the following places Places where it will be subjected to direct sunlight Places with excessive dust Places where it will be subjected to high temperatures or high humidity DVD movie cinema or personal recorded picture cannot be played back on this unit Only the pictures recorded on this unit can be played back Do not use the disc which has ...

Page 9: ...3 Multiplexer buttons 13 Controlling the camera 14 PTZ control using the menu 14 PTZ control using the front panel buttons 14 Recording the picture manually 15 Basic manual recording 15 Setting the recording rate and picture grade for normal recording 15 Playing back the recorded data 16 Basic playback 16 Searching the desired picture 17 Basic search 17 Search by Time and Date 17 Search by Alarm L...

Page 10: ...addition this Product contains Apache and OpenSSL including Original SSLeay library These software programs are also excluded from Licensed Software and not covered by the following Software License Agreement For the terms and conditions for use of these software programs please see Notice about Apache software and Notice about OpenSSL software Each of Berkeley Database agetty expat and zlib conta...

Page 11: ... applicable laws are extended Article 6 Responsibility toward third party Any issues related to intellectual property rights including but not limited to rights of privacy copyright and patent involving any third party arising out of User s use of Licensed Software shall be settled by User on its own responsibility and Licensor shall have no responsibilities for such issues Article 7 Confidentiali...

Page 12: ...nitor Setting the menu using a mouse Use the standard USB mouse which has left and right buttons as illustrated to the left step1 Use the left and right mouse buttons to set the menu Click the left button to open the menu or select a needed item etc Click the right button to set the active area for motion detection function The wheel on a mouse does not work with this unit Setting the menu using t...

Page 13: ...ress the front panel button of the needed item number or left click on the needed item The selected item menu opens Select an item and press the number or click on the menu to open the item 100 000 000 1 Search 2 Copy 5 Protect Data 3 Information 6 PTZ Control D Next E Exit User Menu Setup Menu 1 Recording System 4 2 Timer Motion Det Menu Data 5 3 D Next E Exit 200 000 000 1 Recording 4 System 2 T...

Page 14: ...click on the parameter box until the item to be set appears For some items more detailed setting is required In this case an item such as D Set is displayed If necessary press the D button or left click on the Set to set more details When you close the menu press the E button or left click on Return or Exit You cannot close the menu by pressing the SET UP button on the unit Time Date Setting Time ...

Page 15: ...n you press the 15 button or click this symbol the value of selected item decreases Menu address A unique number for each menu page You can go directly to each menu page by inputting the menu ad dress number using the front buttons of the unit For example when opening the Motion Search menu press the SET UP button and then press the number button in the order of 1 6 Motion Search Main Normal E Ret...

Page 16: ...teps 1 2 step 3 D System 4 1 Day Light Saving Setting Setup Menu Time Date Setting step1 Set the present month date year hour minute and second step2 Select the desired setting for daylight saving Auto Automatically adjust forward or back an hour for the time period set in the Day Light Saving Setting Off Auto daylight saving function is not used step3 Date and time of Auto Day Light Saving Settin...

Page 17: ...Menu System Sequential display does not appear during playback The sequential display is cancelled when you press the SEQUENCE button again or display a different type of split screen or single screen Pressing the OUTPUT A B button on the front panel switches the multiplexer video output When OUTPUT A is selected the button light indicator is off When OUTPUT B is selected the button light indicato...

Page 18: ...e single screen display step2 Press the PTZ button The unit switches to PTZ mode and the button lights up PTZ appears on the LCD display on the front panel during PTZ mode 01 01 2006 00 00 00 PTZ The camera number to be controlled appears on the LCD display on the front panel 01 01 2006 00 00 00 PTZ CAM1 step3 Control the camera Tilt Press the TILT button to tilt the camera in the upward direction...

Page 19: ...tep2 Set the normal recording menu Auto Automatically sets the picture grade and the recording rate by setting the recording cycle and the recording hour per day Set the desired settings and then select Execute The preview screen appears automatically when the auto setting is executed Easy Sets the frame or field recording recording rate and picture grade for normal recording to the same settings ...

Page 20: ...arm Recording Area is set to other than 0 System Menu Memory Data Management Setting for Main Memory LPA appears when Long Pre Alarm Area is set to other than 0 System Menu Memory Data Management Setting for Main Memory step2 2 Press the PLAY button Playback of the selected device starts When you press the PAUSE JUMP TO END button during the playback is stopped the still frame playback picture aro...

Page 21: ...respectively step3 Select Search to activate the search function step4 To playback the searched picture press either the PLAY button or the PAUSE button step5 To stop playback or still frame playback press the STOP button To change the source device to be searched set the desired device in the Select Source Device User Menu Search To display the single screen display of the desired camera number w...

Page 22: ...rding may not be stored in the alarm list and that item may be missed When the data of the camera number which is not corresponded to the alarm sensor number is copied to the external media the alarm list of that data is not exactly similar to that of listed in the digital recorder When the detection of the motion or the ground of the ALARM IN terminal occurs numerously at the same time not all th...

Page 23: ...learing the data of the DVD When copying the data while Copy Data is set to Alarm the unit performs copy operation however the data is not copied if there is no alarm recording data within the speci fied range of copy In case of CD DVD disc the remaining capacity becomes low because only the management information is recorded It is recommended to carry out Calculate in Copy Data to Copy 1 Drive to...

Page 24: ...r than 0 System Menu Memory Data Management Setting for Main Memory When copying the data to DVD while Overwrite is set to On the unit clears the existed data of the disc before overwriting with new data Note that clearing the data takes about 30 to 40 minutes You cannot cancel opera tion during clearing the data of the DVD When copying the data while Copy Data is set to Alarm the unit performs co...

Page 25: ...epare the VCR for recording Set the input source of the VCR to the external input step2 This unit Display the picture in its format single split that you want to record step3 This unit If needed use the search function to display the start position of copy step4 Analogue video cassette recorder Start recording step5 This unit Press the PLAY button to start playback step6 To stop copying press the ...

Page 26: ...he frame rate of the recorded picture Adjust the duration for every data to be played back Synchronized playback Select Synchro in the Playback field You can play back simultaneously the audio and picture of the data downloaded in blocks via network or the data copied together with audio by a recorder Only one playback channel is displayed in this case Audio is not played back during other than no...

Page 27: ...playback between those positions Repeat between A and B Put a check mark to repeat playback between Point A and Point B View menu Picture Size When selected the options of 100 75 50 and 25 appear Pictures are zoomed in or out according to the selected magnification Decode Level When selected the options of Fine Middle and Rough appear When setting the decode level to rough the pic ture becomes rou...

Page 28: ...P CPU IBM PC AT compatible with an Intel Pentium series processor of at least 500 MHz RAM 256 MB or more HDD System drive with unused space of at least 200 MB Web Browser Soft Microsoft Internet Explorer 5 5 or later Display device XGA 1024 pixels x 768 pixels or higher Microsoft and Windows are registered trademarks of the Microsoft Corporation in the US and other regions The official name of Win...

Page 29: ...nge to a new password select change and left click or press ENTER To cancel the change select clear and left click or press ENTER Main Menu This is the screen for selecting from Main Menu Live Monitoring with which live pictures are retrieved and displayed Playback with which pictures that have already been recorded are retrieved and displayed Configuration Menu which allows changes to the setting...

Page 30: ...cting from the 7 types of display patterns default 4 1 4 screen Camera Selects the camera number that you want to display and check Transfer Rate Selects one of 5 stages from Lo to Hi for picture retrieval speed default middle Save Layout The layout of the screen display is regis tered to Local PC Main Menu Returns to the Main Menu Logout For logging out Setting Transfer Rate to Hi may present a p...

Page 31: ...o frame by frame playback in the reverse direction During playback or searching press to stop play back for still frame Device Selects the HDD for playback and search default Normal The date time and the camera number for the picture ac quired are displayed in Image Information Clicking Save Image stores the picture that is still frame displayed in the PC in bit map format The following searches c...

Page 32: ...arm list items step2 Select the No desired and then click Search Click Prev number for a search in the reverse direction and click Next number for a search in the forward direction Click Refresh again to re acquire the Alarm List and click Close to hide the Alarm List Search menu step3 When the image of the alarm is displayed close the search screen and press to review the alarm Image Search Click...

Page 33: ...layback author ity step2 2 To change settings Select change and left click The Change Confirmation screen appears step2 3 If you want to make the change left click change If you want to cancel a change left click cancel step2 4 When you have selected change The Completed screen appears so then left click User Registration The User Registration screen reappears step2 5 When you have selected cancel...

Page 34: ...set are shown in the Current Settings The maximum number of characters that can be used to set the e mail address is 49 step3 To send the test e mail select From Address Test send test mail and left click step4 When attaching alarm recording picture to e mail Put a check mark on Picture checkbox E mail with the picture which is captured during alarm recording is sent to the marked user The file ex...

Page 35: ... can be printed or can be saved in general image formats step5 1 When setting the receiver s address Enter the desired e mail address to New Address step5 2 Set the contents to be transmitted from the recorder to the PC Remain Temp Fan Reboot Record Alarm and Sensor settings can be set step5 3 Select whether to activate or inactivate the e mail address you have set When a check mark is put to Acti...

Page 36: ...ing the daylight saving time function and then select set Access Mode Setup This is the screen for changing the SSL settings step1 Select the item to be changed in the Access Mode Setup Use SSL for Web Access Sets the level of the encoding function SSL No SSL Does not use the encoding function Menus only Uses the encoding function for the menus only Menus Pictures Uses the encoding function for th...

Page 37: ...tes operation limits may take effect Change Login User This screen is for changing the logged in user step1 Select Change Login User and left click The Login screen appears step2 1 To change the logged in user In the Login or change login user settings execute step 2 1 and 2 2 in Login and change the logged in user The logged in user is changed and the Main Menu screen appears step2 2 To log in wi...

Page 38: ...t to Repeat Off The recording starts after the time set for recording rate is passed Was the unit stopped during that time Is the LOCK indicator light on During normal recording alarm recording and emergency recording press the REC STOP button for more than 2 seconds Is timer recording in progress To stop timer recording press the TIMER button for more than 2 seconds Is repeat recording set to Rep...

Page 39: ...he PTZ Setting menu set correctly Is trigger for alarm recording of the camera number for which the motion detection function to be executed set to External Is the alarm recording rate of the camera number for which the motion detection function is executed set to Is the value set in Motion Threshold of the Motion Det menu larger than that of Motion Mask Settings Is the detection area set correctl...

Page 40: ...apacity of disc in Copy 2 drive has become 0 Copy data size error Check the range of copy data or the disk space of copy media Copy media error Cannot copy the data Check the copy device No disk The drive has no disk or wrong type of disk Put a proper disk into the drive The remaining capacity of disc in Copy 1 drive has become 0 Put a new disk into the drive The remaining capacity of disc in Copy...

Page 41: ... the error occurs continuously check the HDD media and cable and then restart the unit Start operation again Turn the power on again using POWER button on the front panel Turn the power on again using MAIN switch on the rear panel Check the unit Turn off the power and change the installation condition Turn off the power and change the installation condition Turn off the power and stop using Stop H...

Page 42: ......

Page 43: ......

Page 44: ...PRINTED IN MALAYSIA ...

Reviews: