background image

EN-19

Menu operation

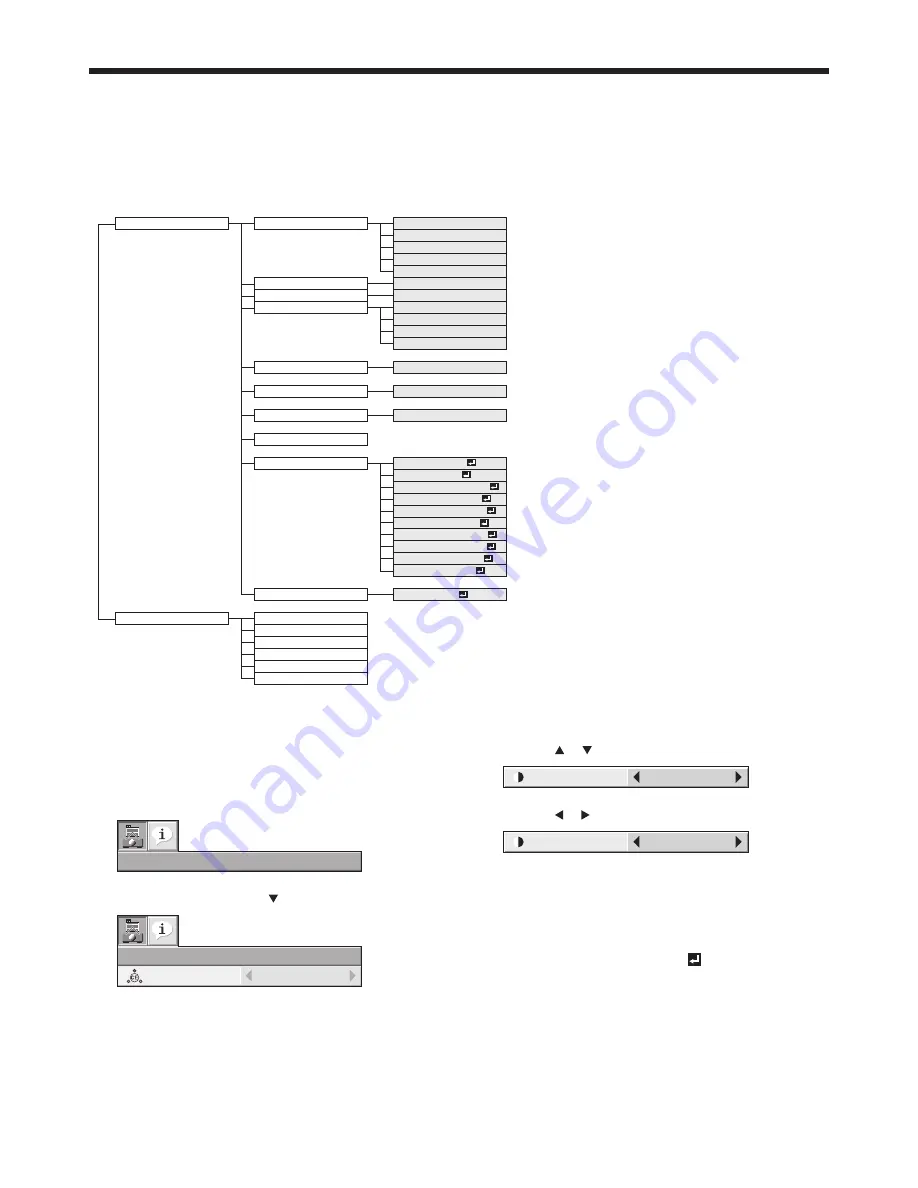
As one of the two types of MENU display, following QUICK MENU appears on the screen when pressing MENU button on the remote control. In 
addition, DETAIL MENU (See page 21) appears when selecting DETAIL MENU in this MENU and pressing ENTER button.

Comparing QUICK MENU with DETAIL MENU, if the contents in those two menus are same each other, the functions in those two menus are 

same as well.

To close QUICK MENU or DETAIL MENU, press MENU button when MENU is displayed.

QUICK MENU

* Menus are not displayed when no signal is supplied to the projector.

QUICK MENU Basic operation

Several settings can be adjusted using the menu.
Example : Contrast setting
1.

Press the MENU button.

2.

Press the ENTER button (or   button).

3.

Press the   or   button to select CONTRAST.

4.

Press the   or   button to adjust the contrast.

5.

Exit the menu by pressing the MENU button several times.

Important: 

When the button doesn’t function, unplug the power cord from the 

wall outlet. Wait about 10 minutes, plug the power cord in, and try 
again.

After selecting the items marked with 

, press the ENTER but-

ton.

QUICK MENU

COLOR ENHANCER

CONTRAST

BRIGHTNESS

COLOR TEMP.

AUTO

THEATER

USER

PRESENTATION

STANDARD

±30

STANDARD

SHARPNESS *1

±5

LAMP MODE

 ASPECT

USER MENU

SELECT USER MENU

STANDARD, LOW

COLOR

LOW

HIGH

USER

INFORMATION

SYNC. TYPE *2

LAMP TIME (LOW)

INPUT

RESOLUTION

VERTICAL FREQUENCY

HORIZONTAL FREQUENCY

±30

WALL SCREEN

TINT

CLOSED CAPTION

AUDIO INPUT

IMAGE REVERSE

MENU POSITION

CINEMA MODE

LANGUAGE

STANDBY MODE

AUTO, 16:9, NATIVE

DETAIL MENU

OK

*1 Not available with certain signals
*2 Not available when the input signal is from the VIDEO IN or S-VIDEO IN terminal.

QUICK MENU

AUTO

COLOR

ENHANCER

QUICK MENU

0

CONTRAST

+10

CONTRAST

As one of the two types of MENU display, following QUICK MENU appears on the screen when pressing MENU button on the remote con
addition, DETAIL MENU (See page 21) appears when selecting DETAIL MENU in this MENU and pressing ENTER button.

Summary of Contents for DLP FD730U

Page 1: ...DLP PROJECTOR MODEL FD730U FD730U G User Manual This User Manual is important to you Please read it before using your projector FD730U FD730U G ...

Page 2: ... in the literature accompanying the appliance WARNING TO PREVENT FIRE OR SHOCK HAZARD DO NOT EXPOSE THIS APPLIANCE TO RAIN OR MOISTURE CAUTION TO PREVENT ELECTRIC SHOCK DO NOT USE THIS POLARIZED PLUG WITH AN EXTENSION CORD RECEPTACLE OR OTHER OUTLET UNLESS THE BLADES CAN BE FULLY INSERTED TO PREVENT BLADE EXPOSURE NOTE SINCE THIS PROJECTOR IS PLUGGABLE EQUIPMENT THE SOCKET OUTLET SHALL BE INSTALLE...

Page 3: ...iantColor are all trademarks of Texas Instruments HDMI the HDMI logo and High Definition Multimedia Interface are trademarks or registered trademarks of HDMI Licensing LLC Microsoft Windows Windows 2000 Windows XP Windows Vista Windows 7 and Internet Explorer are registered trademarks trademarks or trade names of Microsoft Corporation in the U S and or other countries The trademark of PJLink is tr...

Page 4: ...s Never push objects of any kind through openings of this projector as they may touch dangerous voltage points or short out parts that could result in a fire or electric shock Never spill liquid of any kind on the projector 14 Servicing Do not attempt to service this projector by yourself Refer all servicing to qualified service personnel 15 Damage requiring service Unplug this projector from the ...

Page 5: ...because the temperature inside the projector rises very high while the lamp is illuminating Do not use the projector with condensation on it It can lead to breakdown or other failure Place of installation For safety s sake do not use the projector at any place subjected to high temperature and high humidity Please maintain an operating temperature humidity and altitude as specified below Operating...

Page 6: ...on 3 STATUS indicator 4 POWER indicator 5 COMPUTER button 6 button 7 VIDEO button 8 KEYSTONE ENTER button 9 MENU button 10 POWER button ON STANDBY The status is changed between ON and STANDBY 1 3 2 4 5 6 7 8 10 11 12 9 1 Remote control sensor rear 2 S VIDEO terminal 3 AUDIO IN 3 terminals L R 4 MONITOR OUT terminal mini D SUB 15 pin 5 AUDIO IN 1 terminal mini jack 6 COMPUTER COMPONENT VIDEO IN ter...

Page 7: ...n 10 EFFICIENT MODE button 11 AUTO POSITION button 12 buttons 13 FREEZE button 14 VIDEO S VIDEO buttons 15 COMPUTER 1 2 buttons 16 HDMI button ON ASPECT EFFICIENT MODE MAGNIFY KEYSTONE VOL UP 3D DOWN STANDBY MENU FREEZE AUTO POSITION AV MUTE ENTER 1 2 COMPUTER VIDEO VIEWER UNPLUG S VIDEO USB DISP LAN DISP DVI HDMI 1 2 3 4 5 6 7 14 15 11 12 13 16 8 9 10 This model does not have these functions This...

Page 8: ...not used for a long time Do not combine a new battery with an old one If the solution of batteries comes in contact with your skin or clothes rinse with water If the solution comes in contact with your eyes rinse them with water and then consult your doctor Do not carry or store the batteries together with metallic ballpoint pens necklaces coins or hairpins Otherwise they may short out causing exp...

Page 9: ...the aspect ratio of the screen is 4 3 the positional relation between the projected image and the screen is as shown on the right Refer to the following table for installation When the aspect ratio of the image is 16 9 Screen size 4 3 Size of the projected image 16 9 Black space B Hd Projection distance L Lens shift height Diagonal size Width SW Height SH Diagonal size Width W Height H Shortest Wi...

Page 10: ...least 55 kgf When using a metal wire secure one end to a screw hole marked with an arrow on the rear terminal panel and the other end to the mount kit Don t use screw holes without arrow marks In this case make sure that the screw is inserted in the projector at least 5 mm The length of the screw should be 20 mm or shorter Also make sure that no electrical current is flowing in the mount kit due t...

Page 11: ...ut R To video output To S Video output Important Match the colors of the video and audio plugs on the Audio cable with those of the terminals Speaker output is mono Projector DVD player or HDTV decoder Some DVD players have an output connector for 3 line fitting Y CB CR When connecting such DVD player with this projector use the COMPUTER COMPONENT VIDEO IN terminal B R G Audio cable option DVD pla...

Page 12: ... you use the splitter not compliant with the HDMI 1 3 standard this projector may not display any image or not operate correctly When you connect this projector and a Digital device such as a DVD player via the HDMI terminal black color may appear dark and deep depending on the type of the connected device This depends on the black level setting of the connected device There are two kinds of metho...

Page 13: ...e instead of the provided cable the image may not be projected correctly Some computers require additional connectors or analog RGB output adapters to be connected with this projector Contact your dealer for further information This projector uses stereo mini jack for its audio input Check the type of the audio output terminal of the connected computer and prepare a proper cable for connection Som...

Page 14: ...er cord may be damaged resulting in fire or electric shock If dust or metallic substance is on or around the pins of the power plug unplug the power cord and clean it using a dry cloth If you continue to use the projector without cleaning it may result in fire or electric shock Clean the power plug periodically at least once a year Be sure to unplug the power cord from the wall outlet if the proje...

Page 15: ...dicated Note that this value doesn t mean a projection angle The allowable range of the adjustment value in the keystone adjustment varies depending on the installation condition input signal and aspect settings in MENU When the keystone adjustment takes effect the resolution decreases In addition stripes may appear or straight lines may bend in images with complicated patterns They are not due to...

Page 16: ...lens cap while the lamp is on The projector starts warming up when the POWER button is pressed During the warm up process images may appear dark and no commands are accepted By blinking red the STATUS indicator indicates that the lamp should be replaced soon Replace the lamp when the STATUS indicator blinks red See page 39 and 43 Images may not be projected with good quality in an extremely hot or...

Page 17: ...ojector while the STATUS indicator is blinking after the lamp lights up because the lamp s life may be shortened Don t turn the projector back on right after shutting it down because the lamp s life may be shortened Wait about 10 minutes before turning the projector back on Before shutting down the projector be sure to close the menu screen If you shut down the projector without closing the menu t...

Page 18: ...e sign TEMPERATURE blinks red on the screen If the temperature stays high the lamp will go out automatically Important Do not display a still picture for a long time because the afterimages may persist on the screen Wall Screen This function is to reproduce natural color tones when images are projected directly onto a screen or wall surface You can select from BEIGE LIGHT BLUE LIGHT GREEN PINK BLA...

Page 19: ...es Important When the button doesn t function unplug the power cord from the wall outlet Wait about 10 minutes plug the power cord in and try again After selecting the items marked with press the ENTER but ton QUICK MENU COLOR ENHANCER CONTRAST BRIGHTNESS COLOR TEMP AUTO THEATER USER PRESENTATION STANDARD 30 STANDARD SHARPNESS 1 5 LAMP MODE ASPECT USER MENU SELECT USER MENU STANDARD LOW COLOR LOW ...

Page 20: ...ratio automatically depending on the input signal Select this option for normal use 16 9 Select to project images in full size 1920 x 1080 pixels irrespective of type of input signal NATIVE Select to project images in their original size as input U N E M R E S U T C E L E S n i d e t c e l e s m e t i u n e m e h t s y a l p s i D U N E M R E S U t i e h t t c e l e S U N E M R E S U T C E L E S e...

Page 21: ... VIDEO AUTO NTSC PAL SECAM 4 43NTSC PAL M PAL N PAL 60 LOCK 4 4 4 4 4 OVER SCAN 8 HOLD 2 7 HORIZ POSITION 7 VERT POSITION 7 FINE SYNC 2 7 TRACKING 1 2 7 COMPUTER INPUT 2 100 90 OFF 0 999 0 999 MEMORY CALL 1 2 RESOLUTION MEMORIZE 1 2 0 31 0 9999 AUTO RGB YCBCR YPBPR NETWORK PROJECTOR NAME NETWORK PASSWORD NETWORK RESET PJLink CERTIFICATION IP CONFIG BEGIN END SHUTTER L SHUTTER LS SHUTTER RS CLAMP P...

Page 22: ... ENHANCER AUTO Automatically sets an optimal color balance based on the input signal Use this setting for most cases PRESENTATION Makes projected images bright and crisp ST ANDARD Makes projected images look natural THEA TER Makes projected images soft and smooth Best suited for movies USER Adjusts the gamma curve color intensity or balance See page 27 CONTRAST 7 2 e g a p e e S s e g a m i d e t ...

Page 23: ...X signal of AUDIO 1 and AUDIO 2 You can change the balance of AUDIO 1 AUDIO 2 using MIX AUTO POWER ON ON OFF When this mode is set to ON the lamp is automatically lit when the power cord is plugged in the wall outlet Select ON when you set the projector at the ceiling When the lamp is off the projector is in standby Use the remote control to turn on the lamp AUTO POWER OFF OFF 5 60 min Selects a d...

Page 24: ...er FILM or VIDEO which improves the symptom better e d o m m l i f e h t o t d e x i F M L I F VIDEO The film mode will not be activated VIDEO SIGNAL 8 options Select Auto to automatically set the appropriate video format in rela tive to the input signal If projected images aren t displayed correctly select a desired video format manually SETUP AUTO Select this setting to automatically change the ...

Page 25: ...djustment result can be saved to MEMORY 1 or MEMORY 2 EXECUTE OK Press the ENTER button to start the automatic adjustment At the com pletion of the automatic adjustment a message is displayed and you can save the adjustment result to MEMORY 1 or MEMORY 2 CANCEL OK The process to change the current resolution is canceled and the SIG NAL menu is displayed HORIZ POSITION 0 999 Use to adjust the horiz...

Page 26: ...o i t p i r c s e d e r u t a e F n o i t p o u n e M LAMP TIME LOW This menu shows a lamp operating time hour calculated assuming that LAMP MODE is LOW When the LAMP MODE is STANDARD this menu shows a longer lamp operating time than the actual time See page 38 for the interval of lamp replacement When the lamp operating time is 0 to 10 hours 0H is displayed When the lamp operating time exceeds 10...

Page 27: ...re by pressing the or button To cancel the menu 4 Press the MENU button To adjust the tone of white To customize the color tem perature T o set and store a user defined color temperature perform the fol lowing procedure See page 22 for the menu options 1 Select COLOR TEMP in the IMAGE menu 2 Press the or button to select USER 3 Press the ENTER button 4 Press the or button to select the desired set...

Page 28: ... saver if it is active Press the AUTO POSITION button When a signal from a video device or signal marked with 2 on page 46 is being input a window to select the adjustment mode is displayed Select AUTO ADJUST using the or button and press the ENTER button Settings are automatically and optimally adjusted for the input signal Image is projected correctly YES NO Display the screen resolution setting...

Page 29: ... AUTO for normal use Noise appears on the right or left half of the image Adjust SHUTTER LS or SHUTTER RS in the SIGNAL USER menu Noise appears on the top or bottom part of the image Adjust SHUTTER U or SHUTTER L in the SIGNAL USER menu 1 Display the SIGNALmenu 2 Press the or button to select an item to adjust 3 Adjust the selected item by pressing the or button To cancel the menu 4 Press the MENU...

Page 30: ...ter key Shifting the position of enter cursor to the right for each character DEL key Deleting the character in the position of enter cursor for each character caps CAPS key Switching an alphabet character to CAPI T AL or small CLEAR key Deleting all the entered characters The default password is admin 5 Select OK and NEW NETWORK PASSWORD screen appears if the entered password is correct If the en...

Page 31: ...s the ENTER button SUBNET MASK screen appears 5 Enter the Subnet Mask Refer to IP Address Settings for the detail of entering 6 When selecting OK the setting is completed as the Subnet Mask stored However when selecting CANCEL the setting is completed without storing It may take some time to reflect the settings Default Gateway Settings 1 Display the IP CONFIG menu 2 Press the or button to select ...

Page 32: ...of standby mode Glossary For more detail of the glossary below refer to the technical book that is commercially available T erm Description DHCP Abbreviation for Dynamic Host Configuration Protocol This protocol automatically assigns IP Address to networked devices IP Address Numerical address to identify networked comput ers Subnet Mask A numeric value to define the number of bits used for a netwo...

Page 33: ...ar tup screen Even when you select RESET ALL in the FEATURE menu the factory default screen isn t available any longer When you want to change the startup screen again capture another image The captured image will be displayed from the next startup If the captured image isn t displayed make sure that the setting of SPLASH SCREEN in the INST ALLA TION menu isn t OFF See page 23 To display the captu...

Page 34: ...already been set the mode never changes Press the ENTER button to cancel the password function and try again 4 Press the ENTER button The screen for setting the password function appears 5 Press the ENTER button The screen for entering a password appears 6 Enter a 4 8 digit password using the or buttons on the remote control as shown below 1 2 3 4 7 Press the ENTER button To cancel the procedure p...

Page 35: ... projector control and you can control and monitor projector s operations using the same application among projectors of different models and different manufacturers About ProjectorView Global and ProjectorView For details see LAN control UTILITY operation manual in the CD ROM About PJLink To use PJLink function the PJLink application software is required To use this function set the PJLink certif...

Page 36: ... up INPT Input switching 11 COMPUTER1 12 COMPUTER2 21 VIDEO 22 S VIDEO 31 HDMI INPT Inquiry about input switching AVMT Mute control 30 Video and audio mute disable 31 Video and audio mute enable AVMT Inquiry about the mute state ERST Inquiry about the error state 1st byte Fan error 0 or 2 2nd byte Lamp error 0 to 2 3rd byte Temperature error 0 or 2 4th byte Cover open error 0 or 2 5th byte Always ...

Page 37: ...agments from scattering Be sure to use the lamp dedicated to this projector VLT XD700LP for FD730U FD730U G Use of other lamps may cause a failure of the projector A When the projector is placed on the table Make sure that the projector is securely held in place 1 Remove the cover a of the screw fixing the lamp cover with a fingernail If it is difficult to remove it with a fingernail use a finetip...

Page 38: ...operation time unless you replace the lamp Caution The lamp is fragile If it is broken be careful not to cut yourself with glass fragments Contact your dealer for a new lamp Interval of lamp replacement The recommended interval of lamp replacement is about 5000 hours 1 2 of consecutive use Such interval differs depending on the operating environment and may be shorter than 5000 hours 1 2 Decrease ...

Page 39: ... contact your dealer No image appears on the screen Cancel the AV mute by pressing the AV MUTE button Check that the lens cap is removed It may take about 1 minute for the lamp to light up The lamp fails to light up on rare occasions In such a case wait for a few minutes and then try again If the projector was turned off before the lamp was cooled down sufficiently last time the fan may start rota...

Page 40: ...or the IMAGE menu See page 27 Replace the lamp See page 37 Projected images are blurred Adjust the focus See page 16 Clean the lens Press the or button on the remote control to eliminate flicker Adjust TRACKING and FINE SYNC in the SIGNAL menu See page 29 Adjust BRIGHTNESS and CONTRAST in the QUICK MENU or the IMAGE menu See page 27 Adjust the projector and the screen so that they are perpendicula...

Page 41: ...s are flickering After the POWER button or ON button on the remote has been pressed or the LAMP MODE setting has changed images may be flickering until the lamp lights stably This is an expected behavior When selecting the input signal Auto Position and Color Enhancer the projected image may be flickering temporarily This is not a product malfunction Others Problem Solution The exhaust vents emit ...

Page 42: ...e on the projector Ask your dealer for annual cleaning of the inside of the projector If you continue to use the projector with dust inside it may result in fire or malfunction Cleaning of the projector and the vents Use a soft cloth to clean the projector and the vents When the vents become dirty wipe them with a soft cloth dampened with diluted mild detergent and then wipe them with a dry cloth ...

Page 43: ...e clogged with dust or dirt The room temperature is high Clean the vents Relocate the projector to a cooler place Steady red Blinking green The protection circuit is working or the lamp is in an abnormal condition Wait until the STATUS indicator goes out then press the POWER button If the above solution is not effective replace the lamp Steady green Blinking green red The lamp operation time excee...

Page 44: ...0i 576i 480p 576p 1080i 720p 1080p Speaker 10 W mono x 1 S video input Luminance signal 1 0 Vp p 75 Ω negative sync Chroma signal 0 286 Vp p 75 Ω burst signal Video input 1 0 Vp p 75 Ω negative sync Audio input 350 mVrms 10 kΩ or more Analog RGB input RGB 0 7 Vp p 75 Ω negative sync YPBPR YCBCR Y 1 0 Vp p negative sync PBPR CBCR 0 7 Vp p HD CS TTL level positive or negative VD TTL level positive o...

Page 45: ...1 7 TMDS Data 0 8 TMDS Data 0 Shield 9 TMDS Data 0 10 TMDS Clock 11 TMDS Clock Shield 12 TMDS Clock 13 CEC 14 15 SCL 16 SDA 17 DDC Ground 18 5 V Power 19 Hot Plug Detect Dimension drawings unit mm 270 345 134 What s included in the box AC power cord for the U S J2552 0063 03 for Europe J2552 0247 00 for the U K J2552 0065 02 for Australia J2552 0053 00 for South Korea J2552 0247 00 Computer cable ...

Page 46: ... 0 6 8 6 7 x 4 2 0 1 5 7 A G X 8 6 7 x 4 2 0 1 0 8 0 1 x 0 4 4 1 0 0 5 8 8 6 8 6 8 6 7 x 4 2 0 1 5 8 A G X 4 6 8 x 2 5 1 1 0 8 0 1 x 0 4 4 1 1 0 0 7 5 8 3 6 4 6 8 x 2 5 1 1 a 0 7 A G X S 4 6 8 x 2 5 1 1 0 8 0 1 x 0 4 4 1 0 0 5 7 0 5 7 6 4 6 8 x 2 5 1 1 a 5 7 A G X S 4 6 8 x 2 5 1 1 0 8 0 1 x 0 4 4 1 6 0 5 8 9 4 7 7 4 6 8 x 2 5 1 1 a 5 8 A G X S 1 8 6 7 x 0 8 2 1 0 8 0 1 x 0 0 8 1 7 8 9 5 8 7 7 4 8...

Page 47: ... signal mode is indicated as 480i or 576i This projector doesn t support 480p signals from video devices having 4 lines R G B CS or having 5 lines R G B H V Composite Sync When a certain signal such as SXGA85 SXGA85b and UXGA60 is input the number of displayed colors may decrease depending on the setting of ASPECT in the FEATURE menu Change the sig nal format of the computer if necessary NATIVE mo...

Page 48: ...1 Zusho Baba Nagaokakyo City Kyoto Japan Ver 1 0 ...

Reviews: