background image

I n s i d e   t h e   S y s t e m   U n i t

A/4     LS/VS 550 OWNER’S HANDBOOK

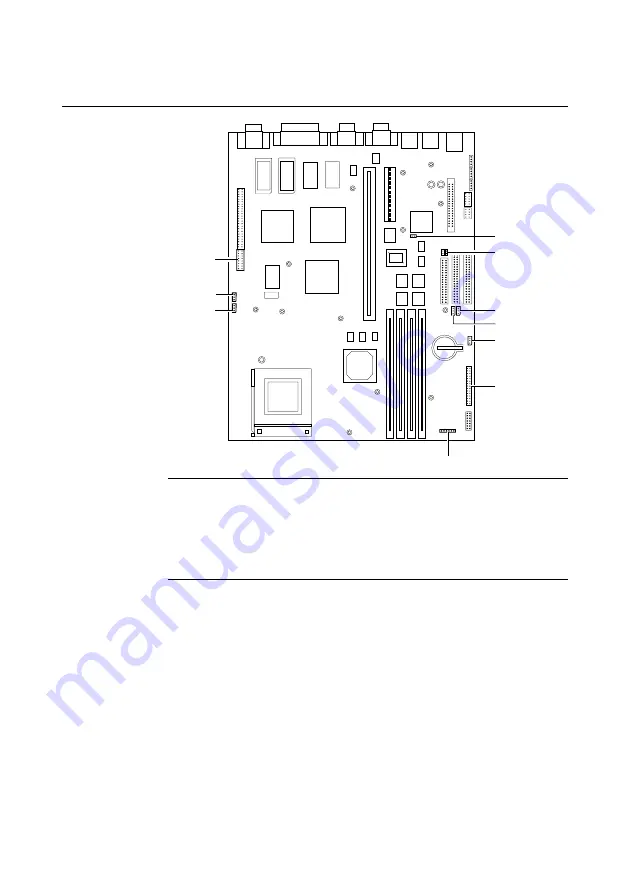
Changing the Jumper settings

PL22

PL36

PL32

PL3, PL4, PL6, 
& PL7

PL8

PL2

PL11

PL10

PL100

PL37

Caution

Caution

Do not alter any jumper or switch settings other than those identified
here, unless told to by your supplier or an authorized maintainer.
Otherwise, you may damage the system processor, the motherboard or
both.

There are only a few jumpers on the motherboard that you may
need to alter. All others are set at the factory and should not be
changed.

In this section, “1-2” means the jumpers should be fitted across pins
1 and 2, “2-3” means the jumper should be fitted across pins 2 and
3, and so on. “Open” means that no jumpers should be fitted;
“Closed” means that all jumpers should be fitted.

On the motherboard, pin 1 of each block is indicated by a small
triangle marking.

Summary of Contents for Apricot LS 550

Page 1: ...LS VS 550 Owner s Handbook NATIONAL ACCREDITATION OFCERTIFICATION BODIES ...

Page 2: ...OWNER S HANDBOOK APRICOT LS VS 550 ...

Page 3: ...in this manual is furnished under a license agreement The software may be used or copied only in accordance with the terms of this agreement It is against the law to copy any disk supplied for any purpose other than the purchaser s personal use No part of this manual may be reproduced or transmitted in any form or by any means electronic or mechanical including photocopying and recording for any p...

Page 4: ...nductive implement to remove the battery If a short circuit is made between its positive and negative terminals the battery may explode Replace a discharged configuration CMOS battery with one of the same type Dispose of the battery in accordance with the manufacturer s recommended instructions and Do not attempt to recharge disassemble or incinerate the discharged battery Keep away from children ...

Page 5: ...ndards for the country of sale will be shown on the label fixed to the rear of the system Notes All interconnecting cables e g Microphone headphone and speaker and communication cables should be less than 2 metres in length If cable extensions are used ensure adequate earth connections are provided and screened cables are used Legalities This equipment complies with the relevant clauses of the fol...

Page 6: ...r of the system If you wish to use the computer in another country it may not be suitable contact your supplier or an authorised Apricot dealer Before connecting up any parts of the system ensure that the AC supply is switched off or disconnected First connect up the keyboard mouse monitor signal cable and audio cables as appropriate Connect up all AC cables System to supply system to monitor all ...

Page 7: ...ions UK ONLY This equipment is supplied with an AC power lead that has a non removable moulded plug Always replace the fuse with one of the same type and rating which is BSI or ASTA approved to BS1362 Always refit the fuse cover never use the plug with the fuse cover omitted ...

Page 8: ... tape drive 3 9 Using a SCSI DDS 2 tape drive 3 12 The sound connections 3 17 The anti theft features of your computer 3 17 Customising your display settings 3 20 Software Backup 3 21 Using Help 3 22 Caring for your computer 3 22 Transporting your computer 3 24 Using your computer in another country 3 25 4 Expansion Cards Configuring the card 4 2 Installing the card 4 7 5 System Upgrades Inside th...

Page 9: ... 6 Replacing the CMOS battery A 7 Replacing the Sensonic batteries A 8 B System BIOS and Setup Entering setup B 2 If setup runs on its own B 2 Control keys B 3 Main menu screen B 4 System summary B 5 Product data B 5 Devices and I O ports B 5 Date and time B 7 System security B 8 Start options B 10 Advanced Setup B 11 Plug and Play B 12 Error Log B 13 Power management B 13 Error messages B 15 C Te...

Page 10: ...npacking the computer you should find Apricot PC system unit System unit AC power cord and monitor power cord appropriate for the country of sale System documentation this Owner s Handbook etc Microsoft Windows 95 or if requested Microsoft MS DOS and Windows for Workgroups documentation More elaborate systems may include software or hardware options with accompanying installation diskettes and add...

Page 11: ...ith energy efficient monitors that support Display Power Management Signalling DPMS Caution Caution Do not attempt to use the computer s energy saving features with a monitor that does not support DPMS the monitor may be permanently damaged If the computer is left unattended for a certain amount of time defined in the BIOS settings the computer will enter a low power mode The screen may blank and ...

Page 12: ...g this button switches the system between normal working mode and its Standby mode In standby mode the system uses little power but can be quickly returned to normal mode 3 Optional CD ROM PD CD ROM or tape drive 4 3 5 Floppy diskette drive 5 Power LED indicator lights when the system unit is powered 6 Hard disk drive activity indicator lights when the hard disk drive is in use 7 Air vents ...

Page 13: ...nnection to USB compatible interfaces 6 Keyboard port connect the keyboard to this port 7 Mouse port connect the mouse to this port 8 Serial port 1 typically used for connecting an external modem or a serial printer signal cable 9 Serial port 2 as serial port 1 10 Parallel port typically used for a printer signal cable 11 Monitor port connect the monitor signal cable to this port 12 Air vents do n...

Page 14: ...the surrounding temperature or humidity may change rapidly See Appendix C Technical Information for recommended temperature and humidity ranges When positioning the system unit monitor and keyboard take into account any local or national regulations relating to ergonomic requirements For example you should ensure that little or no ambient light is reflected off the monitor screen as glare and that...

Page 15: ...e relevant safety standards Before using the computer in a country other than that in which it was originally sold you must check the voltage and frequency of that country s AC power supply and the type of power cord required there Check the power rating labels on the rear of the computer s system unit and its monitor to ensure that they are compatible with the AC power supply If necessary the AC ...

Page 16: ...r Off positions 2 Ensure that the system unit the monitor and any peripherals are turned off 3 Connect the monitor signal cable between the monitor and the monitor port on the rear of the system unit If the monitor signal cable is connected after the computer is turned on the display may appear in monochrome or not at all 4 Where appropriate connect other signal cables between your peripherals and...

Page 17: ... power button or switch see the monitor s User s Guide for details Always make sure that the system unit is turned on before turning on any attached peripherals If the computer does not start when the POWER button is pressed check that the system unit and monitor power cords are securely connected and that the AC power supply is switched on Power on self test Whenever the computer is turned on a p...

Page 18: ...or the first time Note A hard disk may contain more than one operating system in different partitions but only one partition can be active at any one time The computer loads its operating system from the currently active partition Starting the computer for the first time The first time you turn on your computer a message appears explaining the legal terms and conditions that govern the use of the ...

Page 19: ...ny files you have altered If you are logged in to a network logout before turning off the computer This gives the network operating system a chance to free up the network resources you ve been using Close down or quit any software that employs virtual memory or disk caching Windows 95 and Windows for Workgroups do this automatically Always turn off any attached peripherals first However there s no...

Page 20: ...igured in the system BIOS as drive A with a capacity of 1 44 Mbytes The 3 5 diskette drive fitted to your computer can read and write both 720 Kbytes disks if marked DD or double density and 1 44 Mbytes disks if marked HD or high density The HD disks can hold twice the capacity of DD disks Each diskette has a rigid plastic cover with a metal shutter that guards the disk surface The drive automatic...

Page 21: ...kette drive slot shutter foremost and with its label side facing up Some diskettes have a small arrow on the face of the diskette this must point towards the drive when you insert the diskette Push the diskette all the way in until it engages with the drive mechanism When the drive s eject button pops out the diskette is fully engaged Removing a diskette Before attempting to remove a diskette make...

Page 22: ...u cannot create rename or delete any files The BIOS Setup utility can disable the diskette drive or make it read only See Appendix B System BIOS and Setup Using the CD ROM drive The CD ROM drive can retrieve multimedia data from CD ROM discs and multi session Photo CD discs It can also play commercial audio CDs The software required to control the CD ROM drive depends on the operating environment ...

Page 23: ... it is active i e busy reading information it illuminates to amber The CD ROM drive has the following features COMPAC T 2 3 4 5 1 1 Disc drawer 2 Headphone jack and headphone volume level 3 Busy indicator 4 Emergency eject hole 5 Eject button The headphone socket and volume control can be used whilst listening to commercial audio or music CDs providing you are not using external speakers or feedin...

Page 24: ...that the drive is not currently active the drive s activity indicator should be green Press the eject button The drive mechanism disengages and the platter is ejected Note Some software programs can temporarily override the eject button They do this to prevent the user from inadvertently interrupting the CD operation To eject the drawer manually for example during a power failure you must ensure t...

Page 25: ... play audio CDs as well as providing re writable optical cartridge backup It can be fitted as an option into any system where both a CD ROM drive and an efficient re writable backup device is needed COMPACT 3 5 7 1 PD CD BUSY 6 4 2 1 Disc cartridge drawer 2 Emergency eject hole 3 Stereo headphone socket 4 Volume control for headphones 5 CD PD Indicator LED Green CD loaded Amber PD cartridge loaded...

Page 26: ...mpted to format it Inserting a PD cartridge compact disc Warning The PD CD drive can only accept one type of disk at any one time Do not try to attempt to load both a CD and PD cartridge at the same time as this will severely damage the drive Press the eject button on the front of the drive and place the CD or PD cartridge face up on the platter PD CD BUSY Push the button again or gently push the ...

Page 27: ...tion Do not turn the power off or eject a PD cartridge whilst the drive s busy indicator is flashing Your data may not be saved properly or your data may be corrupted To eject the drawer manually for example during a power failure you must ensure that the computer is turned off Then insert a thin metal rod such as a unwound paper clip into the emergency eject hole and push as shown for emergency e...

Page 28: ...ive controller card like most other tape drives The drive is designed for TR 1 or equivalent minicartridges 750 ft 400 Mbytes This nominal capacity can typically be doubled to 800 Mbytes by software data compression The software required to control the tape drive depends on your operating environment ask your supplier for details Note The drive can also accept QIC 80 Wide cartridges 400 ft 208 Mby...

Page 29: ... 1 Check that the cartridge is not being accessed by the computer the drive s activity indicator must be unlit 2 Pull the cartridge carefully out of the drive slot holding it between thumb and forefinger 3 Return the cartridge to its plastic holder This protects the cartridge and prevents dust from collecting on the surface of the tape Write protecting a cartridge A cartridge can be write protecte...

Page 30: ...rive or your tapes are defective Although it is possible to use special kits to clean the drive we recommend the use of 90 isopropyl alcohol and several non abrasive lint free swabs as follows 1 Turn off the system unit and unplug all power cords 2 The read write head and the capstan are accessible through the flip up drive door 3 Gently rub an alcohol dampened swab against the surface of the read...

Page 31: ...pically double and in some cases quadruple tape capacity Data compression and decompression is transparent to the host software The DDS 2 drive uses 120 metre cassettes The drive automatically detects whether cassettes are DDS 2 format or the older DDS format It can read and write both DDS uncompressed and DDS DC compressed data The drive writes compressed data by default unless it finds uncompres...

Page 32: ...status On Off Cassette inserted On On Cassette inserted tape being read or written Flashing slowly On Off Media warning Flashing rapidly On Drive could not write to tape correctly On Off Flashing rapidly Hardware error or high humidity Media warning A media warning when the Cassette in Place green LED flashes slowly indicates that the tape may be becoming unreliable although at this point no data ...

Page 33: ...tomatically ejected As soon as the drive detects that the humidity is at an acceptable level it will return to normal operation Automatic drive operation To prolong the life of the tape and the drive mechanism the drive relaxes during periods of inactivity no read or write operations After 30 seconds the capstan and pinch roller are released and tape tension is removed After 90 seconds the tape is...

Page 34: ...itten back to tape The drive rewinds to the beginning of the tape unthreads it and ejects the cassette Several seconds may pass between the button being pressed and the cassette being ejected so be careful not to turn off the computer before the operation is completed Write protecting a cassette A cassette can be write protected by sliding the white tab on the cassette so that the recess is reveal...

Page 35: ...ould be used After the first four hours of tape movement of a new cassette Every 25 operating hours When a media warning status is indicated When you insert the cleaning cassette the drive recognises it as a cleaning cassette runs it for about 20 seconds then ejects it automatically Each time the cleaning cassette is used the tape advances over an unused portion of the tape If the drive ejects the...

Page 36: ...phantom power for electret condenser microphones The anti theft features of your computer Included with your computer is the Electronic Fingerprinting feature or the Sensonic movement activated siren feature which incorporates Electronic Fingerprinting Electronic Fingerprinting Electronic Fingerprinting allows user supplied information to be stored on part of the computer s permanent memory This i...

Page 37: ...ed on Note You will be able to change any of the items in your branding details by running the Electronic Fingerprinting application later and entering the correct password This would be necessary for example if you moved house Until you have entered your branding details the Electronic Fingerprinting application will automatically run each time Window 95 or Windows for Workgroups starts Thereafte...

Page 38: ...is advisable that you do so before somebody else gains access to your computer and sets a branding message and password which prevents access to your computer Please refer to the on line help file for further details Sensonic The Electronic Fingerprinting feature is included with the Sensonic software and will not appear as a separately accessible application The first time the Sensonic applicatio...

Page 39: ...tor you connect However most monitors today and all Apricot monitors can display in higher resolutions than standard VGA When you have finished installing Windows you can change the setting to one that matches more closely to your own monitor so as to get the best performance from it In Windows 95 Changing the monitor setting is done via the Change Display Type option on Windows 95 s Display Prope...

Page 40: ...lp Software Back up Apricot computers normally arrive with the operating system pre installed on the hard disk in the C WINDOWS directory The hard disk also contains a complete set of video display drivers although initially the computer is configured to use the standard VGA Windows driver Additional software may be pre installed by your supplier We recommend that you copy or back up any pre insta...

Page 41: ...he software needed to exploit those features Apricot Help may be supplied as Windows Help files or README text files Apricot s Windows Help files are usually pre installed in the Apricot folder Windows 95 or program group Windows for Workgroups The README 1ST files or other ASCII text files identified by their TXT extensions can be opened by most text editors and wordprocessing packages Alternativ...

Page 42: ...tor with a soft slightly damp lint free cloth It is best to use anti static glass cleaner on the monitor screen but do not spray glass cleaner directly onto the screen it could run down inside the case and damage the circuitry The keyboard When necessary clean the keycaps with a slightly damp cloth and a minimum amount of non abrasive cleaning agent Take care not to spill any liquid onto the keybo...

Page 43: ...drop into your hand 4 Blow gently into the mouse to remove any dust that has collected there 5 Inside the mouse there are three plastic rollers Using a cotton swab moistened with a solvent cleaner gently wipe off any oil or dust that has collected on the rollers rotating them to reach all surfaces 6 Use clear water or water with a mild detergent to clean the ball Then dry it with a clean lint free...

Page 44: ...ollowing facts about your destination The voltage and frequency of the commercial AC power supply The type of plug required for the AC power outlets AC power supply Check the power rating labels on the rear of the computer s system unit and its monitor to ensure that they are compatible with the AC power supply Warning It is imperative that the computer is set to the correct voltage range before u...

Page 45: ... unit and the monitor are returned to their original voltage settings when you return home AC power cord The AC power cord and plug supplied with the computer comply with the safety standards applicable in the country in which it is first sold If you plan to use the computer in another country you must get a power cord that complies with the safety standards of the destination country ...

Page 46: ...ons on how to remove the system unit cover and information on the motherboard jumpers Warning Warning Never carry out any work on the equipment with power applied Always switch off at the mains and remove the power lead from the equipment before starting work Your computer can accept various expansion cards or boards Most are simple to install You can extend the capabilities of your computer for e...

Page 47: ...erating systems to configure the card automatically when you turn on the computer You need to use the Add New Hardware utility which is located in Control Panel in order to configure the card if Windows 95 does not auto detect it Full instructions are provided on line If manual configuration is required then you will probably need to specify at least two of the following Interrupt request level IR...

Page 48: ...nge them only if they conflict with other devices ISA Interrupt request level IRQ The interrupt request level or IRQ the two terms are used interchangeably is the line over which the expansion card sends a signal to get the attention of or interrupt the processor Many of these are reserved for components on the computer s motherboard Some of these interrupts are fixed others can be re assigned or ...

Page 49: ...ble serial port 1 Do not disable either one unless you have no intention of using the affected port Similarly if you have no intention of using the parallel port you can disable it with the BIOS Setup utility completely freeing IRQ7 for use by an expansion card Direct memory access DMA channel Some hardware devices can use a DMA channel to access system memory without directly burdening the proces...

Page 50: ...g table lists the I O ports used by devices on the motherboard Any ports not listed below may be available for an expansion card I O ports Default assignment 000h 01Fh DMA controller 1 020h 021h Interrupt controller 1 034h 038h 03Ch Alternate Local bus ATA IDE 040h 05Fh System timer 060h 06Fh Keyboard controller 070h 07Fh Real time clock NMI mask 080h 09Fh DMA page register 0A0h 0A1h Interrupt con...

Page 51: ...ller 3F8h 3FFh Serial port 1 Base memory address Some expansion cards are fitted with memory of their own usually read only memory ROM containing functional extensions to the computer s BIOS basic input output system ROM Some cards also have random access memory RAM In order that this memory can be recognised by the system processor it must be mapped somewhere within the computer s own address spa...

Page 52: ... list its possible base memory addresses You will also need to know how much memory the card has so that you can leave the right gap between this card s base address and the next Cards often come with pre configured or default settings It is best to rely on these settings as much as possible and change them only if they conflict with other devices Installing the card Installing expansion cards can...

Page 53: ... need to remove the external security clamp in order to gain access to the blanking plates on the other side of the riser Keep all the screws etc they will be needed later to secure the card 6 If the card you are installing is configured by the means of jumpers or switches check that it is correctly configured before proceeding Note Note If the card uses the video feature connector VFC on the moth...

Page 54: ...lease refer to Appendix A Inside the computer for further details Warning Warning The AMC connector forms a subset of the VFC and has additional pins for supporting multimedia modes Be extremely careful when connecting the ribbon cable to the AMC VFC connector Some of the pins carry power and any improper use can result in damage to the upgrade board 11 Check to ensure no other cables or connector...

Page 55: ...upgrade you may wish to have your supplier or service organisation install it for you Before you start installing any upgrade you should be thoroughly familiar with all the relevant instructions Appendix A Inside the System Unit provides instructions on removing the system unit top cover and information on motherboard jumpers The only tool required to complete the installation of any of the upgrad...

Page 56: ...ffected by the installation instructions in this chapter 4 5 6 2 10 8 7 9 3 1 1 Video memory upgrade sockets 2 Processor speed selection jumpers 3 ZIF processor socket 4 3 5 Floppy disk drive 5 5 25 hard disk drive under the CD ROM drive 6 CD ROM drive 7 SIMM sockets 8 Floppy disk drive ribbon connector 9 CD ROM drive ribbon connector 10 Hard disk drive ribbon connector ...

Page 57: ...m Bank 1 and the sockets labelled MM3 and MM4 form Bank 2 Hint Hint You cannot easily install a SIMM in a socket while the socket immediately next to it is occupied You may therefore need to remove a SIMM before you can install one Installing and removing SIMMs 1 Turn off the computer and unplug all power cords 2 Take suitable anti static precautions and remove the system unit cover Caution Cautio...

Page 58: ... 16 Mb 16 Mb 8 Mb 8 Mb 64 Mb 16 Mb 16 Mb 16 Mb 16 Mb 64 Mb 32 Mb 32 Mb 68 Mb 32 Mb 32 Mb 2 Mb 2 Mb 72 Mb 32 Mb 32 Mb 4 Mb 4 Mb 80 Mb 32 Mb 32 Mb 8 Mb 8 Mb 96 Mb 32 Mb 32 Mb 16 Mb 16 Mb 128 Mb 32 Mb 32 Mb 32 Mb 32 Mb To remove a SIMM 1 Gently disengage the metal holding clips on each side of the socket using your thumbs while placing your forefingers on the top edge of the SIMM Then tilt the SIMM f...

Page 59: ...2 Place the SIMM in the socket at a 15o angle to the vertical 3 Pushing gently on its top corners stand the SIMM upright in the socket until the pegs of the socket engage the holes on the SIMM and the metal clips hold both ends of the SIMM firmly in position Do not use excessive force 4 If the SIMM will not fit easily remove it and start again 5 Repeat these steps for each SIMM you want to install...

Page 60: ...video memory provides more colours and or higher resolutions provided that your monitor can cope If your computer has 1 Mbyte of video memory you can upgrade it to the maximum of 2 Mbytes There are no changes to be made to the system BIOS The only immediate differences will be apparent when you come to make changes to your video driver settings To add video memory 1 Turn off the computer and unplu...

Page 61: ...h the metal pins These memory chips are particularly static sensitive Handle with extreme caution 6 It is vital that the chips are fitted the right way round Each chip has a notch at one end or small bevel at one corner corresponding to the notch or bevel on the socket corner These must be aligned as shown below 7 One at a time press the chips in the sockets push firmly home 8 If necessary replace...

Page 62: ...rive consult your supplier Installing the drive To install the hard disk drive 1 Turn off the computer and unplug all power cords 2 If there is a diskette in the diskette drive remove it 3 Take suitable anti static precautions and remove the system unit cover Caution Caution If you are unfamiliar with the recommended anti static precautions and or the process of removing the system unit cover refe...

Page 63: ...t the hard disk s power and signal cables 13 Refit the CD ROM and floppy drives into the system unit and reconnect the power and signal cables for both 14 Refit the system unit cover Upgrading the processor The computer is supplied with a Pentium processor The ZIF zero insertion force processor socket on the motherboard is designed to accept a variety of Intel Pentium processors You can upgrade yo...

Page 64: ...bles or expansion cards intrude upon the open air space shown below 0 2 0 5cm 0 4 1 1cm 1 0 2 54cm 0 2 0 5cm 1 2 3 1 Heatsink fan 2 Processor 3 ZIF processor socket Removing the old processor 1 Turn off the computer and unplug all power cables 2 Take suitable anti static precautions and remove the system unit cover Warning Warning If you are unfamiliar with the recommended anti static precautions ...

Page 65: ...ocket secures the processor in the socket 4 You will need to remove the heatsink retaining clip before you attempt to lift the lever which secures the processor into the socket If your upgrade processor is not supplied with a built in heat sink or cooling fan you will have to re use the heat sink currently attached to your old processor 5 Lift this lever shown below from its locked position until ...

Page 66: ...ing corner of the processor is slightly bevelled and has a positioning guide in the form of a coloured dot 3 Place the processor in the socket making sure that it is correctly aligned and that you do not bend or otherwise damage the pins If the upgrade processor is not big enough to occupy the entire socket it should be positioned centrally Caution If the processor is misaligned it will not go int...

Page 67: ...ner 6 You will need to adjust the processor speed selection jumpers on the motherboard See Appendix A Inside the System Unit for more information about locating and adjusting motherboard jumper settings 7 If necessary replace the expansion cards you removed earlier 8 Replace the system unit cover ...

Page 68: ...vider Make a note of any of the symptoms error codes display messages etc before calling Problems when starting If you suspect a blown fuse In the United Kingdom and some other countries AC plugs contain fuses Your Apricot computer is initially supplied and fitted with the correct fuse for operation in the country in which it is sold If the fuse in the system s unit AC plug blows when you turn on ...

Page 69: ...ror codes and messages are displayed A full list of these is given at the end of Appendix B System BIOS and Setup You may also be prompted to Press the F1 key to continue or Press any key when ready The computer may be able to continue despite the error indication for example if a memory chip fails POST the computer can continue with less memory Your first action should be to turn off the computer...

Page 70: ...emory error normally accompanied by code 201 Beeps are used when the video cannot display the code Continuous beep Could indicate a serious failure of the system motherboard or a failure of the speaker circuitry Repeating short beeps Usually indicative of a keyboard key stuck down but may be due to the keyboard interface failing One long and one short beep POST has detected an error on the video a...

Page 71: ...1 3 2 First 64K RAM parity test failure 1 3 3 Slave DMA register test failure 1 3 4 Master DMA register test failure 1 4 1 Master interrupt mask register test failure 1 4 2 Slave interrupt mask register test failure 1 4 4 Keyboard controller test failure 2 2 2 Search for video ROM test failure 2 2 3 Screen believed inoperable 2 2 4 Timer tick interrupt test failure 2 3 1 Interval timer channel 2 t...

Page 72: ...in the BIOS setup utility If the problem persists insert a system diskette press F1 backup the data held on the defective hard disk and try reformatting it No boot device available This may indicate a fault in the diskette or hard disk drive or perhaps a damaged system diskette Press F1 to retry using another system diskette if possible Make sure that the Startup Devices option is correctly specif...

Page 73: ...contrast controls are not too low If you have fitted a new video controller expansion card and subsequently encounter problems try disabling the on board video controller by removing a jumper from the motherboard See Appendix A Inside the System Unit for more information Expansion cards If an expansion card does not work check that all internal cables are securely connected that the card is config...

Page 74: ...e password This will stop the siren The computer is in standby If the computer is in standby state when the siren sounds press the purple standby button on the front bezel to bring it out of standby You will be prompted to enter the password to stop the siren Further details can be found in the on line help file provided with the application The system s disk drives Refer also to Chapter 3 Using y...

Page 75: ...PD cartridge check that you have inserted the disk cartridge correctly and also that you have not inserted both If you are having problems writing to a PD cartridge check that it not write protected Hard disk drive If you encounter problems accessing the hard disk drive use the BIOS Setup utility to check that the drive is correctly specified and that the drive s controller is enabled Check also t...

Page 76: ...ly walking across an ordinary carpet Items handed from one person to another or being wrapped or unwrapped can acquire a static charge Air conditioning systems can also result in very high levels of static Clothing made of synthetic fibres is particularly likely to generate static electricity this static electricity is often completely unnoticed by the wearer but can be sufficient to cripple or de...

Page 77: ...me care Hold expansion cards and add on components only by their edges avoiding their electrical contacts Never touch the components or electrical contacts on the motherboard or on expansion cards In general do not handle static sensitive items unnecessarily Keep all conductive material and food and drink away from your work area and the open computer Opening the system unit To remove the system u...

Page 78: ...11 Radio card connector 2 SIMMs sockets 1 and 2 12 TV audio connector 3 Front panel connectors 13 CD audio connector 4 System connectors 14 External ports 5 CMOS Battery 15 Video upgrade sockets 6 Floppy ribbon connector 16 Power connections 7 CD ribbon connector 17 Video feature connection 8 HDD ribbon connector 18 Riser board socket 9 Wave table connection 19 Processor ZIF socket 10 Modem audio ...

Page 79: ...erwise you may damage the system processor the motherboard or both There are only a few jumpers on the motherboard that you may need to alter All others are set at the factory and should not be changed In this section 1 2 means the jumpers should be fitted across pins 1 and 2 2 3 means the jumper should be fitted across pins 2 and 3 and so on Open means that no jumpers should be fitted Closed mean...

Page 80: ...d 2 3 Floppy disk control mode PL22 Default position link pins 1 3 which enables both 3 and 2 mode operation of the drive If this is not required link pins 3 4 for 2 mode operation of the drive System Fan PL36 System fan slow mode PL37 System fan full speed mode Soundblaster enable PL100 Near CD audio connector Link pins 1 2 default Link pins 2 3 for audio disable Processor and BUS clock These set...

Page 81: ...m 200 MHz 2 4 3 5 7 8 11 12 System Connectors The following system connectors are used to connect various features to the motherboard You should not normally need to disturb these connections but if they become loose you may need to re attach them This range of pins is not for jumpers but is used to connect various features around the system case to the motherboard Connector Pins Function PL2 1 2 ...

Page 82: ...ion cards that may obstruct easy access to the battery Warning Warning Do not use a metal or other conductive implement to remove the battery If a short circuit is accidentally made between its positive and negative terminals it may cause the battery to explode 5 Lift the edge of the battery far enough to clear the base of the holder then slide the battery from under the contact spring 6 Check the...

Page 83: ... have an average life of 3 4 years You can use the Sensonic Anti theft software to check the state of the batteries If it is low then you will need to replace them Two AA alkaline batteries are required To replace the batteries 1 Turn off the computer and unplug the power cord 2 Take suitable anti static precautions and remove the system unit cover 3 If you have any expansion cards fitted to the l...

Page 84: ...w you to view and alter the computer s hardware configuration It is also used to configure various security and power saving options Configuring the computer is necessary to ensure that the software you use can recognise and exploit the hardware s capabilities The current configuration is kept in a special area of memory called CMOS memory and maintained by a small battery so that the configuratio...

Page 85: ...apter If a persistent fault is indicated make a note of any new error messages and the current configuration settings before calling an authorised maintainer The CMOS battery may be running down This may be signalled by spurious POST error messages If this happens every time you turn on the computer you may have to change the battery instructions for this are given in Appendix A Inside the System ...

Page 86: ...ollowing control keys can be used in the BIOS Setup utility Provides help on the highlighted topic pressing it again transfers you to the general help pages Exit either the setup or go back a page if in a sub menu Scroll through a menu list To toggle values or settings The enter key to select the highlighted item Numbers used in places where values are to be entered Used when required similar to n...

Page 87: ...s associated with them and are described later in this chapter A bullet next to a line indicates that BIOS setup detected a configuration error and attempted to correct it The Save Settings options saves any changes that you have made so far The Restore Settings option restores the settings that were in effect when you started the BIOS Setup utility with the exception of the Date and Time settings...

Page 88: ...ou to select the I O ports and interrupts used by the two serial ports It is best to leave these at the default settings Do not disable the serial ports unless you are absolutely sure you are not going to need them Port B will be greyed out on those systems which are provided with an infra red remote receiver Parallel port This allows you to set the I O port and interrupt used by the parallel port...

Page 89: ...y disable this setting Diskette drive A B This lets you specify what diskette and floppy disk drives are fitted Diskette drive A is fitted by default and is invariably a 1 44 Mbytes 3 5 drive You will not be required to change this setting Video Setup This details the video controller and details the size of the video memory IDE Controller This option enables the use of the hard drives connected t...

Page 90: ...ransfer Mode You can either select Manual or Automatic If you select manual then you will be required to specify the transfer mode of the hard disk drive Logical Block Address LBA Mode Select Supported if your hard disk drive is 8 Gbytes or larger as LBA mode offers significant performance benefits Date and Time Use this to adjust the motherboard s Real Time Clock RTC This clock is maintained by a...

Page 91: ...ype the password in the Enter Power on Password box then press the DOWN ARROW key To preserve confidentiality the password is not displayed as you type it 2 Type the password once more in the Enter Power on Password Again box 3 If you want the computer to ask for the power on password ensure that Password Prompt is set to On If this option is set to Off the computer will still require the password...

Page 92: ... user is allowed three attempts to enter the correct password If they fail the computer is locked and must be switched off Turning the computer on again restarts the sequence To delete a power on password 1 In the Power on Password dialog choose the Delete Power on Password option A dialog asks you to confirm that you want to delete the existing power on password 2 Press ENTER to confirm Administr...

Page 93: ...diskette drive and report an error if the drive is faulty or missing If Enabled POST will omit the test and continue provided that another boot device is available i e the hard disk drive Displayless Operation If this option is Disabled POST will look for an attached monitor and report an error an error if it is faulty or missing if Enabled POST will allow the computer to start without a monitor K...

Page 94: ...rmally need to be changed Power On Self Test The POST can be selected to either run only a Quick set of tests or a more thorough but longer Enhanced set Virus Detection If this option is Enabled each time the computer boots the BIOS will check the startup device to find if a boot sector virus has crept in This is not an infallible check against the newer types of viruses but it can help Advanced S...

Page 95: ...e chapter entitled Expansion Cards for more information about addressing expansion card ROM Note that the two 32 Kbytes areas from E0000h to E7FFFh and E8000h to EFFFFh cannot be shadowed independently of the system BIOS ROM Caution Caution Shadowing is only appropriate for expansion card ROM It must not be enabled for expansion card RAM PCI Options The only configurable PCI option is Palette Snoo...

Page 96: ...e chapter entitled Expansion Cards for more information about the resources used by expansion cards Error Log Any errors reported during the POST routine will be logged in the Error log It will contain the last three errors detected and can be cleared Power Management The power management features provided aim to reduce the average amount of electricity consumed by your computer The Power Manageme...

Page 97: ...system continue to run although slowly You can wake up the computer again by moving the mouse or pressing any keyboard key Hard disk power saving If this option is Enabled the hard disk drive will stop spinning or spin down after 20 minutes of inactivity If Disabled then the hard disk will spin down only when the Standby button on the front of the machine is pressed Monitor control This option is ...

Page 98: ... Time of day not set preboot 1762 Hard disk configuration 164 Memory size does not match CMOS 1780 Fixed disk 0 failure 165 Add remove MC card 1781 Fixed disk 1 failure 166 Memory configuration change 1782 Fixed disk 2 failure 175 Bad EEPROM CRC 1 1783 Fixed disk 3 failure 176 System tampered 1800 No more IRQ available 177 Bad PAP checksum 1801 No more room for option ROM 178 EEPROM is not functio...

Page 99: ...EVGA 1280 x 1024 EVGA 1024 x 768 SVGA 800 x 600 VGA 640 x 480 Cache On board Pipeline burst 256 Kb or 512 Kb modules with integral Tag RAMs Audio Optional On board Creative Labs Vibra 16CL Internal FM synthesiser I O ports Serial Two 9 way male D Type RS 232 Parallel 25 way female D type EPP ECP compatible Keyboard Win 95 keyboard AT compatible Mouse PS 2 compatible two button USB Optional Dual st...

Page 100: ...e The PSU voltage range is initially set to that appropriate for the country in which it is first sold Setting AC Voltage Frequency 115V 100 to 127V 50 to 60 Hz 230V 200 to 240V 50 to 60 Hz Warning The power cord supplied with the system complies with the safety standards applicable to the country in which it was originally sold You should consult an Apricot dealer before using the system in anoth...

Page 101: ...described in Chapter 3 Using your computer of this manual If you ever forget your usual password you can use the fall back password instead To keep the fall back password secure it is displayed only once the first time that you use the anti theft features That is why you must make a note of the fall back password and keep it safe You should record the password in the space provided below then stor...

Page 102: ...MITSUBISHI ELECTRIC PC DIVISION APRICOT COMPUTERS LIMITED 3500 PARKSIDE BIRMINGHAM BUSINESS PARK BIRMINGHAM B37 7YS UNITED KINGDOM Tel 44 0 121 717 7171 Fax 44 0 121 717 3692 http www apricot co uk ...

Reviews: