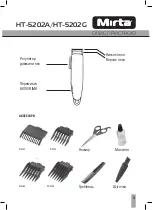


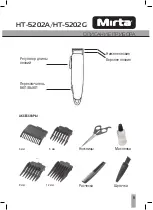


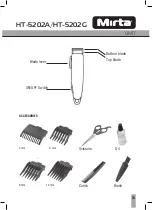


HT-5202A/HT-5202G
17
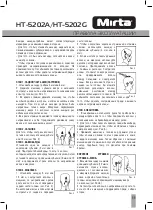
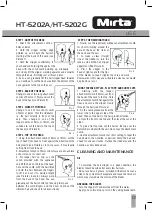
STEP 1. NAPE OF THE NECK
1. Attach the attachment comb of
3mm or 6mm.
2. Hold the clipper cutting edge
pointed up and begin the haircut,
starting at the base of the neck (see
Picture 1).
3. Hold the clipper comfortably in
your hand and hold slightly against the
head with the comb teeth pointing up. Gradually
and slowly lift the clipper, working upwards and outwards
through the hair, trimming just a little at a time.
4. As you cut, gradually lift the hair clipper head towards
you. Continue to cut the back area from the bottom of the
neck upwards to the top of the ears.
STEP 2. BACK OF THE HEAD
Change to one of two long attachment
combs of 9mm or 12mm and cut the
back of the head (see Picture 2).
STEP 3. SIDES OF THE HEAD
Change to one of two short combs
of 3mm or 6mm. Trim the sideburns,
i.e. the hair directly in front of the
ears. Then change to one of the
longer combs of 9mm or 12mm, and
continue to cut the hair to the top of
the head (see Picture 3).
STEP 4. TOP OF THE HEAD
1. Using the attachment comb of 9mm or 12mm, cut the
top of head from back to front against the direction of the
hair growth (see Picture 4). In some cases, it may require
cutting from front to back.
2. Attachment combs of 3mm or 6mm are used to achieve
a short crew cut or short cut.
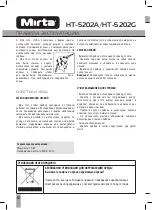
3. For longer hair on top, use the
comb provided with the appliance
and lift the hair on the top of the head.
Cut over the comb, with the hair lifted
or hold the hair between the fingers
to lift it and cut it to desired length
(see Pictures 5 and 6). Always work
from the back of the head. You can
gradually cut the hair shorter by reducing the space
between the comb/fingers and the head. Comb out the
trimmed hair and check for uneven strands.
Pic. 1
Pic. 2
Piс. 3
Рiс. 4
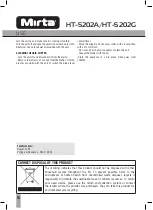
STEP 5. THE FINISHING TOUCH
1. Finally, use the taper lever without an attachment comb
for short trimming around the
base of the neck, the sides of
the neck and the ears.
2. To make a clean straight
line at the sideburns, turn the
reverse side of the hair clipper
uppermost (See Picture 5).
3. Press the clipper to the
head at right angle for the tips
of the blades to touch slightly the skin and work
downwards. In this way you will obtain a clean cut as would
be given by a razor.
SHORT TAPERED STYLES. ‘FLAT TOPS’ AND SHORT CUTS
1. Starting with the longest
attachment comb (12mm), cut from
the back of the neck to the top. Hold
the attachment comb flat against the
head and move the clipper slowly
through the hair (see Picture 6).
2. Do the same procedure from the
lower side to the upper side of the
head. Then cut the hair in the hair growth direction,
i.e. from the front to the top and then level the cut at the
sides.
3. To give a flat top look, cut the hair on the top over the
flat comb provided with the unit. Do not use the attachment
comb.
4. Use the attachment combs for short cutting to taper the
hair down to the neckline as desired. Comb the hair and
check for uneven strands. Outline the sideburns and the
neckline, as described above.
CLEANING AND MAINTENANCE
OIL
- To maintain the hair clipper in a peak condition, the
blades should be oiled after every few haircuts.
- Do not use hair oil, grease, oil mixed with kerosene or any
solvent. Any solvent will evaporate and leave the thick oil,
which may slow down the motion of the blades.
GREASING THE BLADES
- Turn the clipper off and disconnect from the mains.
- Apply one or two drops of oil on the cutting blade teeth,
Рiс. 5
Рiс.6
USE
Summary of Contents for HT- 5202A
Page 1: ...Mirta HT 5202G HT 5202A HT 5202B...
Page 2: ...5202A HT 5202G 2...
Page 3: ...HT 5202A HT 5202G 2...
Page 4: ...HT 5202A HT 5202G 3 3 6 9 12...
Page 5: ...HT 5202A HT 5202G 4 1 2 1 1 2 3 4 1 3 2 6 3...
Page 7: ...HT 5202A HT 5202G 6 6 2 3 4 6 10 230 50...
Page 8: ...5202A HT 5202G 2...
Page 9: ...HT 5202A HT 5202G 8...
Page 10: ...HT 5202A HT 5202G 9 3 6 9 12...
Page 11: ...HT 5202A HT 5202G 10 1 2 1 1 2 3 4 1 3 2 6 3 9 4 12 5 6...
Page 13: ...HT 5202A HT 5202G 12 3 4 6 10 230 50...
Page 20: ......
Page 21: ......
Page 25: ......
Page 26: ...Mirta 24 Mirta 1 2 Mirta 3 4 5 I 1 24 2 30 3 II III 1 2 IV 1 2 3 4...
Page 27: ...5 V VI...
Page 28: ...Mirta 24 Mirta 1 2 Mirta 3 4 5 I 1 24 2 30 3 II III IV 1 2 3 4...
Page 29: ...5 V VI...
Page 32: ...1010 132 2 24 11 2002 N 506 2 N 1...
Page 33: ...3 N 2...
Page 34: ..._____ _______ 20__ _____ _______ 20__ _____ _______ 20__...
Page 35: ......
Page 36: ...5 N 4 N__________________ _____ __ N _________ 5 N 4 N__________________ _____ __ N _________...
Page 37: ...1010 132...
Page 38: ......