background image

INSTALLATION GUIDE

Please record product serial number.

S N

Parker

TM

 - Tub Shower

PT516L/R, PT520L/R


Parker

TM

 - 1 Piece Tub Shower

PT513L/R, PT523L/R


Parker

TM

 - 3 Piece Tub Shower

 

The Acrylic Tub Shower was carefully inspected and packed for 

shipment. You should check your unit and if there are any 
problems, contact your dealer before installation. 

 

Protect the tub shower from dirt and damage by leaving the 

polyethylene protective film in place until installation and other 
related construction are complete.

IMPORTANT

TOOLS AND MATERIALS REQUIRED

Tools:

 Tape Measure, Electric Drill, Drill Bit (3/16”), Level, Hole Saw 

and Caulking Gun

Materials:

 Mildew Resistant Silicone Bathroom

Caulking, Drywall Screws and Shims 

(if required)

.

Assembly and installation of this shower unit requires 2 persons.
To cut plumbing fixture openings on the tub shower unit:

 

Use correct size hole saw based on selected fixture design.

 

Cut from the finished side of the unit.

 

Use masking tape to mask the surrounding surface to prevent 

scratches and other damages.

CAUTION

General Installation Notes

Dimensions are clear openings. Refer to specification sheet for 

dimensions of shower unit.

 

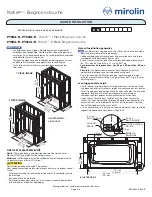
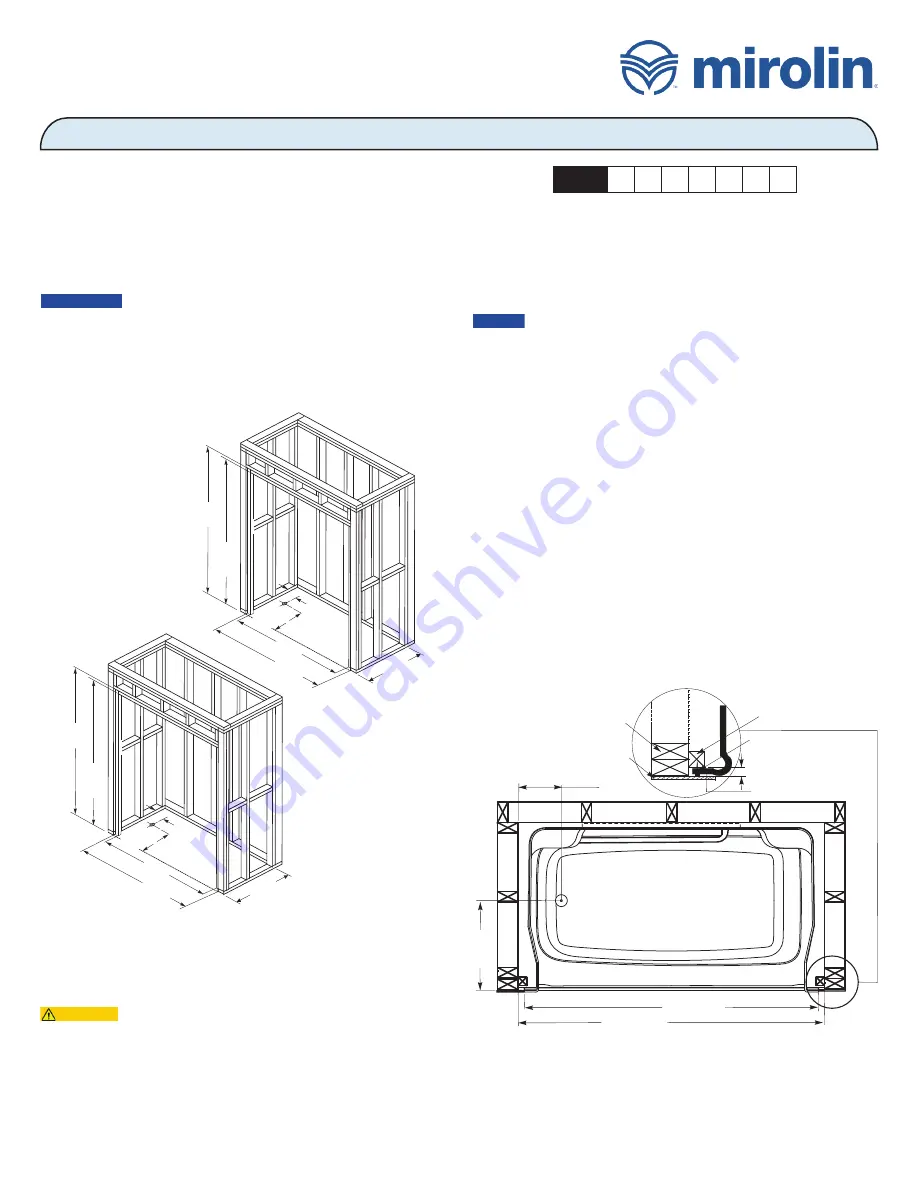
The Tub Shower is to fit into formed recess as shown in Figure 1 and 2.

 

Clear opening is required with the flange outside of the opening: 1 PC - 

57 ½” x 88 ½” and 3 PC- 57 ½ ”X84 ½” 

 

Rough- in dimensions:

 1PC- 60”x90” and 3PC- 60”x86”

 

Framing

: Inside dimension of the studded alcove are to be as specified 

in Figure 1.

 

Follow Figure 2 as specified to ensure width is 57 ½” between the 2” x 

2” recessed studs. 

(See detail view.)

Shimming May Be Required

 

The unit will rest on the front edge and the two legs at the rear of the 

unit. Shims may be required to level the tub to ensure adequate 
drainage. Insert the bottom section in the alcove and shim accordingly. 
Then remove and assemble as per instructions.

 

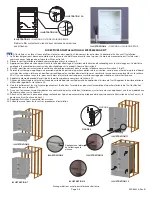
The shower is fastened in place using dry wall screws. Holes are to be 

drilled in the flange on both sides and across the top. The holes are to 
be drilled by the installer, installation is illustrated in figures 3 and 3A.

 

If there is a gap at the seam on the front post, then shim the flange as 

illustrated in Figure 3B.

NOTICE

FIGURE 1

 - 

LAYOUT 

DIMENSIONS


3 PC FRAME

1 PC FRAME

32 ½

ʺ

825 mm

    57 ½

ʺ

1461 mm

   60 ½

ʺ

1537 mm

  88 ½

ʺ

2248 mm

    90

ʺ

2286 mm

   8 ½

ʺ

215 mm

   17 

½

ʺ

   445 mm

33 ½

ʺ

851 mm

  84 ½

ʺ

2146 mm

    86

ʺ

2184 mm

    57 ½

ʺ

1461 mm

   60 ½

ʺ

1537 mm

   8 ½

ʺ

215 mm

   17 

½

ʺ

   445 mm


17 

½

ʺ


 445 mm

   57 ½

ʺ

1461 mm

   60 ½

ʺ

1537 mm

  8 ½

ʺ

216 mm

2

ʺ

 x 4

ʺ


WOOD BLOCK

DRYWALL

2

ʺ

 X 2

ʺ

WOOD BLOCK

3/8

ʺ

DRYWALL

SCREW

TUB FLANGE

FIGURE 2

Page 1 - 8

Save manual for future reference.

R0084314, Rev B

Summary of Contents for Parker PT516L/R

Page 1: ...ormed recess as shown in Figure 1 and 2 Clear opening is required with the flange outside of the opening 1 PC 57 x 88 and 3 PC 57 X84 Rough in dimensions 1PC 60 x90 and 3PC 60 x86 Framing Inside dimension of the studded alcove are to be as specified in Figure 1 Follow Figure 2 as specified to ensure width is 57 between the 2 x 2 recessed studs See detail view Shimming May Be Required The unit will...

Page 2: ...middle section carefully into the tub section See Figures 7 8 9 5 Lock the system by applying moderate pressure from the upper portion of the mid section lock with the back snap first then followed by the two side snaps When in locked position the two sections should align and fill the gap as shown in Figure 10 If there is a gap at the seam then unlock and adjust the section to ensure centering to...

Page 3: ...FINISHING Apply trim around the tub shower periphery to finish drywall if required Install the tub shower door according to the manufacturer s instructions if purchased INSTALLATION CLEAN UP Remove construction dirt and residue with a mild liquid detergent DO NOT USE abrasive cleaners scouring compounds and pads metal scrapers steel wool or other materials that could damage or dull the surface of ...

Page 4: ...r des éraflures et d autres dommages ATTENTION Notes d installation générales Les dimensions sont des ouvertures libres Voir la fiche technique pour les dimensions de l unité de douche La douche baignoire est conçue pour être encastrée dans une forme semblable à celle illustrée aux figures 1 et 2 Éclaircir l ouverture est exigée avec l extérieur de bride de l ouverture 1 pc 57 po x 88 po et 3pc 57...

Page 5: ...s la section inférieure comme illustration 7 8 et 9 5 Fermez le système par appliquer une pression modérée à partir de la partie supèrieur de la mi section serrure avec arrière de rupture d abord suivi des deux snaps latéraux en position verrouillée que les sections devraient aligner et combler la lacune comme représenté sur le schéma 10 si Il y a une espace la couture pour ouvrir alors et ajuster...

Page 6: ...secs de finition s il y a lieu Installez la porte de la douche selon les instructions des manufacturer si acheté NETTOYAGE DE L INSTALLATION Enlevez la saleté et les résidus de construction avec un détergent liquide doux NE PAS UTILISER des nettoyants abrasifs des tampons de récurage des grattoirs métalliques de la laine de verre ni d autres matériaux qui pourraient endommager ou ternir la surface...

Page 7: ... REPLACEMENT PARTS A warranty claim may be made and replacement parts may be obtained by calling 1 800 MIROLIN 1 800 647 6546 or by contacting us by mail e mail or online as follows please include your model number serial number and date of purchase MirolinIndustries Corp 350 South Edgeware Road St Thomas Ontario N5P 4L1 E mail support mirolin com Online support mirolin com DO NOT USE CERTAIN CLEA...

Page 8: ...POUR OBTENIR UN SERVICE SOUS GARANTIE OU DES PIÈCES DE RECHANGE Une réclamation sous garantie peut être effectuée et des pièces de rechange peuvent être obtenues en composant le 1 800 MIROLIN 1 800 647 6546 ou en communiquant avec nous par la poste par courriel ou en ligne comme suit veuillez indiquer votre numéro de modèle numéro de série et date d achat Mirolin Industries Corp 350 South Edgeware...

Reviews: