background image

28 (2181)

REPAIR GUIDE

E

0139

0139

0139

0139

0139

9611-1620-07

9611-1620-07

9611-1620-07

9611-1620-07

9611-1620-07

1001

1001

1001

1001

1001

1171

1171

1171

1171

1171

9744-1630-01

9744-1630-01

9744-1630-01

9744-1630-01

9744-1630-01

9761-2055-07(2)

9761-2055-07(2)

9761-2055-07(2)

9761-2055-07(2)

9761-2055-07(2)

9748-1745-01(2)

9748-1745-01(2)

9748-1745-01(2)

9748-1745-01(2)

9748-1745-01(2)

9611-2035-07

9611-2035-07

9611-2035-07

9611-2035-07

9611-2035-07

1171

1171

1171

1171

1171

5147

5147

5147

5147

5147

5123(3)

5123(3)

5123(3)

5123(3)

5123(3)

1523

1523

1523

1523

1523

1520

1520

1520

1520

1520

0154

0154

0154

0154

0154

9747-1730-07

9747-1730-07

9747-1730-07

9747-1730-07

9747-1730-07

0152

0152

0152

0152

0152

9747-1725-07

9747-1725-07

9747-1725-07

9747-1725-07

9747-1725-07

5133

5133

5133

5133

5133

1811

1811

1811

1811

1811

9747-1750-07

9747-1750-07

9747-1750-07

9747-1750-07

9747-1750-07

1002

1002

1002

1002

1002

9748-2050-07(2)

9748-2050-07(2)

9748-2050-07(2)

9748-2050-07(2)

9748-2050-07(2)

1171

1171

1171

1171

1171

9746-2030-01(2)

9746-2030-01(2)

9746-2030-01(2)

9746-2030-01(2)

9746-2030-01(2)

9749-2050-07(2)

9749-2050-07(2)

9749-2050-07(2)

9749-2050-07(2)

9749-2050-07(2)

1172

1172

1172

1172

1172

9746-2030-01(3)

9746-2030-01(3)

9746-2030-01(3)

9746-2030-01(3)

9746-2030-01(3)

9746-2030-01

9746-2030-01

9746-2030-01

9746-2030-01

9746-2030-01

Fig. 1

Fig. 1

Fig. 1

Fig. 1

Fig. 1

Fig. 2

Fig. 2

Fig. 2

Fig. 2

Fig. 2

Fig. 3, 4, 5

Fig. 3, 4, 5

Fig. 3, 4, 5

Fig. 3, 4, 5

Fig. 3, 4, 5

Fig. 6

Fig. 6

Fig. 6

Fig. 6

Fig. 6

How to replace "SHUTTER ASSY"

By using this method for exchanging "SHUTTER ASSY",
you do not have to perform adjustment of CCD perspective
and adjustment of center part of CCD.
Disassemble it in order of step 1 to 11.
Do these action when mirror is up. (See Page 9 Fig 5-1)

SHUTTER ASSY

SHUTTER ASSY

SHUTTER ASSY

SHUTTER ASSY

SHUTTER ASSY

AF CHARGE ASSY

AF CHARGE ASSY

AF CHARGE ASSY

AF CHARGE ASSY

AF CHARGE ASSY

Summary of Contents for DYNAX 7

Page 1: ...tting items 32 Using HIT System 33 Adjustment Check items available with 2181 ROM Pack 34 Viewfinder Back Adjustment 35 Manual Set SS X Sync Time lag Check 36 Manual Set SS Adjustment 37 SPC Position...

Page 2: ...s use cleaning paper or cloth Never use thinner ketone ether 2 When installing plastic parts insert the specific screws vertically to the parts Be careful not to tighten too much PCBs Since PCBs use M...

Page 3: ...ivate without exterior parts Short circuit the pattern a of I O FLEXIBLE ASSY with solder When using replacement I O FLEXIBLE ASSY no need to short these patterns because it has pattern b Before insta...

Page 4: ...07 9611 1620 07 9611 1620 07 9611 1620 07 9611 1620 07 4904 4904 4904 4904 4904 4909 4909 4909 4909 4909 9747 9747 9747 9747 9747 1770 15 1770 15 1770 15 1770 15 1770 15 9747 1750 15 9747 1750 15 974...

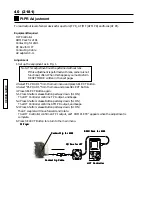
Page 5: ...2 White Orange Yellow Connector Connector Connector Connector Connector Fig 1 Removal the BACK COVER ASSY Fig 1 Removal the BACK COVER ASSY Fig 1 Removal the BACK COVER ASSY Fig 1 Removal the BACK COV...

Page 6: ...6 2181 REPAIR GUIDE...

Page 7: ...384 2190 50 9384 2190 50 5x5mm 5x5mm 5x5mm 5x5mm 5x5mm 1173 1173 1173 1173 1173 1171 4 1171 4 1171 4 1171 4 1171 4 9748 2050 07 4 9748 2050 07 4 9748 2050 07 4 9748 2050 07 4 9748 2050 07 4 5147 5147...

Page 8: ...SY I O FLEXIBLE ASSY I O FLEXIBLE ASSY I O FLEXIBLE ASSY I O FLEXIBLE ASSY Fig 1 Removal the I OFLEXIBLE ASSY Fig 1 Removal the I OFLEXIBLE ASSY Fig 1 Removal the I OFLEXIBLE ASSY Fig 1 Removal the I...

Page 9: ...ntil the mirror raises completely completely completely completely completely DC Power Supply DC Power Supply DC Power Supply DC Power Supply DC Power Supply 2V 1A 2V 1A 2V 1A 2V 1A 2V 1A Driver Drive...

Page 10: ...5x5mm 5x5mm 5x5mm See pg 13 19 See pg 13 19 See pg 13 19 See pg 13 19 See pg 13 19 9749 2050 07 2 9749 2050 07 2 9749 2050 07 2 9749 2050 07 2 9749 2050 07 2 9746 2030 01 3 9746 2030 01 3 9746 2030 0...

Page 11: ...7 2 9747 1740 07 2 9747 1740 07 2 9747 1740 07 2 1073 1073 1073 1073 1073 Fig 6 Fig 6 Fig 6 Fig 6 Fig 6 1072 1072 1072 1072 1072 9747 1740 9747 1740 9747 1740 9747 1740 9747 1740 07 3 07 3 07 3 07 3 0...

Page 12: ...22 1022 1022 1022 1022 4907 4907 4907 4907 4907 DD BOARD ASSY DD BOARD ASSY DD BOARD ASSY DD BOARD ASSY DD BOARD ASSY Solder Solder Solder Solder Solder FLASH BOARD ASSY FLASH BOARD ASSY FLASH BOARD A...

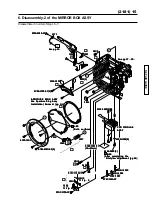
Page 13: ...5 07 2 9747 1735 07 2 B B B B B B 20 B 20 B 20 B 20 B 20 See pg 7 See pg 7 See pg 7 See pg 7 See pg 7 B B B B B B 60 B 60 B 60 B 60 B 60 5 Disassembly 1 of the MIRROR BOX ASSY Disassemble it in order...

Page 14: ...3 Fig 3 Fig 3 Fig 3 DIOPTER SPRING DIOPTER SPRING DIOPTER SPRING DIOPTER SPRING DIOPTER SPRING DIOPTER CAM DIOPTER CAM DIOPTER CAM DIOPTER CAM DIOPTER CAM DIOPTER ADJUSTMENT SHAFT A DIOPTER ADJUSTMEN...

Page 15: ...2162 2659 3 2162 2659 3 2162 2659 3 2082 5054 3 2082 5054 3 2082 5054 3 2082 5054 3 2082 5054 3 2162 2658 3 2162 2658 3 2162 2658 3 2162 2658 3 2162 2658 3 9384 2391 20 9384 2391 20 9384 2391 20 9384...

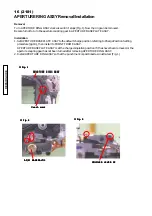
Page 16: ...he aperture coupling gear in APERTURE BASEPLATE ASSY Installation 1 Set APERTURE BASEPLATE ASSY to the default charge position referring to Charge Position Setting procedure pg 18 then install to FRON...

Page 17: ...110 2162 5110 2162 5111 2162 5111 2162 5111 2162 5111 2162 5111 9747 1730 07 2 9747 1730 07 2 9747 1730 07 2 9747 1730 07 2 9747 1730 07 2 5806 5806 5806 5806 5806 B B B B B B 50 B 50 B 50 B 50 B 50 7...

Page 18: ...ure reduction gear in the direction opposite to the spring location a or b in Fig 2 until the spring leg moves over to the other side e g IF the spring lies at a in Fig 2 turn the gear toward a in Fig...

Page 19: ...RIVE LEVER MIRROR DRIVE LEVER MIRROR DRIVE LEVER MAIN MIRROR DRIVE LEVER ASSY MAIN MIRROR DRIVE LEVER ASSY MAIN MIRROR DRIVE LEVER ASSY MAIN MIRROR DRIVE LEVER ASSY MAIN MIRROR DRIVE LEVER ASSY MAIN M...

Page 20: ...2162 1491 2162 1477 2 2162 1477 2 2162 1477 2 2162 1477 2 2162 1477 2 9758 0150 00 2 9758 0150 00 2 9758 0150 00 2 9758 0150 00 2 9758 0150 00 2 2162 1475 2162 1475 2162 1475 2162 1475 2162 1475 2162...

Page 21: ...171 1171 1171 9747 1750 07 9747 1750 07 9747 1750 07 9747 1750 07 9747 1750 07 1403 1403 1403 1403 1403 9384 2190 50 2 9384 2190 50 2 9384 2190 50 2 9384 2190 50 2 9384 2190 50 2 5x5mm 5x5mm 5x5mm 5x5...

Page 22: ...each dent its projections to each dent its projections to each dent its projections to each dent Fit part a of 2162 1474 between the longest Fit part a of 2162 1474 between the longest Fit part a of...

Page 23: ...1480 to install of 2162 1470 1480 to install of 2162 1470 1480 to install of 2162 1470 1480 to install Projection Projection Projection Projection Projection Projection Projection Projection Projecti...

Page 24: ...2098 1353 2098 1353 1437 1437 1437 1437 1437 2098 1354 2098 1354 2098 1354 2098 1354 2098 1354 9747 1730 07 9747 1730 07 9747 1730 07 9747 1730 07 9747 1730 07 1420 1420 1420 1420 1420 1429 1429 1429...

Page 25: ...384 2290 90 3 9384 2290 90 3 10x17mm 10x17mm 10x17mm 10x17mm 10x17mm Stick 9384 2290 90 to the designated position Stick 9384 2290 90 to the designated position Stick 9384 2290 90 to the designated po...

Page 26: ...3 9612 2045 07 3 B B B B B B 10 B 10 B 10 B 10 B 10 1171 1171 1171 1171 1171 See pg 7 See pg 7 See pg 7 See pg 7 See pg 7 10 Disassembly of the CCD ASSY DC JACK HOLDER If CCD ASSY 2181 1001 is exchan...

Page 27: ...1127 9747 9747 9747 9747 9747 1730 07 2 1730 07 2 1730 07 2 1730 07 2 1730 07 2 2162 1432 2162 1432 2162 1432 2162 1432 2162 1432 2162 1433 2162 1433 2162 1433 2162 1433 2162 1433 9747 1425 07 2 9747...

Page 28: ...50 07 9747 1750 07 9747 1750 07 9747 1750 07 1002 1002 1002 1002 1002 9748 2050 07 2 9748 2050 07 2 9748 2050 07 2 9748 2050 07 2 9748 2050 07 2 1171 1171 1171 1171 1171 9746 2030 01 2 9746 2030 01 2...

Page 29: ...Solder Solder Connector Connector Connector Connector Connector Lead wires Lead wires Lead wires Lead wires Lead wires Solder Solder Solder Solder Solder Solder Solder Solder Solder Solder AF COUPLER...

Page 30: ...acy with Built in Flash Grayscales Color Reproduction Current Consumption B C Voltage Removed Replaced Removed Replaced Removed Replaced Removed Replaced Removed Replaced Removed Replaced Viewfinder B...

Page 31: ...AE GAIN DEFECT PIXEL WB SHAKE GAIN Resolving Power Exposure Accuracy Exposure Accuracy with Built in Flash Grayscales Color Reproduction Current Consumption B C Voltage TEBURE ASSY 0901 Parts Adjustme...

Page 32: ...t the adjustment should be completed None Unrelated adjustment and setting items possible to adjust and set solely Related adjustment Adjustment Viewfinder Back SPC Position Manual Set SS PI PR Apertu...

Page 33: ...HIT Controller HIT Controller HIT Controller HIT Controller HIT I F Box HIT I F Box HIT I F Box HIT I F Box HIT I F Box CONTACT JIG FOR 2181 CONTACT JIG FOR 2181 CONTACT JIG FOR 2181 CONTACT JIG FOR 2...

Page 34: ...AREA ADJ P 43 PITCH YAWADJ P 44 EZADJ P 46 EZCHECK P 45 ASSIST MODE TROUBLE CODE TROUBESHOOTING CHART P 2 FLASH CHARGE ON OFF P 3 MATTE TYPE SET SUPPLE P 1 In case peforming SPC position adjustment P...

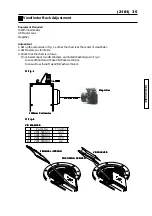
Page 35: ...s Make VB Washers thinner In case of rear focus Make VB Washers thicker Parts No T mm A 2181 5045 01 0 05 B 2181 5046 01 0 1 C 2181 5047 01 0 15 D 2181 5048 01 0 2 1000mm Collimator 1000mm Collimator...

Page 36: ...ence between Max and Min value among range A B and C within 0 6EV Difference between range A B B C within 0 3 With in 0 30EV Shutter speed Item Allowance X sync delay time 0 3 ms or longer From X ON t...

Page 37: ...top Press Control Pad while pressing and holding Button B 7 Press Shutter release Button partway down COMPLETE appears when adjustment is complete S1 ON 8 Press SELECT Button to return to the main men...

Page 38: ...Align Spot Metering Circle with Align Spot Metering Circle with brackets on the chart brackets on the chart brackets on the chart brackets on the chart brackets on the chart Contact jig for 2181 Cont...

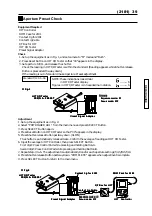
Page 39: ...automatically done for each aperture settings f 4 5 f 9 5 f 19 8 Press Shutter release Button partway down COMPLETE appears when adjustment is complete 9 Press SELECT Button to return to the main men...

Page 40: ...tton partway down S1 ON The AF coupler will move forward and rotate The HIT Controller confirms AF PI output and COMPLETE appears when the adjustment is complete 6 Press SELECT Button to return to the...

Page 41: ...cation is terminated in the camera 7 Press SELECT Button to return to sub menu 8 Disconnect AC Adapter 9 Connect AC Adapter again After connecting to the AC Adapter PI PR Adjustment is automatically e...

Page 42: ...and adjustment Flood Lamp AF Area and Pitch Yaw adjustment color temperature of 2800 degrees K and brightness higher than or equal to EV 10 ROM Pack for 2181 ROM Pack for 2181 ROM Pack for 2181 ROM P...

Page 43: ...and holding Shutter release Button partway down S1 ON to return to the previous menu AF Chart III for 2163 AF Chart III for 2163 AF Chart III for 2163 AF Chart III for 2163 AF Chart III for 2163 5th...

Page 44: ...Screw as in Fig 4 so that reading is within the standard 7 Press SELECT Button while pressing and holding Shutter release Button partway down S1 ON to return to the previous menu Check Perform AF Area...

Page 45: ...land group and 8th island group use AF Chart II for 2163 upside down Standard 50 to 50 3rd 4th 6th 3rd 4th 6th 3rd 4th 6th 3rd 4th 6th 3rd 4th 6th 5th 5th 5th 5th 5th 1st 1st 1st 1st 1st 2nd 2nd 2nd 2...

Page 46: ...l COMPLETE appears after 2nd 8th ISLAND adjustment is completed 9 Press SELECT Button to return to the previous menu 2nd 8th 2nd 8th 2nd 8th 2nd 8th 2nd 8th 3rd 4th 6th 3rd 4th 6th 3rd 4th 6th 3rd 4th...

Page 47: ...on main Switch without battery Second attach battery with pushing these four buttons Menu button ISO button MSET button and WB button Turn on backlight of LCD all marks on infinder LCD and AF area ind...

Page 48: ...Set the camera to adjustment mode and then start up the 2181 adjustment program KMdsc exe Starting up the 2181 adjustment program in the adjustment mode see P 49 4 The new registration for USB is star...

Page 49: ...the window of the 2181 adjustment program 5 Select 2181 from CAMERA CODE in the window according to the display The massage changes to Please connect 2181 and click START in the window 6 Click the STA...

Page 50: ...this operation at every time you register Master Body 1 Click SAVE left side of PAST in adjustment menu 2 Save data to anywhere with any name you like For Example Save location 2181ADJ folder on Deskt...

Page 51: ...equipment PC with preinstalled the 2181 adjustment program CF card for Adjustment ACAdapterAC 11 USB 2 USB cable Use the AC adapter AC 11 not batteries when adjusting Preparation of adjustment Set ca...

Page 52: ...g the camera to after view mode If cross line is not located at the center of the screen please perform setting step 1 to step 6 again Chart Chart Chart Chart Chart Luminance must be between Luminance...

Page 53: ...te is displayed then reading Master body data is complete 4 Click END in AORI CENTER Adjustment menu 5 Click ADJUSTMENT END in adjustment menu 6 Set target camera to adjustment mode Refer to Starting...

Page 54: ...I in AORI CENTER Adjustment menu Fig 1 10 Check the numbers displayed in Aori Adjusment window whther value of C and dPI is in the range of standard value Fig 2 Standard value of C From 10 to 10 Stand...

Page 55: ...Adjustment USB 2 USB cable ACAdapterAC 11 Preparation of the adjustment Set camera to adjustment mode Refer to Starting up the 2181 adjustment program in the adjustment mode in P 49 Procedure of the a...

Page 56: ...ulti camera tester EF 8301 Master Lens PC with preinstalled the 2181 adjustment program CF card for Adjustment USB 2 USB cable ACAdapterAC 11 Preparation of the adjustment 1 Set camera to adjustment m...

Page 57: ...2 Set the camera and the measuring instrument as shown on the Fig 1 Procedure of the adjustment 1 Set the brightness of the luminance box to EV 7 2 Click GAIN of the adjustment menu The adjustment is...

Page 58: ...n P 49 2 Set the camera and the measuring instrument as shown on the Fig 1 Procedure of the adjustment 1 Set the brightness of the luminance box to EV 8 2 Click DEFECT PIXEL of the adjustment menu The...

Page 59: ...ed 5 OK is displayed on the adjustment menu then reading data is complete 6 Clikc ADJUSTMENT END 7 Exchange Master camera for target camera Be careful to exchange camera to avoid any change to the set...

Page 60: ...1 adjustment program in the adjustment mode in P 49 Procedure of the adjustment 1 Click SHAKE GAIN of the adjustment menu Take a picture in the automatic mode 2 Follow the message Please turn on shake...

Page 61: ...n of the adjustment Set camera to adjustment mode Refer to Starting up the 2181 adjustment program in the adjustment mode in P 49 Procedure of the adjustment 1 Click down arrow under the DESTINATION i...

Page 62: ...ight Procedure Managements of the chromaticity and the luminance 1 Light the light source A on 2 Measure the chromaticity coodinate x y with the chroma meter Fig 1 3 The result should be within the ra...

Page 63: ...umber of adjustment sequence 00 ff Sequence number 3 item nubmer Refer to the nexe page 4 Adjustment Item 0 Before adjustment process 00 Initialization reading version Info etc 01 0f 7 Adjustment of i...

Page 64: ...nerr Adjustment ANTI SHAKE system Adjustment ANTI SHAKE system Adjustment ANTI SHAKE system Adjustment ANTI SHAKE system 0x90 NG for CCD CENTER Adjustment 0x 01 Setting of Camera 0x 02 Communication f...

Page 65: ...cent light stand SQ 967W 7981 9012 61 Fuluorescent light FPL 27EX N 7985 1020 01 Vibrationtester 7981 9013 01 Master Lens for SHAKING 2181 0004 75 Shake Offset Chart 2 2181 0006 75 Hexangularscrewdriv...

Page 66: ...for 2181 AORI Chart for 2181 2181 0003 75 2181 0003 75 2181 0003 75 2181 0003 75 2181 0003 75 Shake Offset Chart 2 Shake Offset Chart 2 Shake Offset Chart 2 Shake Offset Chart 2 Shake Offset Chart 2 2...

Reviews: