


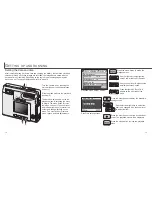


0.25m ~ 2.3m (0.8 ft. ~ 7.5 ft.)
26
27
R
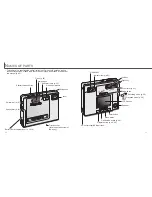
ECORDING MODE
Flash range
The camera automatically controls the flash output. For well-exposed images, the
subject must be within the flash range. Because of the optical system, the flash range
is not the same at the lens’ wide-angle position as it is at the telephoto position.
Wide-angle position
Telephoto position
0.25m ~ 2.9m (0.8 ft. ~ 9.5 ft.)
Autoflash - the flash fires automatically in low-light and backlit conditions.
Red-eye reduction - the flash fires multiple bursts before the main flash burst to
reduce red-eye; an effect caused by light reflected from the retina. Use in low-light con-
ditions when taking photographs of people or animals, the pre-flashes contract the
pupils of the subject’s eyes.
Fill-flash - the flash fires with each exposure
regardless of the amount of ambient light.
Fill-flash can be used to reduce harsh shad-
ows caused by strong direct light or sun-
shine.
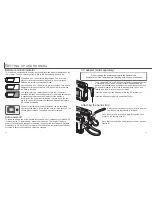
Flash modes
The flash can be used when taking still images. To set the
flash mode, simply press the flash mode button (1) on the
back of the camera until the desired mode is displayed. The
active flash mode is displayed in the top left corner of the
LCD monitor. When the camera is turned off, the flash mode
is reset to autoflash with red-eye reduction if autoflash with
red-eye reduction or night portrait was last set, if not the
mode will be reset to autoflash.
Flash signals
The indicator lamp next to the viewfinder indicates the status
of the flash. When the lamp is red and blinks quickly, the flash
is charging and the shutter will not release. When the lamp
turns green, the flash is charged and ready to fire.
Autoflash
Flash
cancel
Autoflash with
red-eye reduction
Fill-flash
Night
portrait
The flash modes are displayed in the following order:
Flash cancel - the flash will not fire. Use flash cancel when flash photography is pro-
hibited, natural light is desired to illuminate the subject, or the subject is beyond the
flash range. The camera-shake warning may appear when flash cancel is selected (p.
22).
Night portrait - for flash portraits at night. The camera
automatically balances the flash and background expo-
sures. When taking portraits, ask your subject not to move
after the flash burst; the shutter will still be open for the
background exposure. The red-eye reduction function is
used with night portrait.
1
Summary of Contents for DiMAGE image Viewer Utility
Page 1: ...INSTRUCTION MANUAL E...


