background image

Sending Faxes

4

Di 150f

4-57

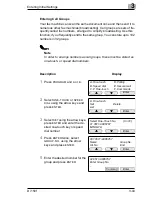
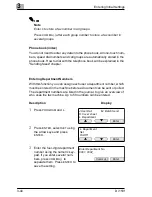
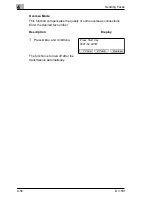
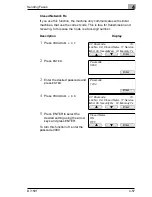
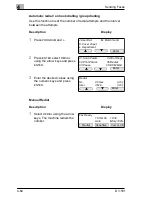
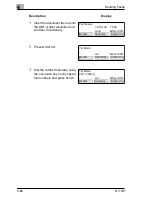
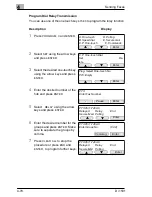
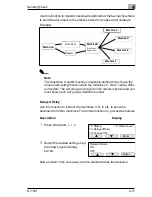
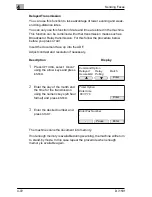
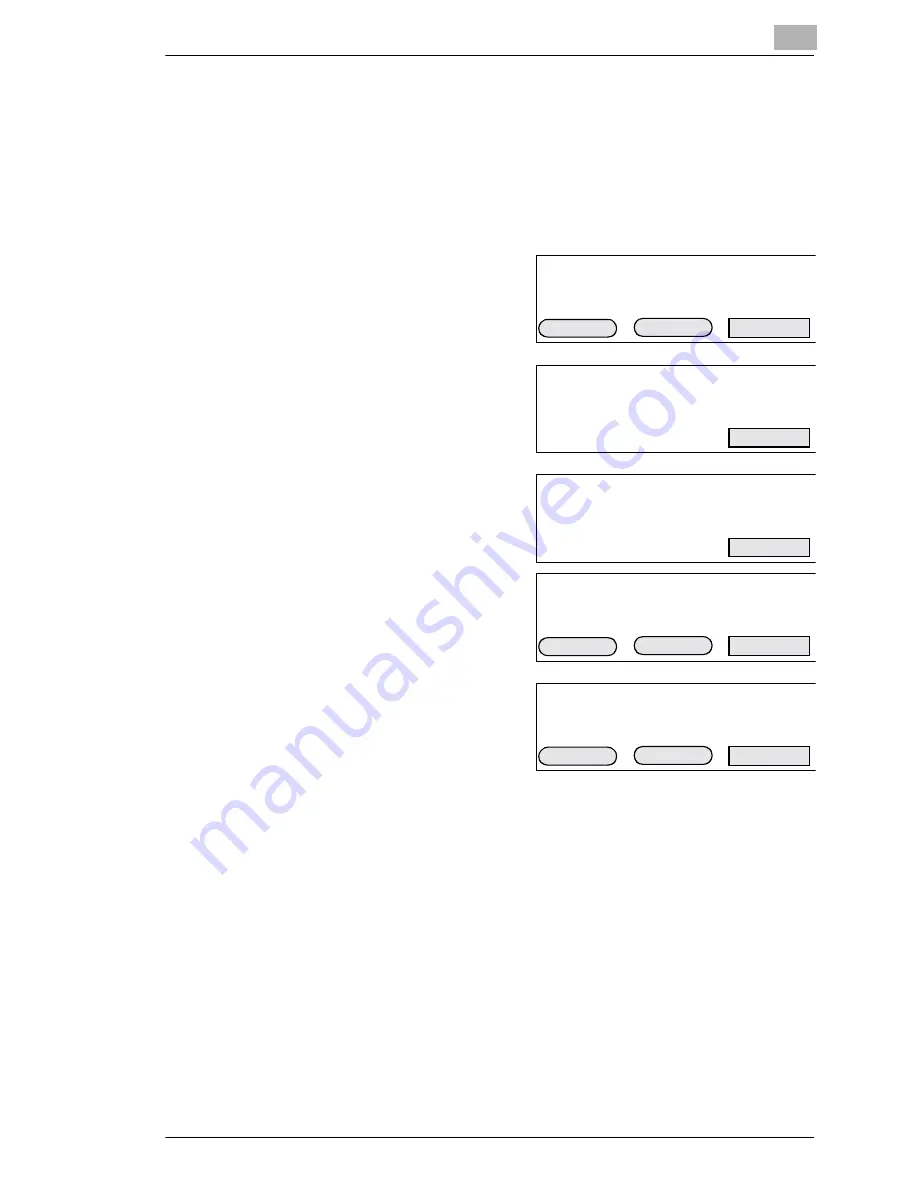
Closed Network Rx

If you use this function, the machine only communicates with similar
machines, that use the correct code. This is true for transmission and
receiving. In this case the Code is a four-digit number.

Description

Display

1

Press

PROGRAM, J, 0, 7

.

2

Press

ENTER

.

3

Enter the desired passcode and
press

ENTER

.

4

Press

PROGRAM, J, 0, 8

.

5

Press ENTER to select the
desired setting using the arrow
keys and press ENTER.

To turn this function off, enter the
passcode 0000.

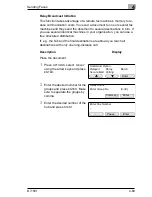
07. Passcode

10.

Lck.No. 08. Closed Netw. 11.Service
Mod. 09. SecureMail. 12. Memory Tx

Enter

Ä

Ä

Passcode
0000

Enter

Passcode
1234

Enter

07. Passcode

10.

Lck.No. 08. Closed Netw. 11.Service
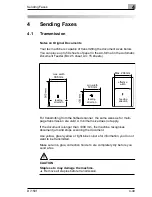
Mod. 09. Security Rx. 12. Memory Tx

Enter

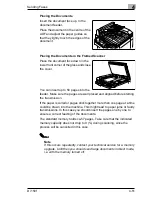
Ä

Ä

Closed Netw.
ON
OFF

Enter

Ä

Ä

Summary of Contents for Di150f

Page 1: ...The essentials of imaging www minoltaeurope com User Manual Di150f ...

Page 2: ...5 2 4 Machine Layout 16 2 5 Control Panel Displays and Keys 18 2 6 The Toner Cartridge and the Drum Cartridge 20 Installing the Toner Cartridge and the Drum Cartridge 21 2 7 Supply Paper 23 Installing the document guide 23 Installing the Paper Input Tray 23 Installing the Paper Tray 23 Replace Rx Paper 24 2 Paper Tray 25 Supply Paper to the Manual Paper Tray 26 2 8 Connecting the Power Cable and t...

Page 3: ... Department Numbers 44 Deleting Department Numbers 45 Activate Department Numbers 46 Selecting Languages 46 3 13 Module 2nd Phone Line 47 Entering Data for the 2nd Phone Line 47 4 Sending Faxes 49 4 1 Transmission 49 Notes on Original Documents 49 Photocopy or Carrying Film 50 Placing the Documents 51 Placing the Documents in the Flatbed Scanner 51 Transmission from the Feeder Memory Transmission ...

Page 4: ...mission 73 Broadcast 74 Program Broadcast 75 Polling Transmission 76 Regular Polling 76 Database Polling 77 Deleting Store Documents 77 Printing Stored Documents 78 Secure Mail 79 Setting Secure Mail as Default 80 Program Secure Mail 81 Batch Transmission 82 Setting a Box 82 Storing Documents 83 Printing Stored Documents 84 Deleting Documents from a Box 85 Deleting Boxes 86 Deleting Programmed One...

Page 5: ...pies 105 Making copies from the Multi Purpose Tray 106 6 2 Multiple Copies 107 Sort 107 6 3 Reduction Enlargement 108 7 Connecting the Fax Machine to Your Computer 109 7 1 RS 232C Interface Cable 109 Modem Specifications 109 Connecting the Fax Machine to Your Computer 110 Fax Operation with Your Computer 110 Setting the RS 232C Interface 111 Initialising 112 Receiving 112 Scanner Mode 113 Printing...

Page 6: ...he Flatbed Scanner 128 9 4 Cleaning the Casing 128 9 5 Replacing the Toner Cartridge and the Drum Cartridge 129 Replacing the Toner Cartridge 129 Replacing the Drum Cartridge 131 9 6 Clearing Paper Jams 132 Clearing Original Document Jams 132 9 7 Clearing Printout Paper Jams 133 Paper Jam in the Paper Cassette 133 Paper Jam in the Multi Purpose Tray 133 Paper Jam inside the Machine 134 9 8 Trouble...

Page 7: ...VI Di 150f ...

Page 8: ...The machine is authorised for use in the public telephone network and is compatible to other fax machines of the communication standard 3 The Di 150f was manufactured to the same high quality standards as is common for all other precision instruments made by Minolta This manual will assist you in becoming familiar with the machine It con tains all the necessary information for the start up its fun...

Page 9: ...ion you will hear shrill sounds Those sounds are the so called hand shaking and function as an introduction sequence before the actual transmission just as interlocutors often in troduce themselves at the beginning of a telephone call In the introducto ry sequence the technical features of both machines are matched to make sure the transmission and the reception are conducted to a high standard Wi...

Page 10: ...dividual PSTNs provided in different countries the approval does not of itself give an unconditional assurance of successful operation on every PSTN network termination point In cases of problems you should contact your equipment supplier in the first instance Annex III Network Compatibility Declaration This equipment has been designed to operate on the Public Switched Telephone Network The equipm...

Page 11: ... flam mable gases or liquids close to the machine l To facilitate communication always keep the machine switched on and program the correct user data Make sure to enter the correct user names l Do not unscrew any parts if not specifically requested in this manual If necessary contact your technical service l Never open the machine while it is transmitting or printing l Take care not to let humidit...

Page 12: ...eleased This amount is not large enough to harm anyone However be sure the room where the fax machine is being used has adequate ventilation especially if you are printing a high volume of material or if the fax machine is being used continuously over a long period 1 5 Features Your new fax machine is a compact multi functional device facilitating your work and reducing your fax communication time...

Page 13: ...unction Functions l Delayed transmission l Broadcasting up to 197 Destinations l Relay broadcast initiation l Batch Transmission l Multi tasking operation interface l Polling RX TX l Confidential reception mailbox transmission l Copy function Additional Functions l RS 232C PC interface optional l Use as scanner software optional l Use as PC fax software optional l Use as printer optional l Use as ...

Page 14: ...he drawing below shows what should be included in the packaging 1 Main unit 2 Document input tray 3 Paper tray 4 Document support 5 Toner cartridge 6 Drum cartridge 7 Telephone line cord 8 Power cord 9 2nd Paper tray 4 screws Bild 6 einfügen 1 2 3 4 5 6 8 7 9 ...

Page 15: ...and heaters l The machines should be easily accessible from all sides l Make sure no liquids can enter the machine l Keep all covers closed when the machine is in standby If any cover is opened no transmission or reception is possible l If any cover is opened during sending or receiving the procedure is in terrupted Avoid extreme fluctuations in temperature which could cause the humidity inside th...

Page 16: ...ly carry the machine with two persons Do not lift the machine if the 2nd paper tray is installed 1 Pull out the carrying bars and lift the machine as shown in the picture 2 Do not lift the machine holding the marked places Bild 1 einfügen Bild 2 einfügen ...

Page 17: ...ner cover 4 Scanner cover 5 Document guide 6 Document input tray 7 Document cover 8 Manual paper tray 9 Side cover of the paper tray 10 Side cover of the 2nd paper tray 11 Paper indicator 12 2nd Paper cassette 13 Paper cassettes 14 Front cover Bild 7 einfügen 1 2 3 4 5 6 7 8 9 10 11 13 12 14 ...

Page 18: ...Installation 2 Di 150f 2 17 1 Paper output 2 Paper tray 3 Mains switch 4 Power terminal 5 Line terminal Bild 9 einfügen 5 2 3 4 1 ...

Page 19: ...on re ceiving etc 15 CLEAR ALL Press this key to interrupt the actual function and return to standby 16 STOP CLEAR Use this key to interrupt all procedures manually and to cor rect typing errors 17 STAMP Press this key to stamp all correctly transmitted pages 18 MEMORY TRANSMIT Press this key to select between memory transmit and di rect transmission 19 SPEED DIAL INDEX Use this key to enter a thr...

Page 20: ...the desired func tion with the numeric keypad or the one touch keys 24 MENU Press this key to select the next menu 25 RESOLUTION Press this key to select the desired resolution Press this key to choose between NORMAL Standard FINE high resolution S FINE for documents with small print HALFTONE for photographs etc 26 CONTRAST Press this key to select the desired contrast Select from four options Num...

Page 21: ...tailed information on the care and handling of the toner cartridge is provided with the shipment of new cartridges Exchange the cartridge when toner low appears in the display approx After 6000 DIN A4 prints The drum cartridge has a service life of about 30000 pages Instructions on how to replace the cartridges are given in the chapter on maintenance Both cartridges are made of non hazardous mater...

Page 22: ...the cartridge with both hands shake it to distribute the ton er evenly 4 Place the cartridge on an even sur face Hold it with one hand and carefully pull out the seal 5 Place the toner cartridge in the drum cartridge Make sure the pins of the toner cartridge slip into the notches in the drum cartridge Bild 11 einfügen Bild 12 einfügen M3 OPEN eins von den Tonerschüttelbildern einfügen Bild 14 einf...

Page 23: ...l it clicks into place 7 Insert the cartridges carefully into the machine 8 Return levers M2 and M3 to their normal positions to lock the drum cartridge 9 Close the top cover Make sure the cover locks Bild 16 einfügen Bild 17 einfügen Bild 18 einfügen M 3 OPE N Bild 18 einfügen 9 ...

Page 24: ...apter Maintenance 2 7 Supply Paper Installing the document guide 1 Insert the guide into the appropriate holes Installing the Paper Input Tray 1 Insert the two protrusions of the tray into the appropriate holes Installing the Paper Tray 1 Insert the two protrusions of the tray into the appropriate holes Bild 26 einfügen Bild 27 einfügen Bild 28 einfügen ...

Page 25: ...input can take up to 250 sheets of paper The paper cassettes hold up to 250 sheets of A4 sized paper A4 A3 A5 B4 and B5 A4 is the standard paper size 1 Open the paper cassette 2 Adjust the paper guide according to the paper size 3 Press the paper plate down until it locks Bild 20 einfügen Bild 21 einfügen Bild 22 einfügen ...

Page 26: ...tack of paper is not higher than the marks Adjust the paper guides so that they touch the edges of the stack 5 Close the paper plate until it locks Affix the paper size sticker 2 Paper Tray The Di 150f can be equipped with up to 2 additional paper trays The ad ditional paper trays must be installed by the service For further informa tion please contact your dealer Bild 23 einfügen Bild 24 einfügen...

Page 27: ...ar as possible Note Only refill the paper after the last sheet has been drawn in from the pa per cassette If the paper is used up the lamp in the bottom right corner of the machine will light and a message appears in the display If no paper is loaded the machine receives in memory mode As soon as paper is loaded the re ceived documents are printed automatically Bild 25 einfügen ...

Page 28: ...g the telephone cord into the socket in the machine 2 Connect the telephone cable to the wall outlet Connecting the Interface Cables The RS 232C interface cable and the Centronics printer cable are available as optional equipment Plug the inter face cables into the appropriate termi nals on the back of the machine Further information is provided in the chapter Connecting the fax to your computer B...

Page 29: ...ug Press I for On press O for Off When the machine is in standby mode the display to the right will ap pear Now the machine is ready for operation Note Always leave the machine on for at least three seconds before turning it off again Otherwise it might be seriously damaged Bild von Hand Schalter einfügen FAX READY 10 OCT 98 10 32 AUTO Mem 100 REDIAL COMM CLR SCANSIZE ...

Page 30: ...e You can always interrupt the process by pressing STOP CLEAR or CLEAR ALL The setting will then not be saved If you do not press any key within 30 seconds your fax machine will return to stand by mode 3 1 Typing Conventions in this Manual If nothing else is requested all keys are to be pressed one after the other This is also the case if they are connected by a comma to facilitate the layout Pres...

Page 31: ...Note To enter spaces press one touch key 32 Press one touch key 80 to enter special characters The table shows which keys you have to press and in which order to enter the desired character E g to enter press 2 first and then 4 1 key press 2 3 4 5 6 7 8 9 E F 0 0 P p Ç É á 1 1 A Q a q ü æ í 2 2 B R b r é Æ ó 3 3 C S c s â ô ú 4 4 D T d t ä Ö ñ 5 5 E U e u à Ò Ñ 6 6 F V f v å û ø 7 7 G W g w ç ù Ø ...

Page 32: ... the user data delete all entries in the machine to make sure only the desired information is stored Description Display 1 Press PROGRAM 2 2 Press DELETE Then enter date and time Clear Settings Are you sure Erase Fax Ready 10 Oct 98 10 32 Auto Mem 100 ScanSize Redial Comm Clr ...

Page 33: ...the display on the activity report and on the oth er fax machine s printouts Description Display 1 Press PROGRAM I ENTER 2 Enter the date YYMMDD and the time 24 hour format and press ENTER to save the setting Enter Your Fax Number Enter Time 01 01 01 01 01 Enter Enter Time 98 10 10 10 32 Enter ...

Page 34: ... the faxes you send The information in the header help the receiving station to identify the sender Note If you want to enter a press the menu key To enter spaces press one touch key 32 Description Display 1 Enter your fax number and press ENTER Enter Your Fax Name Press CLEAR ALL to interrupt the process without saving the data Enter Your Fax Number _ Enter ...

Page 35: ...f your preference Tone dialling DTMF dials the number by transmitting a combination of beeps You might need it when your fax has to transmit a set of numbers which are coded as beep ing noises e g when you use the mailbox function Pulse dialling dials by transmitting a number of pulses for each dialled number Default setting is tone dialling DTMF Description Display 1 Press the arrow keys to selec...

Page 36: ...the desired setting and press EN TER to save the setting For further information see chapter Receiving 3 9 Print Settings This function prints all set data Description Display 1 Press ENTER to print the list or press STOP CLEAR to return to stand by mode Select Receive Mode Fax ready Fax Tel ready Tel Fax ready Ans Fax ready Enter Ä Ä Print Settings Enter ...

Page 37: ...as follows Description Display 1 Press MONITOR and one of the arrow keys to select the menu 2 Select the desired setting and press MONITOR 3 11 LCD Contrast 1 Turn the knob on the top left side above the display to adjust the contrast of the display Tel Mode _ Auto Mrmy 100 ScanSize Redial Comm Clr Set Volume Off Min Mid Max Ö Ö Ä Comm Clr Tel Mode _ Auto Mrmy 100 ScanSize Redial Comm Clr ...

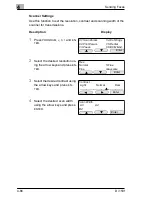
Page 38: ...or polling can be programmed for the one touch keys 73 80 Note If your Di 150f is connected to a PBX you must program a 0 as your line access number Description Display 1 Press PROGRAM and A 2 Press ENTER 3 Press the arrow keys to select SET and press ENTER 4 Press the desired one touch key press ENTER to enter the fax number using the numeric keys and press again ENTER to save the setting A One t...

Page 39: ...o enter further numbers press CLEAR ALL to return to stand by mode You can enter an alternative number for each one touch key The Di150f will dial this number if all redial attempts for the first number fail 8 Select ALT NO using the arrow keys and repeat the procedure described above Press ENTER to save the setting 01 0511 9886767 Name GroupNo Alt No End Enter Ä Ä 01 0511 9886767 Name upper Enter...

Page 40: ... dial number using the nu meric keypad and press ENTER 5 Enter the number and press EN TER to save the setting 6 Press the arrow keys to select NAME and press ENTER To enter press the menu key 7 Enter the name using the one touch keys and press ENTER to save the setting A One touch D Polling B Speed dial E Secure mail C P One touch F Commands Enter Ä Ä B Speed dial Set Delete List Enter Ä Ä Enter ...

Page 41: ...ess CLEAR ALL to return to standby mode You can enter an alternative number for each speed dial number The Di150f will dial this number if all redial attempts for the first number fail 9 Select ALT NO using the arrow keys and repeat the procedure described above Press ENTER to save the setting 001 0511 9886767 Name GroupNo Alt No End Enter Ä Ä 001 0511 9886767 Name GroupNo Alt No End Enter Ä Ä ...

Page 42: ...number Enter the new number and press ENTER 5 Enter the new name using the one touch keys and press EN TER to save the setting 6 If you want to enter further one touch keys or speed dial num bers select END using the arrow keys and repeat the procedure If you do not want to enter any further numbers press CLEAR ALL to return to standby mode A One touch D Polling B Speed dial E Secure mail C P One ...

Page 43: ...ow keys and press ENTER 3 Press the arrow keys to select DELETE and press ENTER 4 Select the desired number and press DELETE 5 Press DELETE and CLEAR ALL to return to standby mode A One touch D Polling B Speed dial E Secure mail C P One touch F Commands Enter Ä Ä A One touch Set Delete List Enter Ä Ä Select One Touch No 01 72 01 0511 9886767 MINOLTA Erase Ä Ä 01 0511 9886767 MINOLTA Are you sure E...

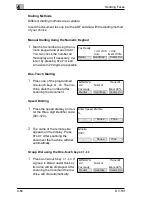
Page 44: ...r speed dial numbers Description Display 1 Press PROGRAM and A or B 2 Select ONE TOUCH or SPEED DIAL using the arrow keys and press ENTER 3 Select SET using the arrow keys press ENTER and enter the de sired one touch key or speed dial number 4 Press ENTER twice select GROUP NO using the arrow keys and press ENTER 5 Enter the desired number for the group and press ENTER A One touch D Polling B Spee...

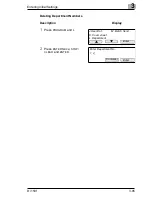
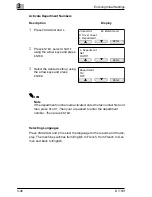
Page 45: ... function you can assign each user a department number which must be entered in the machine before a document can be sent or polled The department numbers are listed in the journal to give an overview of who uses the fax machine Up to 50 numbers can be entered Description Display 1 Press PROGRAM and L 2 Press ENTER select SET using the arrow keys and press ENTER 3 Enter the four digit department n...

Page 46: ...s 3 Di 150f 3 45 Deleting Department Numbers Description Display 1 Press PROGRAM and L 2 Press ENTER twice STOP CLEAR and ENTER J User Dat M Batch Send K Cover sheet L Department Enter Ä Ä Enter Department No 1 2_ Enter Comma ...

Page 47: ...department numbers are activated enter the fax number first and then press START Then your are asked to enter the department number Then press ENTER Selecting Languages Press PROGRAM and to select the language for the reports and the dis play The machine switches from English to French from French to Ger man and back to English J User Dat M Batch Send K Cover sheet L Department Enter Ä Ä L Departm...

Page 48: ...ata must be entered twice A 1 or 2 appears in the top right corner of the display After entering the dial type select the communication type for each line separately 1 Press the arrow keys to select the desired setting and press EN TER to save the setting 2 Press the arrow keys to select the desired setting and press EN TER to save the setting 3 Either enter the access number or the fax number dep...

Page 49: ...3 Entering Initial Settings 3 48 Di 150f ...

Page 50: ...i page transmission are valid A minimum size does not apply If the document is longer than 1000 mm the machine recognises document jam and stops scanning the document Use yellow green yellow or light blue colours for information you do not want to be transmitted Make sure ink glue correction fluid etc are completely dry before you send a fax CAUTION Staples etc may damage the machine è Remove all ...

Page 51: ...llowing characteristics must be photocopied or placed in a carrying film before they can be sent l paper sizes less than 120 mm width or less than 100 mm length l paper lighter than 50g m l folded torn wrinkled damp rough or curled papercoated or l coated or pressure sensitive paper ...

Page 52: ...gned before starting the transmission If the paper is curled or pages stick together more than one page at a time could be drawn into the machine This might lead to paper jams or faulty transmissions In this case you should insert the pages one by one to ensure a correct feeding of the documents The standard memory holds ca 57 pages Take care that the indicated memory capacity does not drop to 0 d...

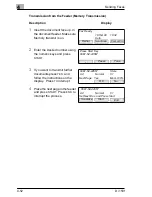
Page 53: ... START 3 If you want to transmit further documents press YES and follow the instructions on the display Press TO interrupt 4 Place the next page in the feeder and press START Press END to interrupt the process Fax Ready 10 Okt 98 10 32 Auto ScanSize Redial Comm Clr Press Start Key 0081 52 44567 Tone Pause 0081 52 44567 Store A4 Normal 01 Next Page Yes Mem 100 No O K 0081 52 44567 A4 Normal 01 Set ...

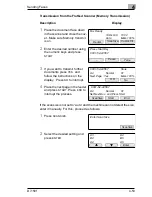
Page 54: ... to interrupt 4 Place the next page in the feeder and press START Press END to interrupt the process If the scan size is not set to auto and the machine can not detect the size enter it manually For this proceed as follows 1 Press SCANSIZE 2 Select the desired setting and press ENTER Fax Ready 10 Okt 98 10 32 Auto Mem 100 ScanSize Redial Comm Clr Press Start Key 0081 52 44567 Tone Pause 0081 52 44...

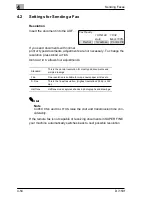
Page 55: ...nsmission time con siderably If the remote fax is not capable of receiving documents in SUPER FINE your machine automatically switches back to next possible resolution Standard This is the normal resolution for most typed documents and simple drawings Fine Fine resolution is suitable for maps newspaper articles etc S Fine This is the finest resolution Highest resolution 203 dpi x 392 dpi Half tone...

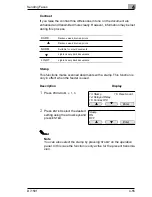
Page 56: ...escription Display 1 Press PROGRAM J 1 3 2 Press ENTER select the desired setting using the arrow keys and press ENTER Note You can also select the stamp by pressing STAMP on the operation panel In this case the function is only active for the present transmis sion DARK Darkens weak blurred prints Ä Darkens weak blurred prints NORM Suitable for most documents Ä Lightens very dark documents LIGHT L...

Page 57: ...unction compensates the quality of some overseas connections Enter the desired fax number Description Display 1 Press MENU and OVERSEA The function is turned off after the transmission automatically Press Start Key 0081 52 44567 Oversea 2 Tone 1 Tone ...

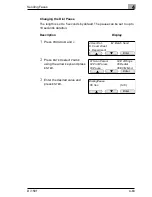
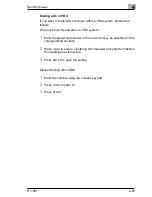
Page 58: ...OGRAM J 0 7 2 Press ENTER 3 Enter the desired passcode and press ENTER 4 Press PROGRAM J 0 8 5 Press ENTER to select the desired setting using the arrow keys and press ENTER To turn this function off enter the passcode 0000 07 Passcode 10 Lck No 08 Closed Netw 11 Service Mod 09 SecureMail 12 Memory Tx Enter Ä Ä Passcode 0000 Enter Passcode 1234 Enter 07 Passcode 10 Lck No 08 Closed Netw 11 Service...

Page 59: ...Description Display 1 Press PROGRAM and K 2 Press ENTER select SET using the arrow keys and press ENTER 3 Enter the message using the one touch keys and press ENTER 4 Select ON using the arrow keys and press ENTER To print the cover sheet press LIST and ENTER in step 2 J User Dat M Batch Send K Cover sheet L Department Enter Ä Ä K Cover Sheet Set Send List Enter Ä Ä Ä Cover Page Upper Enter K Cove...

Page 60: ...ers the pages in multi page transmissions 1 Press MENU 2 Press PAGENUM enter the number of pages and press ENTER Then proceed with the desired transmission mode Fax Ready 10 Oct 98 10 32 Mem 100 Flash PageNum Comm Rpt PageNum Enter Number Of Pages 1 30 1 Enter ...

Page 61: ...fter scanning the document Speed Dialling 1 Press the speed dial key and en ter the three digit identifier code 001 120 2 The name of the remote side appears on the display Press START After scanning the document the machine will dial automatically Group Dial using the One touch keys 01 80 1 Press a one touch key 01 80 If a group is stored under this key its name will be displayed After scanning t...

Page 62: ...ialling The one touch keys 73 80 can be programmed with the following functions l Broadcast l Delayed Transmission l Secure Mail l Polling Reception l Relay Broadcast Initiation For details refer to the corresponding sections of this manual ...

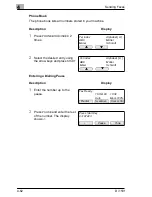
Page 63: ...ing the arrow keys and press START Entering a Dialling Pause Description Display 1 Enter the number up to the pause 2 Press PAUSE and enter the rest of the number The display shows Tel Index Alphabet A ABC Müller Maier Schmidt Ä Ä Tel Index Alphabet A ABC Müller Maier Schmidt Ä Ä Fax Ready 10 Okt 98 10 32 Auto Mem 100 Redial ScanSize Comm Clr Press Start Key 9 197423 Pause Tone ...

Page 64: ...s duration Description Display 1 Press PROGRAM and J 2 Press ENTER select PAUSE using the arrow keys and press ENTER 3 Enter the desired value and press ENTER J User Dat M Batch Send K Cover sheet L Department Enter Ä Ä 01 Scan Param 04 of Rings 02 Print Param 05 Redial 03 Pause 06 ECM Mod Enter Ä Ä DialingPause 06 Sec 5 10 Enter Ä Ä ...

Page 65: ...e arrow keys and press ENTER 3 Enter the desired values using the numeric keys and press ENTER Manual Redial Description Display 1 Select REDIAL using the arrow keys The machine redials the number J User Dat M Batch Send K Cover sheet L Department Enter Ä Ä 01 Scan Param 04 of Rings 02 Print Param 05 Redial 03 Pause 06 ECM Mod Enter Ä Ä Redial No 4 times 2 5 Inter 3 Min 3 5 Enter Ä Ä Fax Ready 10 ...

Page 66: ...in a PBX system 1 Enter the speed dial number or the one touch key as described in the corresponding sections 2 Press HOLD to enter a Entering this character prevents the machine from calling an external line 3 Press ENTER to save the setting Manual Dialling within PBX 1 Enter the number using the numeric keypad 2 Press HOLD to enter a 3 Press START ...

Page 67: ... 2 Select the desired resolution us ing the arrow keys and press EN TER 3 Select the desired contrast using the arrow keys and press EN TER 4 Select the desired scan width using the arrow keys and press ENTER 01 Scan Param 04 of Rings 02 Print Param 05 Redial 03 Pause 06 ECM Mod Enter Ä Ä Res Normal S Fine Fine Grayscale Enter Ä Ä Contrast Light Normal Dark Enter Ö Ö Ä Scan Width A3 A4 B4 Enter Ä ...

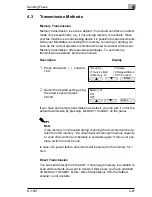
Page 68: ... keys and press ENTER If you have set memory transmission as default you can turn it on for the actual transmission by pressing MEMORY TRANSMIT on the panel Note If the memory is exhausted during scanning the document will be de leted from the memory You should wait until enough memory capacity to scan all documents completely is available again If this is not pos sible switch to direct mode In ca...

Page 69: ...on and contrast if necessary 2 Press MONITOR 3 Dial the number manually using the one touch keys or by speed dial numbers and press START Fax Ready 10 Oct 98 10 32 Auto Mrmy 100 Redial ScanSize Comm Clr Tel Mode _ A4 Mem 100 Redial ScanSize Comm Clr Tel Mode 0511 7404 0_ A4 Mrmy 100 Redial ScanSize Comm Clr ...

Page 70: ... structured distribution If e g the hub and the final destinations are abroad you reach all destinations with only one long distance call Description Display Place the document 1 Press OPTIONS select RELAY using the arrow keys and press ENTER 2 Enter the desired number for the groups and press ENTER Make sure to separate the groups by comma 3 Enter the desired number of the hub and press START Com...

Page 71: ...eys and press ENTER 6 Enter the desired number for the groups and press ENTER Make sure to separate the groups by comma 7 Press CLEAR ALL to stop the procedure or press END and ENTER to program further keys A One touch D Polling B Speed dial E Secure mail C P One touch F Commands Enter Ä Ä C P One touch Dial Set De lete List Enter Ä Ä Prog Select One touch No P73 Empty Enter Ä Ä P73 Enter Fax Numb...

Page 72: ... group s identifier number Relayed Relay Use this function to instruct the machines C D E etc to send the document to further machines To turn this function on proceed as follows Description Display 1 Press PROGRAM J 1 4 2 Select the desired setting using the arrow keys and press ENTER Now proceed in the same way as for a standard relay transmission Machine A Document Report Machine B Speed Dial M...

Page 73: ...t contrast and resolution if necessary Description Display 1 Press OPTIONS select RELAY using the arrow keys and press ENTER 2 Enter the day of the month and the time for the transmission using the numeric keys 24 hour format and press ENTER 3 Enter the desired number and press START The machine scans the document into memory If not enough memory is available during scanning the machine will retur...

Page 74: ...ssion using the numeric keys 24 hour format and press ENTER 7 Press CLEAR ALL to stop the procedure or press ENTER to program further keys Note If you enter 00 instead of a day the timer function is executed every time the programmed one touch keys is pressed A One touch D Polling B Speed dial E Secure mail C P One touch F Commands Enter Ä Ä C P One touch Dial Set Delete List Enter Ä Ä Prog Select...

Page 75: ...rast and resolution if necessary Description Display 1 Press BROADCAST 2 Enter the desired numbers Make sure to separate the numbers by comma For this press BROADCAST 3 Repeat this procedure until you have entered all recipients 4 Press START If not enough memory is available during scanning the machine will return to standby mode In this case repeat the procedure when enough memory is available a...

Page 76: ...s and press ENTER 4 Enter the desired numbers and press ENTER Press GROUP DIAL and enter the group number to store a group 5 Press CLEAR ALL to stop the procedure or press END and ENTER to program further keys A One touch D Polling B Speed dial E Secure mail C P One touch F Commands Enter Ä Ä C P One touch Dial Set Delete List Enter Ä Ä Prog Select One touch No P73 Empty Enter Ä Ä P73 Enter Fax Nu...

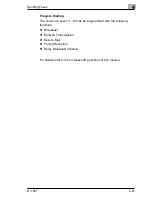
Page 77: ...m Your Di 150f acknowledges the code and begins immediately with the polling transmission The recipient initiates the transmission by pressing START Polling transmission are possible in regular mode and from database In regular mode any machine of the same type can poll documents In Database polls the receiver must know the number of the files to be polled Up to 10 different documents can be store...

Page 78: ...Display 1 Press PROGRAM and D 2 Press ENTER 3 Select DELETE using the arrow keys and press ENTER If you want to delete a document stored for database polling enter the ID code A One touch D Polling B Speed dial E Secure mail C P One touch F Commands Enter Ä Ä Polling Empty Enter Ä Ä DB Polling Documents Enter File No 0 99 00_Empty Enter Ä Ä A One touch D Polling B Speed dial E Secure mail C P One ...

Page 79: ... using the arrow keys and press ENTER If you want to print a document stored for database polling enter the ID code 4 Press PRINT Polling Are you sure Cancel Delete A One touch D Polling B Speed dial E Secure mail C P One touch F Commands Enter Ä Ä D Polling Stored De lete Doc PRT Ä Ä Polling Stored Print Ä Ä Print Polling Documents Stored Print Ä Ä ...

Page 80: ...ransmitted to a wrong mailbox The document is scanned into the remote fax machine s memory and can only be printed if the recipient enters the correct mailbox ID Description Display Place the document 1 Press OPTIONS select SECURE MAIL using the arrow keys and press ENTER 2 Enter the desired ID code using the numeric keys and press ENTER 3 Enter the desired number and press START Command Option Re...

Page 81: ...ion as default proceed as follows Description Display 1 Press PROGRAM J 0 9 and EN TER 2 Select the desired setting using the arrow keys and press ENTER to save the setting 07 Passcode 10 Lck No 08 Closed Net 11 Service Mod 09 Secure Mail 12 Memory Tx Enter Ä Ä SecureMail ON OFF Enter Ä Ä ...

Page 82: ...w keys and press ENTER 6 Enter the desired ID code using the numeric keys and press ENTER 7 Press CLEAR ALL to stop the procedure or press END and ENTER to program further keys A One touch D Polling B Speed dial E Secure mail C P One touch F Commands Enter Ä Ä C P One touch Dial Set Delete List Enter Ä Ä Prog Select One touch No P73 Empty Enter Ä Ä P73 Enter Fax Number _ Enter Pause P73 0511 7404 ...

Page 83: ...lect SET BOX using the arrow keys and press ENTER 3 Enter the desired number for the box and press ENTER 4 Enter the desired number and press ENTER 5 Enter the desired time and press ENTER 6 Enter the name of the box using the one touch keys and press ENTER to save the setting J User Dat M Batch Send K Cover sheet L Department Enter Ä Ä Batch Send Doc PRt Delete Box List Lst Prt Set Box Del Box En...

Page 84: ...ess OPTIONS select RELAY using the arrow keys and press ENTER 2 Enter the number of the box and press ENTER 3 Press ENTER Command Option Relayed Relay Batch Secure Mail Polling Enter Ä Ä Batch Option Enter Box Number 1 5 1 0511 7404 0 Enter Ä Ä Batch Option Box No 1 0511 7404 0 Receipt Enter ...

Page 85: ...3 Enter the desired number for the box and press PRINT 4 Enter the desired two digit number for the document 00 39 using the numeric keys and press ENTER J User Dat M Batch Send K Cover sheet L Department Enter Ä Ä Batch Send Doc PRt Delete Box List Lst Prt Set Box Del Box Enter Ä Ä 1 0511 7404 0 1 5 Enter Box No Minolta Print Ä Ä Enter Doc No 1 0511 7404 0 Enter ...

Page 86: ... box and press DELETE 4 Enter the desired two digit number for the document 00 39 using the numeric keys and press ENTER 5 Press DELETE and CLEAR ALL J User Dat M Batch Send K Cover sheet L Department Enter Ä Ä Batch Send Doc PRt Delete Box List Lst Prt Set Box Del Box Enter Ä Ä Enter Box No 1 5 1 0511 7404 0 Minolta Erase Ä Ä 1 0511 7404 0 Enter Receipt Enter 1 0511 7404 0 Are you sure Cancel Era...

Page 87: ...t Del BOX using the arrow keys and press ENTER 3 Enter the desired number for the box and press DELETE 4 Press DELETE 2 times and CLEAR ALL J User Dat M Batch Send K Cover sheet L Department Enter Ä Ä Batch Send Doc PRt Delete Box List Lst Prt Set Box Del Box Enter Ä Ä Enter Box No 1 5 1 0511 7404 0 Minolta Erase Ä Ä 1 0511 7404 0 Are you sure Cancel Erase ...

Page 88: ... 2 Select DELETE using the arrow keys and press ENTER 3 Press the desired one touch key and press DELETE 4 Press DELETE and CLEAR ALL to return to standby mode A One touch D Polling B Speed dial E Secure mail C P One touch F Commands Enter Ä Ä C P One touch Dial Set Delete List Enter Ä Ä Prog Select One touch No P73 0511 7404 0 Timer Erase Ä Ä P73 0511 7404 0 Timer Are you sure Cancel Delete ...

Page 89: ...STOP CLEAR to delete the programmed transmission Press COMPLETE to stop the process any time If you have programmed a broadcast transmission you can check the individual numbers For this press BROADCAST The first number for the broadcast transmission appears in the display Use the arrow keys to scroll through the entries Fax Ready 10 Okt 98 10 32 Auto Mrmy 100 ScanSize Redial Comm Clr Sending Pres...

Page 90: ...lit press ANSWER Tel Fax ready Mode Operation with a Telephone The machine operates together with a telephone in the same wall outlet For further information please contact your dealer Your fax machine will answer calls after a set number of rings Make sure the answer LED is lit Description Display 1 Press PROGRAM I and 5 times ENTER 2 Select TEL FAX READY using the arrow keys press ENTER and STOP...

Page 91: ...d 5 times ENTER 2 Select FAX READY using the ar row keys press ENTER and STOP CLEAR to return to standby mode Select Receive Mode Fax ready Fax Tel ready Tel Fax ready Ans Fax ready Enter Ä Ä Select Receive Mode Fax ready Fax Tel ready Tel Fax ready Ans Fax ready Enter Ä Ä ...

Page 92: ...he answering machine to answer a call after 2 rings at the most The message on the answering machine should not be longer than 10 seconds Make sure the answer LED is lit Description Display 1 Press PROGRAM I and 5 times ENTER 2 Select ANS FAX READY using the arrow keys press ENTER and STOP CLEAR to return to standby mode Select Receive Mode Fax ready Fax Tel ready Tel Fax ready Ans Fax ready Enter...

Page 93: ...D code and the correct 1 digit ID number of the mailbox have been entered Your Di 150f is equipped with up to 10 mailboxes Setting up a Mailbox Description Display 1 Press PROGRAM and ENTER 2 Select SET using the arrow keys and press ENTER 3 Enter the desired 1 digit ID code using the numeric keys and press ENTER 4 Enter the desired code and press ENTER 5 Enter the desired 4 digit code for the mai...

Page 94: ...sing the numeric keys and press PRINT 4 Enter the desired 4 digit code for the mailbox 0001 9999 using the numeric keys and press EN TER The received document will be printed and deleted from memory A One touch D Polling B Speed dial E Mailbox C P One touch F Commands Enter Ä Ä E Mailbox Set Doc PRT List Time Enter Ä Ä Enter Mailbox ID 0 9 0 Minolta Print Ä Ä 0 Minolta Enter I D Code 1111 Enter ...

Page 95: ...l be automati cally deleted The machine can store documents up to 31 days Description Display 1 Press PROGRAM and E 2 Select TIME using the arrow keys and press ENTER 3 Enter the desired time 2 digit 00 31 using the numeric keys and press ENTER A One touch D Polling B Speed dial E Mailbox C P One touch F Commands Enter Ä Ä E Mailbox Set Doc PRT List Time Enter Ä Ä Enter Time _ 01 31 Enter Ä Ä ...

Page 96: ...l documents In database mode only machines of the same model can poll documents For this you must know the numbers of the files in which the desired documents are stored You can poll up to 10 files per call Regular Polling Description Display 1 Press OPTIONS select POLL ING using the arrow keys and press ENTER 2 Press ENTER 2 times enter the fax number and press ENTER and START The machine starts ...

Page 97: ...the arrow keys and press ENTER 2 Press ENTER enter the file number and press ENTER 3 Enter the fax number and press ENTER and START The machine starts polling Command Option Relayed Relay Batch SecureMail Polling Enter Ä Ä Polling Options Enter File No 0 9999 5 26_ Comma Enter Enter Fax Number _ Pause Enter ...

Page 98: ...am a database polling enter the file number and press ENTER To program a regular polling press ENTER 7 Press CLEAR ALL to stop the pro cedure or press END and ENTER to program further keys A One touch D Polling B Speed dial E Secure mail C P One touch F Commands Enter Ä Ä C P One touch Dial Set De lete List Enter Ä Ä Prog Select One touch No P73 Empty Enter Ä Ä P73 Enter Fax Number _ Enter Pause P...

Page 99: ...isplay 1 Press PROGRAM J 0 7 2 Press ENTER 3 Enter the desired passcode and press ENTER 4 Press PROGRAM J 0 8 5 Press ENTER select the desired setting using the arrow keys and press ENTER To turn this function off enter the passcode 0000 07 Passcode 10 Lck No 08 Closed Netw 11 Service Mod 09 Security Rx 12 Memory Tx Enter Ä Ä Passcode 0000 Enter Passcode 1234 Enter 07 Passcode 10 Lck No 08 Closed ...

Page 100: ... that are not stored in the telephone di rectory Description Display 1 Press PROGRAM J 1 0 and EN TER 2 Select the desired setting using the arrow keys and press ENTER 10 Lck No 13 Stamp 11 Service Mod 14 Relayed Relais 12 Memory Tx 15 PC Connect Enter Ä Ä BlockJunkFax ON OFF Enter Ä Ä ...

Page 101: ...er of rings the fax machine waits before it answers an incoming call Description Display 1 Press PROGRAM J 0 4 and EN TER 2 Set the number of rings 1 9 and press ENTER 04 of Rings 07 Passcode 05 Redial 08 Closed Net 06 ECM Mod 09 Secure Mail Enter Ä Ä of Rings 2 Times 1 9 Enter Ä Ä ...

Page 102: ...ine quality is sent repeatedly This procedure reduces the number of er rors considerably Although the time for the transmission is longer it is still quicker than re sending a whole page Description Display 1 Press PROGRAM J 0 6 and EN TER 2 Select the desired setting using the arrow keys and press EN TER 04 of Rings 07 Passcode 05 Redial 08 Closed Net 06 ECM Mod 09 SecureMail Enter Ä Ä ECM Mode O...

Page 103: ...inted on two pages m Variable You can set the reduction rate manually in steps of 1 between 100 and 50 l Margin If your fax machine receives a document it compares the length of the document with the length of the set paper plus the set margin If the sum of the two is more than the length of the document the document is print ed on one page l Half page mode Use this function to print several short...

Page 104: ... Select SET MARGIN using the ar row keys enter the desired val ue and press ENTER 4 Select the desired setting using the arrow keys and press EN TER 01 Scan Param 04 of Rings 02 Print Param 05 Redial 03 Pause 06 ECM Mod Enter Ä Ä Rx Red Auto Variable Enter Ä Ä Rx Red Set Reduce 50 100 100 Set Margin 0 85 24mm Enter Ä Ä Half Page Recept ON OFF Enter Ä Ä ...

Page 105: ...5 Receiving Faxes 5 104 Di 150f ...

Page 106: ...eder or the flatbed scanner Adjust contrast and resolution if necessary Description Display 1 Press COPY FAX 2 Press START Note If the message SELECT PAPER appears in the display proceed as de scribed in section Making copies from the Multi Purpose Tray Copy Ready No 1 Off Auto 100 Zoom Paper Sort Copy ready Print No 1 On Auto 100 Zoom Paper Sort ...

Page 107: ... the Di 150f recognises the paper size automatically Should this not be the case the machnie requests a manula entry for the pa paper size For this proceed as follows 2 Press PAPER and select CASS 3 Select the desired paper size and press ENTER 4 Press START Place a sheet in the multi purpose tray and adjust the paper guides Copy Ready No 1 Off Auto 100 Zoom Paper Sort Auto Tray Cass1 A4 Cass2 B4 ...

Page 108: ...achine scanns the pages and starts copying them Sort Th copies can be sorted in two ways If you press SORT the Di 150f will sort the copies Two copies of a double sides document will be sorted in the order 1 2 1 2 If SORT is not pressed the copies will be printed in the order 1 1 2 2 Kopie bereit Nr 1 Aus Auto 100 Zoom Papier Sortier Kopie bereit Nr 2 Aus Auto 100 Zoom Papier Sortier Kopie bereit ...

Page 109: ... the original size Please note that you can use this function copy mode only Description Display 1 Press COPY FAX 2 Press ZOOM enter the desired setting using the numeric keys or the arrow keys and press EN TER Copy Ready No 1 On Auto 100 Zoom Paper Sort 100 Reduce 100 50 200 A4àA3 B4àA3 B4àA4 A4àB4 A3àB4 A3àA4 Enter Ä Ä ...

Page 110: ... a PC fax machine only the machine s modem is in use The compatibility with the programs named above allows trans fer rates of up to 19200 bps between the PC and the Di 150f Use a 9 pin RS 232C interface cable wired 1 1 optional Modem Specifications The Di 150f has the following protocol specifications Standard EIA 578 Class 1 Fax Modem no data modem included Speed with HDLC support 300 bps Pin No...

Page 111: ...ter and the fax machine 4 Install the driver on your computer according to the manufacturer s in structions Fax Operation with Your Computer This function allows you to send documents that you have created on your computer without printing them first Also faxes can be sent directly to your computer for editing The fax will not have to be scanned separately Please refer to the software manual for f...

Page 112: ...ect the desired setting using the arrow keys and press ENTER 5 Select the desired setting using the arrow keys and press ENTER 6 Select the desired setting using the arrow keys and press ENTER N PC Interface Scan Initial Set Enter Ä Ä N PC Interface Scan Initial Set Enter Ä Ä Set RS232C Speed Variable 1200bps 4800bps 600bps 2400bps 9600bps Enter Ä Ä Set Parity Bit None Even Odd Enter Ä Ä Set Stop ...

Page 113: ... 2 Select INITIAL using the arrow keys and press ENTER The machine is initialised Receiving Your Di 150f must be set to manual reception If your software is set to automatic reception your Di 150f will direct the incoming message to your computer Some programs will also allow man ual reception N PC Interface Scan Initial Set Enter Ä Ä N PC Interface Scan Initial Set Enter Ä Ä ...

Page 114: ...e software manual for further information Description Display 1 Press PROGRAM N and ENTER 2 Select SCAN using the arrow keys and press ENTER Printing from Your Fax Machine Use the Di 150f with a GDI driver as a PC printer For the necessary infor mation please contact your dealer Operation as a Network Printer The Di 150F can also be used as a network printer For the necessary in formation please c...

Page 115: ...7 Connecting the Fax Machine to Your Computer 7 114 Di 150f ...

Page 116: ...er every transmission Description Display 1 Press PROGRAM G and ENTER 2 Select COMM RPT using the ar row keys and press ENTER 3 Select TX REPORT using the ar row keys and press ENTER 4 Select the desired setting using the arrow keys and press EN TER G Journal J User Settings H Groupdial K Cover Sheet I Installation L Department Enter Ä Ä G Journal List Comm Rpt Auto PRT Enter Ä Ä Comm Rpt Tx Repor...

Page 117: ...the arrow keys and press ENTER The transmission report is print ed after the transmission Fax Ready 10 Okt 98 10 32 Memry 100 PageNum Comm Rpt Comm Rpt On OFF Enter Ä Ä Minolta Fax 49 511 74040 Transmission Report P1 Location Mode Start Time S Code ResultNote 001 45962 Normal 10 3015 42 0 42 1 0000 OK ...

Page 118: ...ransmission Description Display 1 Press PROGRAM G and ENTER 2 Select COMM RPT using the ar row keys and press ENTER 3 Select RX REPORT using the ar row keys and press ENTER 4 Select the desired setting using the arrow keys and press EN TER G Journal J User Settings H Groupdial K Cover Sheet I Installation L Department Enter Ä Ä G Journal List Comm Rpt Auto PRT Enter Ä Ä Comm Rpt Send ber Rx Report...

Page 119: ...sing the arrow keys and press ENTER The reception report is printed after the reception Fax Ready 10 Okt 98 10 32 Memry 100 PageNum Comm Rpt Comm Rpt On OFF Enter Ä Ä Minolta Fax 49 511 74040 Reception Report P1 Location Mode Start Time S Code ResultNote 001 45962 Normal 10 3015 42 0 42 1 0000 OK ...

Page 120: ...elect the desired setting using the arrow keys and press EN TER Manual Print Description Display 1 Press PROGRAM G and ENTER 2 Select LIST using the arrow keys and press ENTER The machine will print the activi ty report at once The entries will not be deleted G Journal J User Settings H Groupdial K Cover Sheet I Installation L Department Enter Ä Ä G Journal List Comm Rpt Auto PRT Enter Ä Ä Auto PR...

Page 121: ...ion L Department Enter Ä Ä Print settings Enter User Settings Name Minolta Fax Nr 49 511 123456 3072 KB Secure Doc Hold 03 Days Journal auto print ON OFF Comm RPT TCR RCR ON OFF Line Type Tone Imp Receive Mode FAX TEL FAX FAX TEL ANS FAX Scan Width A4 B4 A3 Resolution Normal Fine S Fine Grey Density Dark Normal Light Reduction Auto Margin 24mm Receive 1 2 Page ON OFF Dialling Pause 05 Sec No Call ...

Page 122: ...ress PROGRAM and A and EN TER 2 Press the arrow keys to select LIST and press ENTER Your fax machine prints the one touch key list A One touch D Polling B Speed dial E Secure mail C P One touch F Commands Enter Ä Ä A One touch Set Delete List Enter Ä Ä Minolta Fax 49 511 74040 One Touch List P1 30 Oct 98 16 02 Location FaxNo 01 Schmidt 030 4321678 02 Müller KG 1234567 03 Schulze GmbH 7654321 ...

Page 123: ...nd A and EN TER 2 Press the arrow keys to select LIST and press ENTER Your fax machine prints the speed dial list A One touch D Polling B Speed dial E Secure mail C P One touch F Commands Enter Ä Ä B Speed dial Set Delete List Enter Ä Ä Minolta Fax 49 511 74040 Speed Dial List P1 30 Okt 98 16 02 Location FaxNo S001 Otto GmbH 030 4321678 S002 Voss KG 1234567 S003 Mayer GmbH 7654321 ...

Page 124: ...to make your fax machine print the key setting list Description Display 1 Press PROGRAM H and ENTER Your fax machine prints the group dial list G Journal J User Settings H Groupdial K Cover Sheet I Installation L Department Enter Ä Ä Minolta Fax 49 511 74040 Group List P1 30 Okt 98 16 02 No Location 00 10 20 30 01 Schmidt 3 ...

Page 125: ...f the box the fax number of the destination the name of the destination date and time of the transmission Description Display 1 Press PROGRAM M and ENTER 2 Select BOX LIST using the arrow keys and press ENTER Your fax machine prints the group dial list A One touch D Polling B Speed dial E Secure mail C P One touch F Commands Enter Ä Ä F Comm List Doc PRT Enter Ä Ä J User Dat M Batch Send K Cover s...

Page 126: ...is list contains an overview of the command stored under the one touch keys 73 80 Description Display 1 Press PROGRAM C and ENTER 2 Select LIST using the arrow keys and press ENTER Your fax machine prints the pro gram list J User Dat M Batch Send K Cover sheet L Department Enter Ä Ä Batch Send Doc PRt Delete Box List Lst Prt Set Box Del Box Enter Ä Ä A One touch D Polling B Speed dial E Secure mai...

Page 127: ...D codes are not print ed for security Description Display 1 Press PROGRAM and E 2 Select LIST using the arrow keys and press ENTER Your fax machine prints the group dial list A One touch D Polling B Speed dial E Mailbox C P One touch F Commands Enter Ä Ä E Mailbox Set Doc PRT List Time Enter Ä Ä ...

Page 128: ...TION è Never use alcohol or solvents è Always unplug the fax machine before you clean it 9 2 Cleaning the ADF and the Scanner 1 Open the ADF and clean the indi cated places of the rollers Turn the rollers manually to reach all places 2 Open the inner cover of the ADF and clean the rollers as described above 3 Wipe the surface of the scanner 4 Close the ADF cover bild 44 bild 45 bild 46 ...

Page 129: ... 3 Cleaning the Flatbed Scanner 1 Open the cover of the scanner and clean the glass plate and the white background with a soft cloth 9 4 Cleaning the Casing Clean the casing with a moistened cloth or a mild detergent Note Make sure the cloth does not get stuck in the machine and damages any of the components Never leave anything inside the machine bild 47 ...

Page 130: ...appears on the display 1 Open the front cover 2 Release lever M2 and M3 by turning them in the direction of the arrow After releasing the lock lever re move the drum cartirdge from the machine 3 Remove the toner cartridge from the drum cartridge Hold the toner car tridge with both hands and shake it to spread the toner inside the car tridge evenly Replace both car tridges in the machine If the dis...

Page 131: ...ace the toner cartridge in the drum cartridge Make sure the pins of the toner cartridge slip into the notches in the drum cartridge 6 Press the unit in the direction of the arrow until it clicks into place 7 Insert the cartridges carefully into the machine 8 Return levers M2 and M3 to their normal positions to lock the drum cartridge Bild 14 einfügen Bild 15 einfügen Bild 16 einfügen Bild 17 einfü...

Page 132: ...d the toner cartridge from the machine as described above 1 Unpack the drum cartridge and insert the toner cartridge into the drum cartridge 2 Insert both units into the machine as described above Close the top cover 3 Press PROGRAM J 1 5 4 Press ENTER 5 Select YES using the arrow keys and press ENTER Bild 18 einfügen 9 13 Stamp 15 Reset Ctr 14 Relayed Relay Reset DR Ctr O K No Enter Ä Ä Reset DR ...

Page 133: ...anned pages will be deleted and the machine returns to standby mode Follow the procedure below to remove a document jam 1 Open the ADF cover and remove the jammed document 2 If the document cannot be removed open the inner cover of the ADF and then remove the document Note If the document is wrinkled place it in the flatbed scanner to scan it again Fax Ready 10 Oct 98 10 32 Auto Mrmry100 Fax Ready...

Page 134: ...r Jam in the Paper Cassette 1 If the paper is jammed in the paper tray open the cover of the paper tray 2 Pull the paper in the direction of the arrow 3 Close the cover firmly Paper Jam in the Multi Purpose Tray 1 If the paper is jammed in the multi purpose tray carefully remove it as shown Bild 40 Bild 41 Bild 42 Bild 43 ...

Page 135: ...ver and turn lever M3 in the direction of the arrow to release it 2 Turn M4 in the direction of the arrow to remove the jammed paper 3 Turn M1 in the direction of the arrow and remove the jammed paper 4 If the paper cannot be removed re lease lever M2 and remove the ton er and the drum cartridge from the machine bild 35 M 3 O PE N Bild 36 Bild 37 M3 OPEN ...

Page 136: ...Maintenance and Trouble Shooting 9 Di 150f 9 135 5 Lock all levers and close the front cover bild 39 ...

Page 137: ... on but does not receive Make a copy to check if the machine is working prop erly Make sure there is paper in the paper cassette Check whether the machine is in manual reception mode or memory reception mode whether there is pa per in the paper cassette and or enough memory is available The ADF does not work Check the size of the document and if it is placed prop erly in the feeder The reception p...

Page 138: ...the paper is not wrinkled or folded The other fax machine s printouts are distorted Adjust the paper guides Although the paper cassette has been refilled the error light is on and the mes sage NO PAPER appears on the LCD Make sure the paper cassette is properly loaded Make sure the 2nd paper tray is properly locked Printout quality is becoming worse Replace the drum cartridge The reception copy is...

Page 139: ... drum cartridge as soon as possible Further Error Mes sages If error messages are displayed that are not described here a machine malfunction has oc cured Call the technical service Memory Overflow During scanning in memory mode the capacity of the memo ry was exceeded Press STOP to delete the pag es of the actual process The pages of other processes will re main in memory Or press START to proces...

Page 140: ...rs Too many numbers or charac ters were entered Press CLEAR ALL to delete the superfluous numbers or characters Hang Up Phone The receiver of the connected telephone is off hook Place the receiver on the hook No Report The desired report cannot be printed because the correspond ing process was not carried out After the process has been car ried out the report can be print ed Enter No 01 32 The gro...

Page 141: ...nt er is in use Wait until the printer is idle Document Stored The selected storage place for the polling document is occu pied Wait until the polling is finished Document Stored The selected mailbox contain at least one document Delete the corresponding docu ment 40 Files or Less Too many files in one group Store no more than 40 files in a group 5 Locations or Less Too many locations for a broad ...

Page 142: ...ed No communication could be set up because the machine is set to PBX but from a PSTN was called and the access number for ex ternal lines is not stored Set the machine to PBX Enter the line access number Error Message Printer HSYNC Error Printer Unit Error Printer Scan Error Printer Motor Error Mirror Carrige Error Printer Inside Fan Error Printer PS Fan Error Printer Serial Error Printer No Coun...

Page 143: ...for ex ternal lines is not stored Enter the line access number D 0 2 The other location is busy Try to send again D 0 6 D 07 The other location does not re spond the communication was interrupted because STOP was pressed during dialling Try to send again Reception error R 1 1 The other location did not trans mit because the communication was interrupted or the ID codes did not match R 1 2 The fax ...

Page 144: ...n T 2 2 The fax machines were incom patible This is a group 3 ma chine Contact the other location by tel ephone T 2 3 Transmission was impossible due to bad line quality Retry the transmission T 3 1 The page counter detected a feeding error during transmis sion Insert the document into the ADF and restart the transmis sion T 3 2 The machine did not detect a pause after closing the commu nication l...

Page 145: ... Bad line quality No handshake signal from the other location received Error in ADF or page counter Other location does not respond after the set number of redials Busy Other location busy The other location does not respond Check documents The reception signal of the other location was not detected Bad line quality distorted the received image Memory full The memory capacity of the other location...

Page 146: ...s Function Simultaneous processing of up to 3 functions Scanner Flatbed CCD Printing Electrostatic print with dry toner Original size Single original for ADF Max 306 mm width x 900 mm length Min 120 mm width x 100 mm length 30 157 g m each2 Multi original for ADF Max 297 mm width x 420 mm length Min 148 mm width x 105 mm length 52 3 104 7 g m each2 FBS Flatbed scanner Max 297 mm width x 420 mm len...

Page 147: ... Original feeding up to 50 pages Paper path U turn feed Original feed Document Set Face up Scanning Contact image sensor Scanning Speed 2 0 sec standard resolution Power supply 230V 10 50 60 Hz Power consumption Stand by 26 W Transmission 49 W Reception 775 W Copies 795 Max Simultaneous copying transmission and scanning 979 W Dimensions mm 522 H x 582 W x 615 D Weight Total 50 0 kg System without ...

Page 148: ...6 dot mm x 15 4 lines mm or higher than 400 x 400 dpi Scan width A3 294 mm B4 254 mm A4 208 mm Scan register point ADF Centre of page FBS Top left Original contrast Light dark compensation in 5 steps Grayscale 64 ADF capacity A4 50 sheets max 6 3 mm B4 25 pages A3 15 pages Original feed ADF Original face up FBS Original face down Scan time Norm 2s page Fine 4s page S Fine 8s page A4 lengthways eac...

Page 149: ...rgins Top margin 3 2 1 mm Lower margin 3 2 1 mm Print width A3 291 mm B4 251 mm A4 204 mm Capacity paper tray Paper trays 250 pages Single sheet feeder 1 page Paper Size A3 and B4 lengthways A4 lengthways and sideways A5 and B5 sideways Capacity exit tray Max 250 sheets Zoom Variable 50 200 in steps of 1 Fixed 70 81 86 100 115 122 141 Output reduction Automatic reduction up to 50 to adjust to the ...

Page 150: ...uch keys 8 of 80 one touch keys Phone Book Stored numbers inclusive ID name Redial 2 5 possible redials at intervals from 3 5 minutes Timer transmission Up to 70 transmissions for up to 31 days programmable in ad vance Broadcasting Up to 197 numbers 5 manual dialled 192 speed dial numbers or 120 speed dial numbers 72 one touch numbers Group Dialling Up to 192 numbers can be programmed in up to 32 ...

Page 151: ...partment code Storage of the number of transmissions per department Reception mode Available modes Phone Phone Fax Fax Phone Fax The auto answer function can be turned on and off with the auto answer key Auto Reception 1 9 calls Memory Reception Storage of up to 250 transmission during lack of paper or toner Block Junk Fax Deleting of faulty transmissions 2 Phone type Accessories Holding queue Hol...

Page 152: ...on or reception report Journal Printout of the last 50 transmissions Cover Page The cover sheet contains date time sender name and number and a message with max 40 characters Mailbox list Printout of the names of the mailboxes Data list List of the received and stored faxes Batch list Printout of the locations with starting time of the transmission Batch file list Printout of the location with sta...

Page 153: ...nction Simultaneous Operations Copying Reception GDI print Memory transmission PC fax transmission receiving Reception Copying GDI print Transmission Transmission Copying GDI PCL4 print PC Fax Reception Copying Print with parallel port Programming transmission PC Fax Transmission Copying Print with parallel port Programming transmission ...

Page 154: ...istics of information technology equipment ITE EN61000 3 2 1995 Harmonic Current Emission Harmonics EN61000 3 3 1995 Voltage Fluctuations Flicker EN 50 082 1 1997 Electromagnetic compatibility Generic immunity standard Part1 Residential commercial and light industry ENV 50 204 1995 Radiated elctromagnetic field of mobil telephones EN 61 000 4 2 1995 Electrostatic discharge requirement EN 61 000 4 ...

Page 155: ...any rights to patents copyrights trade names trademarks whether registered or unregistered or any other rights franchises or licenses in respect of the Software Title to the Software and any copy made from it is retained by Minolta or such other owners 3 LICENSE Minolta hereby grant to you and you agree to accept a non exclusive non transferable and limited license and you may l install and use th...

Page 156: ...Warranty which was supplied with the hardware With the exception of the foregoing express warranties applicable to hardware and media only the Software is not warranted and is provided AS IS SUCH WARRANTIES ARE IN LIEU OF ALL OTHER WARRANTIES EXPRESS OR IMPLIED INCLUDING BUT NOT LIMITED TO THE IMPLIED WARRANTIES OF MERCHANTABILITY AND FITNESS FOR A PARTICULAR PURPOSE 6 LIMITATION OF REMEDIES IN NO...

Page 157: ...ter Software clause at FAR 252 227 7013 subdivision b 3 ii or subparagraph c 1 ii as appropriate Further use duplication or disclosure is subject to restrictions applicable to restricted rights software as set forth in FAR 52 227 19 c 2 YOU ACKNOWLEDGE THAT YOU HAVE READ THIS AGREEMENT UNDERSTAND IT AND AGREE TO BE BOUND BY ITS TERMS AND CONDITIONS NEITHER PARTY SHALL BE BOUND BY ANY STATEMENT OR ...

Page 158: ...der Software und jedweder von ihr angefertigten Kopie Die Verantwortung für die Wahl zur Erzielung der gewünschten Ergebnisse Installation Benutzung und die mit der Software erzielten Ergebnisse liegt allein bei Ihnen als Lizenznehmer LIZENZ Ihnen als Lizenznehmer ist es gestattet l die Software auf einem Computer und einem angeschlossenen Drucker zu installieren und zu benutzen l ausschließlich z...

Page 159: ...eine Garantie auf Material und Verarbeitung der Hardware die die Software beinhaltet Die Haftungsbedingungen und beschränkungen bezüglich der Hardware die die Software beinhaltet sind in den Gewährleistungsbedingungen aufgeführt die mit der Hardware ausgeliefert wurden Neben dieser Gewährleistung auf Hardware und Medien wird keine weitere Haftung für die Software übernommen Die Software wird in de...

Page 160: ...mungen im Abschnitt unter der Überschrift Lizenz gilt eine Frist von 4 Jahren Für diesen Vertrag gilt im übrigen das Recht des Landes indem dieses Produkt erworben worden ist LIZENZNEHMER REGIERUNG Handelt der Lizenznehmer für eine oder im Auftrage einer Einrichtung der Amerikanischen Regierung gelten die folgenden Bestimmungen Nutzung Vervielfältigung oder Offenlegung durch die Regierung unterlie...

Page 161: ...ENDVERBRAUCHER LIZENZVERTRAG ...

Page 162: ...s le domaine des logiciels A l exception de ce qui est indiqué dans cet accord vous n avez aucun droit sur les brevets les droits de reproduction les noms de marque enregistrés ou pas ni aucun autre droit franchise ou licence vis à vis de ce logiciel Le titre de ce logiciel et tout autre copie faite à partir de celui ci sera gardé par Minolta ou d autres propriétaires 3 La licence Par la présente ...

Page 163: ...equel le logiciel est enregistré contre tout défaut matériel ou de fabrication dans les conditions normales d utilisa tion Les détails de garantie et les limites du logiciel sont décrits sur la déclara tion de la garantie limitée fournie avec le matériel informatique A l excep tion des garanties expresses en vigueur applicables au matériel informatique et audiovisuel uniquement le logiciel n est p...

Page 164: ...ositions suivantes s appliquent Utilisation duplication ou divulgation sont sujettes aux restrictions men tionnées dans Rights in Technical Data and Computer Software FAR 252 227 7013 section b 3 ii ou chapitre c 1 ii as approprié Toute utilisation supplémentaire duplication ou divulgation est sujette aux re strictions applicables aux droits restreints sur les logiciels définis dans FAR 52 227 19 ...

Page 165: ... ha avuto la licenza da parte degli altri proprietari i diritti di autore per il Software Ad eccezione di quanto dichiarato nel pre sente Contratto non avrete alcun diritto di brevetto copyright nomi di marchi marchi di fabbrica sia registrati o non registrati o qualsiasi altro diritto mandato di rappresentanza o licenza rispetto a questo Software 3 LICENZA Con il presente contratto MINOLTA confer...

Page 166: ...a la violazione delle restrizioni di esportazione dettate dal Governo locale 5 GARANZIA LIMITATA MINOLTA garantisce che i mezzi su cui il Software è registrato sono privi di difetti nei materiali e nella fabbricazione secondo un normale uso I det tagli della garanzia e le limitazioni per il Software sono descritti nella Dichi arazione di Garanzia Limitata che viene fornita insieme all hardware Con...

Page 167: ...ovvedimenti L uso la duplicazione o la divulgazione da parte del Governo sono soggetti alle re strizioni stabilite nella clausola Rights in Technical Data e in Computer Software in FAR 252 227 7013 sottodivisione b 3 ii o sottoparagrafo c l ii rispettivamente Ulteriore uso duplicazione o divulgazione sono soggetti alle restrizioni applicabili ai limitati diritti di software stabiliti nel FAR 52 22...

Reviews: