background image

Cleaning

Clean the accessible parts of the device regularly. The frequency of cleaning depends on the

operating environment: moist, smoky or particularly dirty environments may cause a higher

accumulation of dirt on the components of the device.

n

Use a dry soft cloth for cleaning.

n

Remove stubborn stains with a slightly damp cloth.

n

Never use cleaners containing alcohol or thinner.

n

Never put any vinyl items on the device, as vinyl can stick to the surface or lead to its disco‐

louration.

Device parts

Cleaning


e-drum module

40

Summary of Contents for MPS-400

Page 1: ...MPS 400 e drum module user manual...

Page 2: ...Musikhaus Thomann Thomann GmbH Hans Thomann Stra e 1 96138 Burgebrach Germany Telephone 49 0 9546 9223 0 E mail info thomann de Internet www thomann de 20 07 2015 ID MPS 400...

Page 3: ...tallation 11 5 Operating elements 14 6 Operation 21 6 1 Functions 21 6 2 Playing customising and accompanying songs 24 6 3 Creating drum kits 26 6 4 Adjusting pad settings 31 7 Technical specification...

Page 4: ...10 Appendix 42 10 1 Voice list 42 10 2 Kit list 51 10 3 Song list 53 10 4 MIDI implementation 54 Table of contents e drum module 4...

Page 5: ...hat it is available to all persons using this device If you sell the device to other users be sure that they also receive this manual Our products are subject to a process of continuous development We...

Page 6: ...N This combination of symbol and signal word indicates a pos sible dangerous situation that can result in minor injury if it is not avoided NOTICE This combination of symbol and signal word indicates...

Page 7: ...to be improper and may result in personal injury or property damage No liability will be assumed for damages resulting from improper use This device may be used only by persons with sufficient physica...

Page 8: ...ld swallow the pieces and choke Never let children unattended use electrical devices CAUTION Possible hearing damage With loudspeakers or headphones connected the device can produce volume levels that...

Page 9: ...pply Before connecting the external power supply ensure that the input voltage AC outlet matches the voltage rating of the device and that the AC outlet is protected by a residual cur rent circuit bre...

Page 10: ...gs n Click function n Flexible assignment of the pad voices n Programming of various pad parameters like touch velocity sensitivity etc n Reverb effect and voice tuning n Individual adjustment of acco...

Page 11: ...e Finally check that all connecting cables between the pads and the drum module are connected correctly Connect the supplied power adapter to the 9 V input of the device and then insert the mains plug...

Page 12: ...module Connect the inputs of your amplifier or powered speaker to the OUTPUT sockets of the drum module When using a mono amp connect its input to the L MONO output socket of the module Connecting he...

Page 13: ...onnect external MIDI devices to the MIDI IN OUT connections of the drum module Connect external MIDI devices or your computer to the USB connection of the drum module Connecting CD or MP3 player Conne...

Page 14: ...5 Operating elements Front panel Operating elements e drum module 14...

Page 15: ...sting the metronome and playback tempo Press the or button briefly to increase or decrease the indicated value by one Keep the or button pressed to increase or decrease the value quickly 4 start stop...

Page 16: ...menu 11 save Button for saving settings 12 Button for song and kit selection and for adjusting of the various parameters and values Press the or button briefly to increase or decrease the indicated va...

Page 17: ...Rear panel Operating elements MPS 400 17...

Page 18: ...ads 15 output R L mono Output to connect external audio devices mono stereo 16 aux in Input for external audio devices like MP3 or CD player 17 9 V Connection socket for the power supply adapter Opera...

Page 19: ...Side view Operating elements MPS 400 19...

Page 20: ...on off Main switch to turn the device on or off 19 in MIDI out Connection sockets for an external MIDI device 20 Connection socket for USB cable 21 phones Headphones socket Operating elements e drum m...

Page 21: ...device is not used it will switch off automatically after 30 minutes To switch it on again switch to the OFF position and then to the ON position Deactivating the automatic switchoff To deactivate th...

Page 22: ...e 30 user drum kits see Chapter 10 2 Kit list on page 51 1 Press the kit button The display shows the current kit number and the KIT LED lights up 2 Use the and buttons to select the desired kit In Ki...

Page 23: ...n change the click volume in a range of 0 to 16 using the and buttons To do so keep the click button pressed The display shows the set value in Cxx format Use the tempo button to change the click temp...

Page 24: ...rum module on song 001 is shown on the display by default 1 Press the song volume button The display shows the song number the Song LED on the 3 digit display lights up 2 Use the and buttons to select...

Page 25: ...y shows the song volume in Axx format 2 Use the and buttons to adjust the volume in a range of 00 to 32 1 Press the song volume button repeatedly until the display shows the song number again 2 Use th...

Page 26: ...rum off button to mute the drum sound of the song The indicator LED lights up as long as the part is muted 2 Press the drum off to unmute the drum track 6 3 Creating drum kits The 307 pre installed vo...

Page 27: ...ively you can directly activate the pad by playing it The display shows the number of the currently assigned voice The indicator LED of the pad lights up 3 Select the desired voice using the button se...

Page 28: ...f the current selection in Lxx format 2 Press the button of the pad whose volume you want to change Alternatively you can directly activate the pad by playing it The indicator LED of the pad lights up...

Page 29: ...x format 2 Press the button of the pad whose panorama setting you want to change Alternatively you can directly activate the pad by playing it The indicator LED of the pad lights up 3 Adjust the panor...

Page 30: ...ing the button setting range t 8 to t 8 4 Repeat steps 2 to 3 to adjust the pitch setting of the other pads as desired After you have assigned all the pads with the desired voices and adjusted the set...

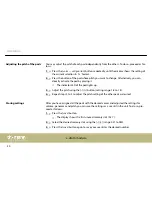
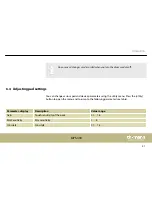
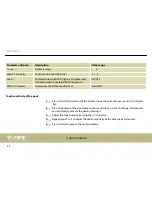
Page 31: ...rious pad and device parameters using the utility menu Press the utility button to open the menu and to jump to the following parameter see table Parameter display Description Value range Gain Touch s...

Page 32: ...ntern GM 1 Press the utility button until the display shows the current touch sensitivity in format Exx 2 Press the button of the pad whose touch sensitivity you want to change Alternatively you can d...

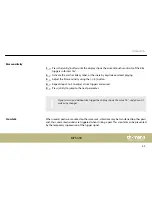
Page 33: ...o adjust all rim triggers as desired 5 Press utility to jump to the next parameter If you select a pad without rim trigger the display shows the value rE and you can t make any changes When several pa...

Page 34: ...ivate the pad by playing it 3 Adjust the signal suppression time using the button 4 Repeat steps 2 to 3 to adjust the signal suppression time of the other pads as desired 5 Press utility to jump to th...

Page 35: ...pads as desired 5 Press utility to jump to the next parameter 1 Press the utility button until the display shows the current touch sensitivity of the hi hat in Fxx format 2 Adjust the touch sensitivit...

Page 36: ...at default setting P n or in GM format n Choose its own proprietary MIDI format if you want to use the drum module as a sound module If you connect an external MIDI device choose the GM format 1 Press...

Page 37: ...follows 1 Switch the device off 2 Keep the tempo button pressed while switching the unit on When resetting the unit to factory defaults all user settings and adjustments are irre trievably deleted Re...

Page 38: ...7 Technical specifications Number of voices 307 Drum kits 20 preset kits 30 user kits Songs 50 preset songs Technical specifications e drum module 38...

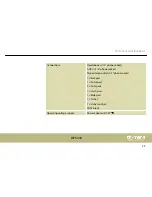
Page 39: ...t AUX in 1 4 phone socket Mono stereo outlet 1 4 phone socket 1 Kick pad 1 Snare pad 3 Tom pads 1 Crash pad 1 Ride pad 1 Hi hat 1 Hi hat control MIDI in out Operating voltage supply Power adapter DC 9...

Page 40: ...onments may cause a higher accumulation of dirt on the components of the device n Use a dry soft cloth for cleaning n Remove stubborn stains with a slightly damp cloth n Never use cleaners containing...

Page 41: ...ng Please follow the notes and markings on the packaging This product is subject to the European Waste Electrical and Electronic Equipment Directive WEEE Do not dispose with your normal household wast...

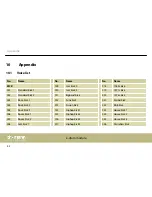
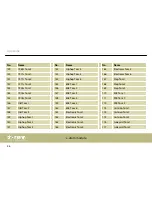
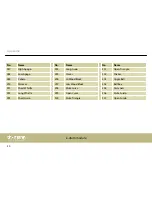
Page 42: ...2 011 Bigband Kick 020 1976s Kick 003 Rock Kick 1 012 Funk Kick 021 Pwrbd Kick 004 Rock Kick 2 013 Fusion Kick 022 R B Kick 005 Rock Kick 3 014 Hiphop Kick 1 023 House Kick 1 006 Room Kick 1 015 Hiph...

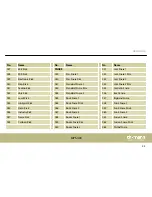
Page 43: ...Snare Rim 055 Jazzlatin Snare 032 Voic Kick 043 Standard Snare 2 056 Bush Snare 033 Lowfi Kick 044 Rock Snare 1 057 Bigband Snare 034 Junkyard Kick 045 Rock Snare Slick 058 Funk Snare 1 035 Disco Kick...

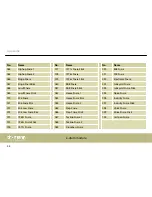
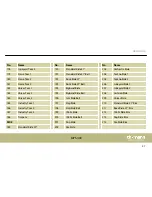
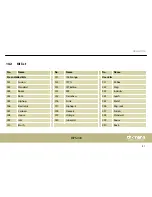
Page 44: ...Stick 094 Junkyard Snare Stick 069 Lowfi Snare Stick 082 House Snare 1 095 Noise Snare 070 506 Snare 083 House Snare Rim 096 Industry Snare 071 506 Snare Rim 084 House Snare 2 097 Industry Snare Stick...

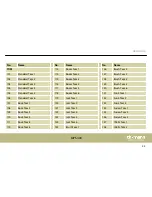
Page 45: ...117 Room Tom 5 130 Brush Tom 6 105 Standard Tom 5 118 Room Tom 6 131 Funk Tom 1 106 Standard Tom 6 119 Jazz Tom 1 132 Funk Tom 2 107 Rock Tom 1 120 Jazz Tom 2 133 Funk Tom 3 108 Rock Tom 2 121 Jazz To...

Page 46: ...8 Tom 2 169 Step Tom 3 144 1976s Tom 2 157 808 Tom 3 170 909 Tom 1 145 1976s Tom 3 158 808 Tom 4 171 909 Tom 2 146 Old Tom 1 159 808 Tom 5 172 909 Tom 3 147 Old Tom 2 160 808 Tom 6 173 Cartoon Tom 1 1...

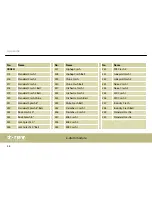
Page 47: ...s Tom 1 194 Bigband Ride 207 Junkyard Ride 2 183 Voices Tom 2 195 Bigband Ride Bell 208 Cartoon Ride 184 Voices Tom 3 196 Jazz Ride Bell 209 Voices Ride 185 Industry Tom 1 197 Slap Ride 210 Standard R...

Page 48: ...4 Noise Crash 2 219 Standard Crash 2 Bell 232 Orchestra Crash 2 245 SFX Crash 1 220 Standard Crash China 233 Orchestra Crash Bell 246 SFX Crash 2 221 Standard Splash 8 234 Mute Crash Bell 247 Industry...

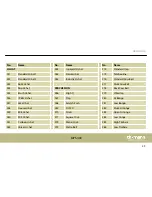
Page 49: ...Pop Hi hat PERCUSSION 278 Rock Cow Bell 255 Brush Hi hat 266 High Q 279 Vibraslap 256 1969s Hi hat 267 Slap 280 Hi Bongo 257 Ska Hi hat 268 Scratch Push 281 Low Bongo 258 House Hi hat 269 DJ SFX 282...

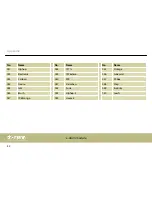
Page 50: ...go 295 Claves 302 Shaker 289 Cabasa 296 Hi Wood Block 303 Jingle Bell 290 Maracas 297 Low Wood Block 304 Belltree 291 Short Whistle 298 Mute Cuica 305 Castanets 292 Long Whistle 299 Open Cuica 306 Mut...

Page 51: ...x 002 Standard 013 1976disco 022 Step 003 Room 014 909 023 Industry 004 Rock 015 Drumbass 024 Lowfi 005 Hiphop 016 Funk 025 Metal 006 Electronic 017 Hiphop 3 026 Pop rock 007 Cartoon 018 House 2 027 F...

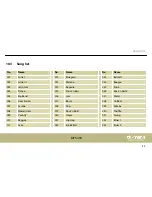
Page 52: ...1971s 045 Vintage 032 Electronic 039 1976disco 046 Junkyard 033 Cartoon 040 909 047 M box 034 House 041 Drumbass 048 Step 035 Jazz 042 Funk 049 Industry 036 Brush 043 Hiphop 3 050 Lowfi 037 1969songo...

Page 53: ...Beguine 025 Punk 004 Dance 015 Drum n Bass 026 Rock n Roll 2 005 Big Band 016 Jazz 027 Metal 006 Slow Fusion 017 Bossa 028 16 Beat 007 Samba 018 Pop 029 Rumba 008 Modern Jazz 019 Rock n Roll 1 030 Sh...

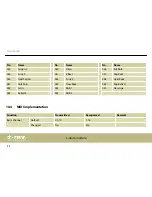
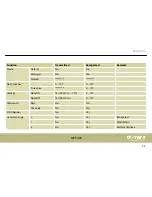
Page 54: ...Pop Rock 036 Acid Fusion 042 Funk 3 048 Hard Rock 037 Folk Pop 043 Slow Rock 049 Pop Ballad 038 Latin 044 R B 1 050 New Age 039 Ballad 2 045 R B 2 10 4 MIDI implementation Function Transmitted Recogni...

Page 55: ...Altered Note number 0 127 0 127 True voice 0 127 Velocity Note ON Yes 99H V 1 127 0 127 Note OFF Yes 99H V 0 0 127 Aftertouch Keys No No Channels No No Pitch bender No Yes Control change 0 No Yes Ban...

Page 56: ...No Yes Pan 11 No Yes Expression 64 No Yes Sustain pedal 65 No Yes Portamento ON OFF 66 No Yes Sostenuto pedal 67 No Yes Soft pedal 80 No Yes Reverb program 81 No Yes Chorus program 91 No Yes Reverb l...

Page 57: ...123 No Yes All Notes Off Program change Yes Yes System exclusive No Yes System common Song Position No No Song Select No No Tune No No System real time Clock Yes No START and STOP only Command Yes No...

Page 58: ...Function Transmitted Recognized Remarks Active Sense Yes No System reset No No Appendix e drum module 58...

Page 59: ......

Page 60: ...Musikhaus Thomann Hans Thomann Stra e 1 96138 Burgebrach Germany www thomann de...

Reviews: