background image

110

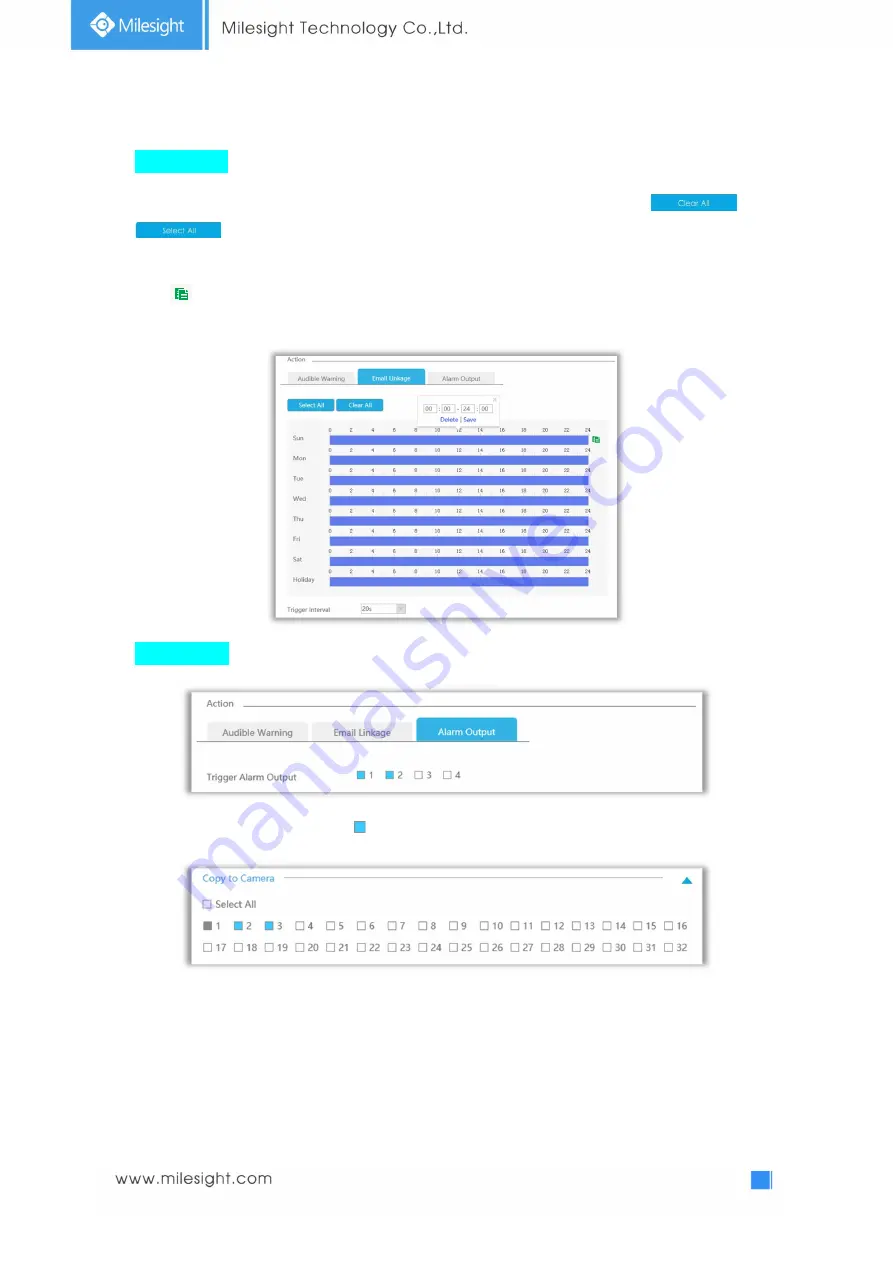
Email Linkage: NVR will send an email to the address you set before.

Drag a line on the time table for time setting, it will be more convenient by clicking

 or

  to set or clear all time settings.

What’s more, you can click time bar to edit the time accurately.

Click  

to copy time setting to other day.

Trigger Interval: The effective interval between two actions when event triggered.

Alarm Output: Trigger alarm output when alarm is triggered.

Step 3. Click [Copy to Camera] and   to copy the same configuration to other channels.

Summary of Contents for UI-1009-NA

Page 1: ...Network Video Recorder User Manual V5 02...

Page 2: ...potential injury or material damage Warnings u This installation must be conducted by a qualified service person and should strictly comply with the electrical safety regulations of the local region...

Page 3: ...se volatile solvents such as alcohol benzene or thinners as they may damage the surface finishes u Save the package to ensure availability of shipping containers for future transportation EU Conformit...

Page 4: ...4 3 3 Playback 24 3 3 1 Video Playback Error Bookmark not defined 3 3 2 Video Files Backup 27 3 3 3 Picture Playback 29 3 3 4 Picture Files Backup 31 3 4 Camera Settings 32 3 4 1 Camera Management 32...

Page 5: ...5 Event Status 79 3 8 6 Logs 80 3 9 Logout 81 4 WEB Settings 82 4 1 Login 82 4 2 Menu 83 4 3 Live View 84 4 3 1 Camera List 84 4 3 2 PTZ 85 4 3 3 Image Configuration 85 4 4 Playback 86 4 4 1 How to p...

Page 6: ...4 6 5 Event Status 130 4 6 6 Packet Capture Tool 130 4 7 Logs 131 4 8 Logout 131 5 Services 132...

Page 7: ...R 1000 Series PoE NVR 5000 Series and PoE NVR 7000 Series which can work with Milesight network cameras and connect with third party network cameras that support ONVIF Monitoring l Support HDMI video...

Page 8: ...t arbitrary area in playback l Support video data playback l Support pause fast play slow play skip forward and skip backward when playback locating in progress bar by dragging the mouse Backup l Supp...

Page 9: ...v4 and IPv6 l Support remote acquiring of device status system log and alarm status l Support remote operate system maintenance by format of hard disk upgrade and auto reboot etc l Support upload alar...

Page 10: ...10 2 Hardware 2 1 Panel Buttons Model Hardware Interface 4K H 265 Mini NVR 1000 Series UI 1009 A Firmware version 71 xx xx xx UI 1009 NA 4K H 265 Pro NVR 5000 Series UI 5016 B...

Page 11: ...11 UI 5032 B 4K H 265 Pro NVR 7000 Series UI 7016 B UI 7032 B 4K H 265 Pro NVR 8000 Series UI 8032 B...

Page 12: ...12 4K H 265 PoE NVR Series UI 1009 PA UI 5016 PB UI 7032 PB...

Page 13: ...mask alarm settings 3 Drag the digital zoom area 4 Drag the channel and the time scroll bar Right Button Single click Live view shows pop up menu Menu exit and go to Live View Scroll wheel Scroll up S...

Page 14: ...14...

Page 15: ...d disk panel Step3 Install the hard disks into NVR with screws shown in below pictures SATA slots of hard disks should be toward inside NVR Step4 Join the power connectors to corresponding hard disks...

Page 16: ...16 Note 1 The SATA slots are in SHORT HALF side and the SATA slot toward inside NVR 2 The data connector sequence of UI 7000 series is different from UI 8000 series...

Page 17: ...ord to modify password Note It is recommended to change the initial password for the safety of your equipment Note 1 If the NVR firmware version out of the factory is xx 7 0 6 or above the default use...

Page 18: ...ing Select the Time Zone and date via NTP or you can set date and time manually Step3 Network setting Input the IP Address Subnet Mask Gateway and Preferred DNS Server Internal NIC IPv4 Address option...

Page 19: ...on Pro NVR 7000 series PoE NVR 7000 series and Pro NVR 8000 series Click to set up RAID for selected disk Note RAID will be available after it was enabled and the device rebooted Step5 Camera Manageme...

Page 20: ...20 Step6 Record The user can start all channels recording by clicking Step6 Login Input the user name and password to login the system...

Page 21: ...creens layout 9 screens layout 16 screens layout 32 screens layout Select other screen layouts Start all channels recording Stop all channels recording Adjust image in proportion Display settings Sequ...

Page 22: ...nu Single Screen The selected channel will be full screen You could go back to previous screen layout by Sub Screen Ctrl Switch to sub screen to operate Only for Pro NVR 8000 Series Multi Screen Switc...

Page 23: ...igital zoom Snapshot manually Fisheye Mode Close menu Fisheye Mode Click to expand Fisheye Mode panel then set installation mode and display mode for Milesight Fisheye camera Installation Mode Ceiling...

Page 24: ...2 Layout Step1 Select a layout format Step2 Set desired channels Click to close a channel Select a window and then select a desired channel to add in Click to save the settings or click to reset the...

Page 25: ...ported Step1 Select screen layout channels date and recording type Select playback layout and channels User can click for quick selecting channels Click the date in red when there are recorded files o...

Page 26: ...arm Purple Emergency And take this bar above as an example it means that in this recording period timing and motion event have been triggered Icons Descriptions Icons Descriptions Next 4 cameras Previ...

Page 27: ...ves USB flash disk USB HDD USB writer and eSATA etc Step1 Select Recorded files Select the channel and date you want to backup then select the start time at timeline and click it will change into whic...

Page 28: ...media and click Step3 The window will prompt Please wait Step4 When all backup files have been exported Backup Successfully will be prompted Note The download time of files depends on the time length...

Page 29: ...29 3 3 3 Picture Playback Step1 Search and look for the snapshot files saved in HDD by selecting channels start time and end time click...

Page 30: ...o List and look up the pictures Click to play the selected picture or click to auto play pictures Icons Descriptions Icons Descriptions Play backward Play Previous picture Next picture Download pictur...

Page 31: ...31 3 3 4 Picture Files Backup Step1 Select pictures you want to backup in picture playback interface Step2 Click and select backup media to save picture...

Page 32: ...e network setting for your NVR is properly set 3 4 1 Camera Management Step1 Add camera Method1 Add camera through Device Search interface Settings Camera Device Search 1 Select IP Range NIC and Proto...

Page 33: ...33 2 Click button to search cameras at the same LAN with NVR 3 Select one channel click button input password and click button to finish...

Page 34: ...protocol for it Click to finish batch adding Note The steps for adding the third party PoE cameras plugged into Milesight PoE NVR Set camera s IP segment to the same as NVR PoE NIC before plugging to...

Page 35: ...protocols available for camera connection l ONVIF You can add any ONVIF IP cameras with ONVIF protocols l RTSP You can add any IP cameras with RTSP protocol streams Port 554 It needs you to input comp...

Page 36: ...ding the IP channels click button on Camera Management interface then appears under Status If it doesn t appear you need to check if the network is connected or whether the user name or password is co...

Page 37: ...37 Select Parameters page to re edit parameters of this channel Click OK to save the configuration Batch configuring camera Click select multiple channels and set parameters of cameras...

Page 38: ...work segment with internal NIC IPv4 address then the camera will be connected successfully 3 If the camera s password is not ms1234 the PoE channel will show disconnect status You need to input the ca...

Page 39: ...vice Search Select Protocol and NIC then set the IP range and click to quickly search the IP devices that support selected protocol at the same LAN with NVR Select channels and batch editing their IP...

Page 40: ...an click to copy the same configuration to other channels Note 1 Settings for a PTZ camera must be configured before it can be used Make sure that the PTZ and RS 485 of the NVR are connected properly...

Page 41: ...e position of preset Then choose a preset number and click to save a preset position Step2 Choose a preset number and click to delete the preset position Step3 Choose a preset number and click to chec...

Page 42: ...dialog box to delete it Step4 Click to preview the path patrol Click to stop Step5 Click and select in the dialog box to delete all preset positions of the path patrol Note 1 The preset positions deci...

Page 43: ...Up to 4 patterns could be set Step2 Drag the mouse or click 8 direction keys by mouse to rotate PTZ Step3 Click to save the PTZ movement patterns Step4 Click to preview the pattern Click to stop PTZ...

Page 44: ...add a privacy mask by following steps Step1 Select channel and enable privacy mask Step2 Set the privacy mask type and drag the mouse to select the area which is privacy on the live window You can add...

Page 45: ...imestamp Show Video Title Enable it and the video title will be shown on screen Title Position Set the position for the video title Top Left or Top Right Date Position Set the position for the date To...

Page 46: ...to trigger Day Mode IR Light Sensor Value Shows the current value of IR light sensor Power Line Frequency 50Hz and 60Hz are available Corridor Mode Set corridor mode Image Rotation Set image rotation...

Page 47: ...cord Step1 Ensure your NVR has been installed and the HDD has been initialized please check it on Settings Disk Management interface Step2 Ensure that the HDD has sufficient storage space Double click...

Page 48: ...edit schedule Select Day Record Type and Time to finish editing Method 2 Select operation type Timing Motion Alarm Motion Alarm or Erase Then drag a square in the time table to set record effective ti...

Page 49: ...copy the same record configuration to other channels Batch Settings Step1 Click to enter Batch Settings interface Step2 Select channels and click to start always record Step3 Select channels and clic...

Page 50: ...pre record It will start recording before the event is triggered Duration Time Event pre record duration time Post Record Enable Disable post record It will keep recording after the event is over Dur...

Page 51: ...e Motion Detection Select channel Sensitivity and click to enable Motion Detection Step2 Set the area for triggering motion detection You can set the area by dragging a square on live view window Note...

Page 52: ...o set or clear all time settings Click to edit record effective time manually Audible Warning NVR will trigger an audible beep when motion is detected The user can set effective schedule as following...

Page 53: ...e more convenient by clicking or to set or clear all time settings Click to edit effective time manually Trigger Interval The effective interval between two actions when event triggered Event Popup Tr...

Page 54: ...54 Alarm Output Trigger alarm output when alarm is triggered Others Trigger other channels record when alarm is triggered Step 5 Click and to copy the same configuration to other channels...

Page 55: ...ected The user can set effective schedule as following two ways Select the operation type Email or Erase Then drag a square on the time table for time setting it will be more convenient by clicking or...

Page 56: ...a rectangle on the time table for time setting it will be more convenient by clicking or to set or clear all time settings Click to edit record effective time manually Trigger Interval The effective...

Page 57: ...cking Record Start recording when alarm is triggered Trigger Channel Record Trigger selected channels to record when alarm is triggered Channel Record Schedule Select channel and set corresponding sch...

Page 58: ...effective time manually Trigger Interval The effective interval between two actions when event triggered Email Linkage NVR will send an email to the address you set before User can set effective sche...

Page 59: ...red PTZ action includes Preset and Patrol User can set effective schedule as following two ways Select the operation type Email or Erase Then drag a square on the time table for time setting it will b...

Page 60: ...arm Alarm Type Choose NO or NC alarm type for the alarm Dwell Time The output time for alarm If the output alarm lasts too long you can select the Manually Clear to stop it Step2 Select effective Time...

Page 61: ...iled Recording fails including HDD Failed HDD Full and so on HDD Failed Failed to recognize HDD HDD Unformat HDD is unformat No Disk There is no HDD Step2 Select normal linkage includes Pop up Alarm A...

Page 62: ...display duration time for Motion Detection popup screen Boot Wizard Enable it to pop up boot wizard after rebooting Local Authentication Enable it to authenticate the user after rebooting Menu Authent...

Page 63: ...lly IPv6 Manual Router Advertisement DHCPv6 are available DNS Server Preferred DNS Server DNS server IP address Alternate DNS Server DNS server alternate address Note 1 Check the DHCP check box when t...

Page 64: ...k DDNS check box to enable it then select a DDNS Server and input the user name password and host name Do not forget to save the configuration Milesight has its own DDNS server Please do port forwardi...

Page 65: ...Security Protocol of email sending including TLS and SSL Host Name It will be attached in the email Sender Named by yourself for the Sender s E mail Sender Email Address It must be same as User name S...

Page 66: ...ter clicking Saving please check corresponded possibilities below P2P Status Description Network unavailable Failed to connect with internet Authentication request failed Failed to authenticate P2P en...

Page 67: ...The version of SNMP Please select the version of your SNMP software SNMP v1 No security protection SNMP v2c Require password for access SNMP v3 Support encryption on the premise that the HTTPS protoco...

Page 68: ...default HTTP port for IE browser is 80 2 HTTP port is used for remote network access for 4k H 265 NVR Series HTTPS Port The default HTTPS port is 443 Please modify HTTPS ports according to actual app...

Page 69: ...rmal disk mode Recycle Mode Enable recycle mode to enable the recycle for full disk Hot Spare A disk can be used as the hot spare for any array created in the system Rebuild When the array is in Degra...

Page 70: ...tores data over multiple hard disk drives to provide enough redundancy so that data can be recovered if one disk fails Step1 Select HDD and click Step2 Select RAID Type and HDD port then click to crea...

Page 71: ...rs Test Type Fast and Full are available Self evaluation If the HDD is in good condition it will pass the self evaluation 3 7 4 Holiday It can configure the record or image capture schedule for holida...

Page 72: ...rsion the default password will turn to ms1234 after a reset or it will keep the old default password 123456 3 If the NVR firmware version is below xx 7 0 6 the default user name is admin and the defa...

Page 73: ...es into dark gray click to edit user privileges Local Privilege means that the privilege to the monitor connected with NVR Remote Privilege means that the privilege to web settings Click to modify pas...

Page 74: ...d select the corresponding firmware Step2 Click confirm the upgrade Note The system will auto reboot after confirming upgrade 3 7 7 Save Load Configuration Backup Restore Backup Select a folder and th...

Page 75: ...75 Restore Select a cfg file and then click to import configuration to your NVR Reset All parameters can be reset to default settings by clicking...

Page 76: ...your configuration Permanent 1 Month 2 Months 4 Months 6 Months 8 Months 10 Months and 12 Months are available for these two options 3 7 9 Auto Reboot You can set day and time for reboot and the NVR w...

Page 77: ...your rapid reference If you want to make any configuration please go to corresponding parts accordingly 3 8 1 Device Information Device Information includes Device ID Model MAC Address Hardware Versi...

Page 78: ...ze and Status The PoE Port Status is only for PoE NVR it will show you the current power and connection status of PoE ports 3 8 4 Disk Status Disk Status includes Port Vendor Status Total GB Free GB H...

Page 79: ...t and Output list here if NVR has corresponded interface will turn into when the corresponding alarm is triggered Camera Event The user can check Camera Event here including Video Loss Motion and I O...

Page 80: ...eck search and export logs in Logs interface By selecting the Start Time End Time Main Type and Sub Type which can narrow down the scale of logs you can search for logs that you need Click to export s...

Page 81: ...81 3 9 Logout Logout Exit the current login account Reboot Restart the NVR Shutdown Close the NVR...

Page 82: ...factory is xx 7 0 6 or above the default user name is admin and the default password is ms1234 2 If the NVR firmware version is below xx 7 0 6 the default user name is admin and the default password i...

Page 83: ...s Hide or show secondary menu Live view Play back the video Make settings for Camera Record Event and System Check Device Information Network Status Camera Status Disk Status and Event Status Check al...

Page 84: ...ondary Stream Save View Play default view 1 screen mode 4 screens mode 8 screens mode 9 screens mode Full screen Digital zoom Snapshot Start all live view Stop all live view Record Previous page Next...

Page 85: ...85 4 3 2 PTZ Operating PTZ Preset Patrol and Pattern on PTZ page 4 3 3 Image Configuration Adjust image Brightness Contrast Saturation Sharpness and Noise Reduction Level on Image Configuration page...

Page 86: ...It supports playback according to recorded time Play recorded files in specified time period Step1 Select channel and date Step2 Select record types Timing Motion Detection or Emergency Step3 Click to...

Page 87: ...aning of each color is shown below Blue Timing Green Motion Red Alarm Purple Emergency And take this bar above as an example it means in this recording period timing and motion event have been trigger...

Page 88: ...playback interface select camera the date and time to playback Step2 Select Recorded files for Backup Click then select start time and end time by dragging the vertical line on the time bar Step3 Bac...

Page 89: ...nterface Step2 Pause first when you want to backup a special scene during video playback Step3 Click to save the picture Then the backup picture can be found in the files path you set before Note It i...

Page 90: ...iew Picture Path Playback Preview Path Connection Type Play Mode and Primary Stream When Fullscreen option 4 5 2 Camera Before configuration please ensure that camera is connected to the same network...

Page 91: ...terface Settings Camera Device Search 1 Select IP Range NIC and Protocol which includes ALL ONVIF and MSSP MSSP You can search out all Milesight camera which has different network segment in the LAN 2...

Page 92: ...and you can choose TCP or UDP transport protocol for it Click to finish batch adding Note The steps for adding the third party PoE cameras plugged into Milesight PoE NVR Set camera s IP segment to the...

Page 93: ...ee protocols available for camera connection l ONVIF You can add any IP cameras with ONVIF protocols l RTSP You can add any IP cameras with RTSP protocol streams Port 554 It needs you to input complet...

Page 94: ...ment interface then appears under Status If it doesn t appear you need to check if the network is connected or whether the user name password is correct or not Step3 Configure IP Channel Configure one...

Page 95: ...devices and then click to delete Batch configuring camera Click select multiple channels and set cameras parameters Note The user name and password entered here are the default user name and password...

Page 96: ...will be connected successfully 3 If the camera s password is not ms1234 the PoE channel will show disconnect status You need to input the camera s password by clicking to realize authentication you ca...

Page 97: ...Device Search Select Protocol and NIC set the IP range then click to quickly search the IP devices that support selected protocol at the same LAN with NVR Select channels and batch editing their IP i...

Page 98: ...o Camera to copy the same configuration to other channels Note 1 The PTZ protocol and address of IP channel must be consistent with those of the PTZ decoder 2 Settings for a PTZ camera must be configu...

Page 99: ...ou can add a privacy mask by following steps Step1 Select channel and enable privacy mask Step2 Set the privacy mask type and drag the mouse to select the area which is privacy on the live window You...

Page 100: ...and the video title will be shown on screen Video Title Set the video title for the channel Title Position Set the position for the video title Top Left Top Right Bottom Left or Bottom Right Show Time...

Page 101: ...llumination intensity to trigger Day Mode IR Light Sensor Value Shows the current value of IR light sensor Power Line Frequency 50Hz and 60Hz are available Corridor Mode Set corridor mode Image Rotati...

Page 102: ...or Configuration Step1 Ensure your NVR has installed and initialized the HDD Step2 Ensure that the HDD has sufficient storage space Select Recycle Mode to ON in the case of insufficient capacity of HD...

Page 103: ...e desired channel Step3 Set record schedule Select record type includes Timing Motion Detection Alarm and Motion Alarm then set the time you want to record It is convenient for you to set all or clear...

Page 104: ...104 Click Copy to Camera to copy the same configuration to other channels Batch Settings Record and Stop are available for user to set or clear always record schedule for selected channels...

Page 105: ...t recording before the event is triggered Duration Time Event pre record duration time Post Record Enable Disable post record It will keep recording after the event is over Duration Time Event post re...

Page 106: ...able Motion Detection Select channel Sensitivity and click to enable Motion Detection Step2 Set the area for triggering motion detection You can select an area by dragging the mouse to set the trigger...

Page 107: ...at s more you can click time bar to edit the time accurately Click to copy time setting to other day Audible Warning NVR will trigger an audible beep when motion is detected Drag a line on the time ta...

Page 108: ...king or to set or clear all time settings What s more you can click time bar to edit the time accurately Click to copy time setting to other day Trigger Interval The effective interval between two act...

Page 109: ...rning NVR will trigger an audible beep when alarm is triggered Drag a line on the time table for time setting it will be more convenient by clicking or to set or clear all time settings What s more yo...

Page 110: ...r to set or clear all time settings What s more you can click time bar to edit the time accurately Click to copy time setting to other day Trigger Interval The effective interval between two actions w...

Page 111: ...alarm is triggered Trigger Channel Record Trigger selected to record when alarm is triggered Channel Record Schedule Set record schedule for selected channel Also you can click to copy the schedule t...

Page 112: ...ed Click Copy to Alarm and to copy the same configuration to other channels Email Linkage NVR will send an email to the address you set before Trigger Interval The effective interval between two actio...

Page 113: ...nd Alarm Name Alarm Output No The channel which will output the alarm signal Alarm Type Select alarm type NO or NC Delay Set the output time for alarm If the output alarm lasts too long you can select...

Page 114: ...Failed HDD Full and so on HDD Failed Failed to recognize HDD HDD Unformat HDD is unformat No Disk There is no HDD Step2 Select normal linkage includes Pop up Alarm Audible Warning and Email Linkage P...

Page 115: ...auto search IP When enable DHCP function you can not modify IP Subnet mask Gateway Disable IPv4 DHCP to modify IP Subnet mask Gateway manually IPv6 Manual Router Advertisement DHCPv6 are available DNS...

Page 116: ...Check DDNS check box to enable it then select a DDNS Server input the user name password and host name Do not forget to save the configuration Milesight has its own DDNS server Please do port forwardi...

Page 117: ...on Security Protocol of email sending including TLS and SSL Host Name It will be attached in the email Sender Named by yourself for the Sender E mail Sender Email Address It must be same with User nam...

Page 118: ...after clicking Saving please check corresponded possibilities below P2P Status Description Network unavailable Failed to connect with internet Authentication request failed Failed to authenticate P2P...

Page 119: ...3 The version of SNMP please select the version of your SNMP software SNMP v1 No security protection SNMP v2c Require password for access SNMP v3 Support encryption on the premise that the HTTPS proto...

Page 120: ...ity The reliable and stable technology can secure the user information security and device safety There are three certificate installation types Create a Private Certificate Click Create to create the...

Page 121: ...the certificate request Download the certificate request and submit it to the trusted certificate authority for signature After receiving the signed valid certificate import the certificate to the dev...

Page 122: ...Secure Shell SSH has many functions it can replace Telnet and also provides a secure channel for FTP POP even for PPP Note The default SSH port is 22 Only for Milesight R D debugging HTTP Port Settin...

Page 123: ...ming Protocol RTSP is an application layer protocol in TCP IP protocol system The default RTSP port is 554 Please modify RTSP port according to actual application Note 1 RTSP port is used for remote n...

Page 124: ...s of the current year Click to open holiday configuration page to modify holiday name check the Enable Holiday check box and then select Type to setup Start End date There are By0 Month By Week and By...

Page 125: ...to ms1234 after a reset or it will keep the old default password 123456 3 If the NVR firmware version is below xx 7 0 6 the default user name is admin and the default password is 123456 Add a new user...

Page 126: ...r changes into blue click to edit user privileges Local Privilege means the privilege to the monitor connected with NVR Remote Privilege means the privilege to web settings Click to change password De...

Page 127: ...to your configuration the NVR will automatically delete your logs and photos after the retention period or permanently keep the Log and Photo Reboot Click to reboot the NVR Set Default Click to reset...

Page 128: ...sconnect the device power during the process The device will reboot automatically after upgrading 4 6 Status You can have a quick view of the information of the device network camera disk and event Th...

Page 129: ...and LAN2 4 6 3 Camera Status Camera status includes Channel Name IP Address Record Frame Rate Bit rate Resolution and Status 4 6 4 Disk Status Disk status includes Port Vendor status Total GB Free GB...

Page 130: ...when alarm is triggered Camera Event Camera Event shows camera event including Video Loss Motion and I O turns into when alarm is triggered 4 6 6 Packet Capture Tool Input IP and Port then click Start...

Page 131: ...heck search and export logs By selecting the Main Type Sub Type Start Time and End Time which can narrow down the scale of logs you can search for logs that you need and then export them locally 4 8 L...

Page 132: ...rt Technical Support Mailbox support milesight com Web http www milesight com Online Problem Submission System http www milesight com support feedback asp MILESIGHT USA TEL 1 800 561 0485 Add 7509 N W...

Page 133: ...133...

Reviews: