


32
Installation
Unpack Appliance
Beware of sharp edges! Wear gloves!
1. Unpack the appliance.
2. Unpack any loose items from around the appliance
and check against the Pack Content list provided in
the documentation package.
3. Verify that you have all the components required
for the installation,
including:
-
VENT PLATE;
-
fuel bed;
- fret brackets and fret (if used);
- venting components and accessories;
- blower and electrical components for blower
installation if used.
Prepare Appliance
The size of the existing fi replace cavity will aff ect the
method of installation. Smaller fi replaces, particularly
factory-built zero-clearance fi replaces will require the
RF24 fi rebox to be disassembled then reassembled
inside the fi replace. Plan your particular installation
accordingly.
1. Unhook barrier screen and window cover. The
screen is hooked to the window cover which in turn
is hooked to the fi replace at the top and attached
with magnets at the bottom. Grabbing both the
screen and window cover, pull the bottom to detach
the magnets and unhook the top.
2. Remove window. Rotate the four fastening studs at
the bottom corners and sides 90 degrees to release
them. Unhook window.
3. Remove items from packed inside fi rebox.
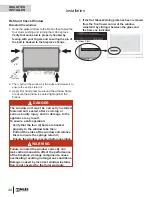
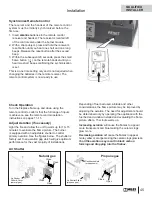
4. Strip fi rebox down by removing:
a. Log Support (4 screws;
b. Burner Module (10 screws);
c. Support Legs (2 screws per leg) (required
when inserting into small fi replaces only).
x 4
Remove Burner
Module
(10 screws)
Remove Log
Support
(4 screws)
Remove Support
Legs (2 screws/leg)
QUALIFIED
INSTALLER


