background image

Warnings and safety instructions

13

 

Do not slide pots or pans over the oven floor.

This could scratch and damage the surface.

 

The door can support a maximum load of 15 kg. Do not lean or sit

on an open door, or place heavy items on it. Make sure that nothing
gets trapped between the door and the oven cavity. This could
damage the oven.

 

This oven must only be used for cooking food. Fumes, vapors or

heat given off by glues, plastics or flammable liquids and materials
could be hazardous. Do not use it as a dryer, kiln, dehumidifier, etc.

 

Do not obstruct the flow of combustion and ventilation air.

 

Do not let metal objects (aluminum foil, pans) come in contact

with the heating element.

 

Make certain that the power cords of small appliances do not

come in contact with or get caught in the oven door.

 

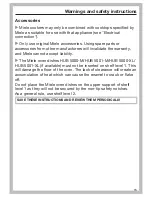
When baking frozen pizzas or pies, place them on the wire rack

lined with parchment paper. Do not use the baking tray or the
roasting pan for frozen foods with a large surface area. The tray or
pan could become warped and difficult to remove from the oven
when hot. Frozen foods like french fries, chicken nuggets, etc. can
be baked on the baking tray.

For ovens with a stainless steel front:

 

The coated stainless steel surface can be damaged by adhesives

and will lose its protective effect against dirt. Do not adhere sticky
notes, transparent tape, masking tape or other adhesives onto the
stainless steel surface.

 

The surface is susceptible to scratching. Even magnets can cause

scratches.

Summary of Contents for H2265B

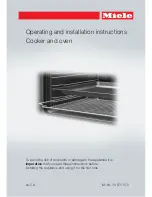
Page 1: ...on instructions Cooker and oven To avoid the risk of accidents or damage to the appliance it is imperative that you read these instructions before installing the appliance and using it for the first time en CA M Nr 10 571 570 ...

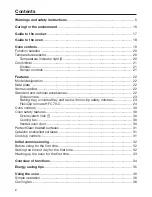
Page 2: ...sories 22 Side runners 23 Baking tray universal tray and rack with non tip safety notches 23 FlexiClip runners HFC 70 C 24 Oven controls 30 Oven safety features 30 Oven system lock 30 Cooling fan 30 Vented oven door 30 PerfectClean treated surfaces 31 Catalytic enamelled surfaces 31 Cooktop controls 31 Initial commissioning 32 Before using for the first time 32 Setting the time of day for the firs...

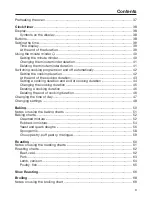
Page 3: ...he cooking duration 43 Setting a cooking duration and end of cooking duration 44 Changing the cooking duration 45 Deleting a cooking duration 46 Deleting the end of cooking duration 46 Changing the time of day 47 Changing settings 48 Baking 50 Notes on using the baking charts 51 Baking charts 52 Creamed mixture 52 Rubbed in mixture 54 Yeast and quark doughs 56 Sponge mix 58 Choux pastry puff pastr...

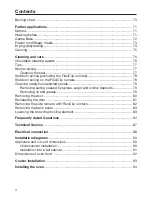
Page 4: ...catalytic enamelled panels 79 Removing soiling caused by spices sugar and similar deposits 79 Removing oil and grease 79 Removing the door 80 Reinstalling the door 81 Removing the side runners with FlexiClip runners 82 Removing the back panel 83 Lowering the browning broiling element 83 Frequently Asked Questions 84 Technical Service 87 Electrical connection 88 Installation diagrams 90 Appliance a...

Page 5: ... the oven to prevent accidents and machine damage This appliance complies with all current local and national safety requirements Inappropriate use can however lead to personal injury and damage to property Read the operating and installation instructions carefully before using the oven They contain important notes on the installation safety operation and maintenance of the appliance This prevents...

Page 6: ...isk of Fire Do not use this oven to store or dry flammable materials This oven can only be used by people with reduced physical sensory or mental capabilities or lack of experience and knowledge if they are supervised whilst using it This oven is supplied with a special lamp to cope with particular conditions e g temperature moisture chemical resistance abrasion resistance and vibration This speci...

Page 7: ...safe manner Children must be able to recognize and understand the possible consequences of incorrect operation Children must not be allowed to clean or maintain the appliance unsupervised Risk of suffocation Children may be able to wrap themselves in packaging material or pull it over their heads with the risk of suffocation Keep children away from all packaging materials Danger of burning Childre...

Page 8: ...Connect only to properly grounded outlet See Electrical connection GROUNDING INSTRUCTIONS It is imperative that this basic safety requirement be met If there is any doubt have the electrical system of the house checked by a qualified electrician The connection data voltage and frequency on the data plate of the oven must match the domestic power supply in order to avoid the risk of damage to the o...

Page 9: ...rts are used Defective components must only be replaced by genuine Miele spare parts If the oven is delivered without a power connection cable or if the power connection cable is damaged a special cable must be installed by a Miele approved service technician see Electrical connection The oven requires a sufficient supply of cool air for efficient operation Make sure that the supply of cool air is...

Page 10: ...ot let food sit in the oven for more than one hour before or after cooking Doing so can result in food poisoning or sickness It is important that the heat is allowed to spread evenly throughout the food being cooked and that the temperature is sufficiently high This can be achieved by stirring and or turning the food Use only dry heat resistant potholders Moist or damp potholders used on hot surfa...

Page 11: ...ssarily as someone may trip over it or be injured by it Oils and fats are a fire hazard if allowed to overheat Never leave the appliance unattended when cooking with oil or fats Never attempt to put out oil or fat fires with water Switch the oven off and extinguish the flames by leaving the door closed Never attempt to put out oil or fat fires on the cooktop with water Switch the cooktop off Extin...

Page 12: ...oven Follow the manufacturer s instructions When using residual heat to keep food warm corrosion from high air humidity and condensation can occur in the oven This can cause damage to the control panel countertop and cabinet carcase Do not switch the oven off Instead select the lowest temperature available for the selected function The cooling fan will then continue to run automatically Food which...

Page 13: ...ome in contact with the heating element Make certain that the power cords of small appliances do not come in contact with or get caught in the oven door When baking frozen pizzas or pies place them on the wire rack lined with parchment paper Do not use the baking tray or the roasting pan for frozen foods with a large surface area The tray or pan could become warped and difficult to remove from the...

Page 14: ...tion Instructions Scratches on the door glass can cause the glass to break Do not use abrasive cleaners hard sponges brushes or sharp metal tools to clean the door glass The side runners can be removed see Cleaning and care Make sure that they are reinserted correctly The catalytic enamelled back panel can be removed for cleaning purposes see Cleaning and care Ensure it is correctly fitted after c...

Page 15: ...ele cannot accept liability The Miele oven dishes HUB 5000 M HUB 5001 M HUB 5000 XL HUB 5001 XL if available must not be inserted on shelf level 1 This will damage the floor of the oven The lack of clearance will create an accumulation of heat which can cause the enamel to crack or flake off Do not place the Miele oven dishes on the upper support of shelf level 1 as they will not be secured by the...

Page 16: ...n many valuable materials They also contain certain materials compounds and components which were essential for their correct functioning and safety These could be hazardous to your health and to the environment if disposed of with general waste or if handled incorrectly Please do not therefore dispose of your old appliance with general waste Instead please make use of officially designated collec...

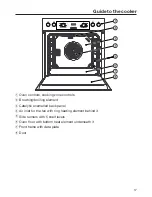
Page 17: ...controls b Browning broiling element c Catalytic enamelled back panel d Air inlet for the fan with ring heating element behind it e Side runners with 5 shelf levels f Oven floor with bottom heat element underneath it g Front frame with data plate h Door ...

Page 18: ...rowning broiling element c Catalytic enamelled back panel d Air inlet for the fan with ring heating element behind it e Side runners with 5 shelf levels f Oven floor with bottom heat element underneath it g Front frame with data plate h Door ...

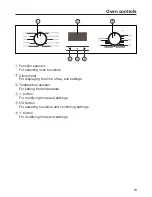
Page 19: ...nctions b Clock timer For displaying the time of day and settings c Temperature selector For setting the temperature d button For modifying times and settings e OK button For selecting functions and confirming settings f button For modifying times and settings ...

Page 20: ...e for the cooking processes It can be turned clockwise until a resistance is felt and then turned back again When the function selector is in the position it can be retracted by pushing it in The temperature settings are marked on the temperature selector and on the control panel Temperature indicator light The temperature indicator light on the display lights up whenever the oven is heating up As...

Page 21: ...or your settings It goes slightly darker if settings are not being entered Please refer to Clock timer for more information Sensor controls The sensor controls respond to the touch of a fingertip Every touch on the sensors is confirmed by an audible tone The tone can be switched off by changing setting to status see Clock timer Changing settings ...

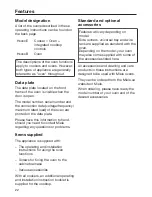
Page 22: ...ding any questions or problems Items supplied The appliance is supplied with The operating and installation instructions for using the oven functions Screws for fixing the oven to the cabinet carcase Various accessories With all cookers an additional operating and installation instruction booklet is supplied for the cooktop Standard and optional accessories Features will vary depending on model Si...

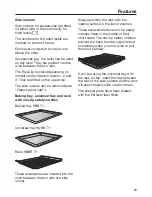
Page 23: ...tray universal tray and rack with non tip safety notches Baking tray HBB 71 Universal tray HUBB 71 Rack HBBR 71 These accessories are inserted into the oven between the two rails of a side runner Always position the rack with the loading surface in the lower position These accessories have non tip safety notches fitted in the middle of their short sides The non tip safety notches prevent the trays...

Page 24: ... the FlexiClip runners right into the oven cavity before placing accessories on them To prevent the risk of accessories sliding off the runners Make sure that they are sitting securely on their runners in between the stoppers at either end of each runner Always place the rack with the loading surface in the lower position on the FlexiClip runners The FlexiClip runners can support a maximum load of...

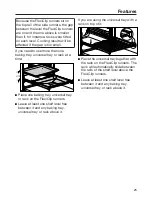
Page 25: ...rsal tray or rack at a time Place one baking tray universal tray or rack on the FlexiClip runners Leave at least one shelf level free between it and any baking tray universal tray or rack above it If you are using the universal tray with a rack on top of it Place the universal tray together with the rack on the FlexiClip runners The rack will automatically slide between the rails of the shelf leve...

Page 26: ...ists of two rails The FlexiClip runners are fitted on the upper rail of the two rails that make up a shelf level The FlexiClip runner with the Miele logo is fitted on the right When fitting the FlexiClip runners do not extend them If the FlexiClip runners are difficult to pull out after fitting you may need to pull firmly on them once to release them Hook the FlexiClip runner onto the front of the...

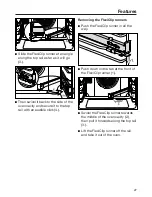
Page 27: ...e it to the top rail with an audible click 4 Removing the FlexiClip runners Push the FlexiClip runner in all the way Push down on the tab at the front of the FlexiClip runner 1 Swivel the FlexiClip runner towards the middle of the oven cavity 2 then pull it forwards along the top rail 3 Lift the FlexiClip runner off the rail and take it out of the oven ...

Page 28: ...d for dehydrating or drying food The enamelled surface has been treated with PerfectClean The round perforated baking tray HBFP 27 1 can be used for the same things Baking stone HBS 60 The baking stone is ideal for items which need a well baked base such as pizza quiche bread bread rolls and savoury snacks The baking stone is made from heat retaining fireclay and is glazed Place it directly on the...

Page 29: ...nduction cooktops Catalytic enamelled accessories Side walls These are installed behind the side runners and protect the interior walls against soiling Ceiling panel This is installed above the browning broiling element to protect the ceiling against soiling Back panel This should be replaced if the catalytic enamel has become ineffective due to incorrect use or very heavy soiling When ordering pl...

Page 30: ...rted The cooling fan mixes hot air from the oven cavity with cool room air before venting it out into the kitchen through vents located between the appliance door and the control panel The cooling fan will continue to run for a while after the oven has been switched off to prevent any humidity building up in the oven on the control panel or in the cabinet carcase The cooling fan will switch itself...

Page 31: ...rated Gourmet baking tray Round baking tray Round perforated baking tray Catalytic enamelled surfaces The back panel is coated with catalytic enamel Soiling from oil and fat is burnt off this type of surface when very high temperatures are used in the oven See Cleaning and care Cooktop controls features will vary depending on model HxxxxE cookers also have cooking zone controls for operating the c...

Page 32: ...ay is shown in 24 hour clock format After connecting the oven to the electricity supply will flash on the display The time of day is set in segments first the hours then the minutes Confirm with OK will light up and will flash While the symbol is flashing confirm with OK The hours will flash Use or to set the hours Confirm with OK The hours are saved and the minutes will flash Use or to set the mi...

Page 33: ...e oven up wipe the interior with a damp cloth to remove any dust or bits of packaging that may have accumulated in the oven cavity during storage and unpacking Select Convection Bake The oven heating lighting and cooling fan will switch on Set the maximum temperature 475 F 250 C Heat the empty oven for at least an hour After the heating up process has finished turn the function selector to Off and...

Page 34: ...at For rapid preheating of the oven cavity Once the desired temperature has been reached the oven mode must be selected Convection Bake For baking and roasting You can cook on several shelf levels at the same time Because the fan distributes the heat to food straight away it allows you to use a lower temperature than you would with Surround Intensive For baking cakes with moist toppings Intensive ...

Page 35: ... several shelf levels at the same time Gentle Bake is an innovative function that makes optimum use of residual heat You can save up to 30 energy compared to cooking with a standard oven function as long as the door is kept shut during cooking Convection Broil can be used for a wide variety of food With Convection Broil you can use lower temperatures than with other broil functions which use the m...

Page 36: ...ature The oven heating will switch on After cooking Turn the function selector to Off and the temperature selector to Take the food out of the oven Cooling fan The cooling fan will continue to run for a while after the oven has been switched off to prevent any humidity building up in the oven on the control panel or in the cabinet carcase The cooling fan will switch itself off automatically after ...

Page 37: ...d cakes or biscuits with a short baking time up to 30 minutes delicate mixtures e g sponges dark bread doughs beef sirloin joints and fillet Rapid PreHeat With Rapid PreHeat the heating up phase can be shortened Do not use Rapid PreHeat to preheat the oven when baking pizzas or delicate mixtures e g sponges biscuits They will brown too quickly on top Select Rapid PreHeat Select a temperature When ...

Page 38: ... symbols appear Symbol function Minute minder Any Cooking duration Function End of cooking duration Temperature indicator light Time of day Off Setting Setting status System lock You can only set or change a function if the function selector is in the correct position Buttons Button Use Highlight functions Reduce duration Access settings Change the status of a setting Highlight functions Increase ...

Page 39: ...psed and the numeric block is no longer flashing you have to access the function again Use or to set the time you want Confirm with OK The right hand numeric block will flash Use or to set the time you want Confirm with OK The time has now been saved Time display The symbols and or will show if you have set times If you are using the minute minder cooking duration and end of cooking duration funct...

Page 40: ... minder Example You want to boil some eggs and set a minute minder duration of 6 minutes and 20 seconds Press continuously until flashes Confirm with OK will appear and the minutes will start to flash If you press once two dashes will appear and then when you press again the maximum possible minutes will appear in the minute numeric block Use or to set the minutes Confirm with OK The minutes are s...

Page 41: ...d will appear Confirm with OK The minutes will flash Use or to set the minutes Confirm with OK The seconds will flash Use or to set the seconds Confirm with OK The changed minute minder duration is now saved and will count down in seconds Deleting the minute minder duration Press continuously until flashes Confirm with OK The minutes will flash Reduce the minutes down to using or increase them up ...

Page 42: ...for baking do not delay the start for too long Cake mixture or dough will dry out and the raising agents will lose their effectiveness Setting the cooking duration Example a cake needs to bake for 1 hour and 5 minutes Place the food in the oven Select the required oven function and the temperature The oven heating lighting and cooling fan will switch on Press continuously until flashes will appear...

Page 43: ...he cooking duration At the end of the cooking duration will appear flashes The oven heating will switch off automatically The cooling fan continues to run For approx 7 minutes a buzzer will sound if switched on see Clock timer Changing settings Confirm with OK The buzzer will stop and the symbols in the display will go out The time of day appears The oven heating will then switch on again Turn the...

Page 44: ... and cooling fan will switch on First set the cooking duration Press continuously until flashes Confirm with OK will appear and the hours will flash Use or to set the hours Confirm with OK The hours are saved and the minutes will flash Use or to set the minutes Confirm with OK The cooking duration is now saved The symbol indicates the cooking duration Then set the end of cooking duration Press con...

Page 45: ... the oven heating lighting and cooling fan will switch on The cooking duration set appears and will count down in minutes until the last minute which will count down in seconds Changing the cooking duration Press continuously until flashes The time remaining will appear in the display Confirm with OK The hours will flash Use or to set the hours Confirm with OK The minutes will flash Use or to set ...

Page 46: ...to Off and the temperature selector to Take the food out of the oven Deleting the end of cooking duration Press or continuously until flashes Confirm with OK The hours will flash Press or continuously until two dashes appear Confirm with OK Four dashes appear Confirm with OK The symbol appears and the cooking duration set will count down in minutes until the last minute which will count down in se...

Page 47: ...nction selector to Off Press continuously until flashes Confirm with OK The hours will flash Use or to set the hours Confirm with OK The hours are saved and the minutes will flash Use or to set the minutes Confirm with OK The time of day is now saved The time of day must be reset following an interruption to the power supply ...

Page 48: ...til the relevant digit appears Confirm with OK The setting is selected and the current status appears e g To change the status Press or continuously until the status you want is shown Confirm with OK The selected status is now saved and the setting appears again To change further settings proceed in the same way If you do not want to change further settings Wait approx 15 seconds until the time of...

Page 49: ...of day is shown in the 12 hour format If you change the clock after 1 00 pm from a 12 hour clock to a 24 hour clock you will need to update the hour accordingly Oven system lock The system lock is switched off The system lock is switched on and appears on the display The system lock prevents the oven from being used unintentionally The system lock remains active even after a power failure Keypad t...

Page 50: ... cook properly Always place bakeware on the rack Position rectangular tins with the longer side across the width of the rack for optimum heat distribution and even baking results Bake cakes with fruit toppings or deep cakes on the universal tray Baking paper greasing the tin Miele accessories e g the universal tray are treated with PerfectClean enamel see Features Surfaces treated with PerfectClea...

Page 51: ...ng results Baking duration As a general rule check the food after the shortest duration Stick a skewer into the food If it comes out clean without any batter dough on it the food is done Shelf level The shelf level on which you place your food depends on the function selected and the number of trays Convection Bake 1 tray shelf level 2 2 trays shelf levels 1 3 2 4 3 trays shelf levels 1 3 5 If you...

Page 52: ...160 1 3 2 15 25 Small cakes biscuits 2 trays 275 300 140 150 2 4 2 25 35 3 Sponge cake 300 325 150 160 2 2 60 70 300 325 150 160 1 1 60 70 Ring cake 300 325 150 160 2 2 50 60 325 340 160 170 1 60 70 Function Convection Bake Surround Temperature Shelf level Duration 1 Preheat the oven Do not use the Rapid PreHeat function for this 2 If you are using FlexiClip runners depending on model fit them one...

Page 53: ... 2 40 50 325 340 160 170 2 2 45 55 Fresh fruit cake tray 300 325 150 160 2 2 35 45 325 340 160 170 2 2 35 55 Fresh fruit cake tin 300 325 150 160 2 2 55 65 340 350 170 180 1 35 45 Flan base 300 325 150 160 2 2 25 35 340 350 170 180 1 2 2 15 25 Function Convection Bake Surround Temperature Shelf level Duration 1 Preheat the oven Do not use the Rapid PreHeat function for this 2 If you are using Flex...

Page 54: ...0 350 170 180 1 2 2 20 30 Streusel cake 300 325 150 160 2 2 45 55 340 350 170 180 2 2 45 55 Cheesecake 300 325 150 160 2 2 70 80 340 350 170 180 1 80 90 300 325 150 160 2 2 70 80 Function Convection Bake Surround Intensive Temperature Shelf level Duration 1 Preheat the oven Do not use the Rapid PreHeat function for this 2 If you are using FlexiClip runners depending on model fit them one level low...

Page 55: ...0 Fresh fruit cake glazed tin 300 325 150 160 2 2 55 75 340 350 170 180 1 55 75 300 325 150 160 2 2 55 65 Swiss apple pie tray 425 450 220 230 1 1 30 50 350 375 180 190 1 30 50 Function Convection Bake Surround Intensive Temperature Shelf level Duration 1 Preheat the oven Do not use the Rapid PreHeat function for this 2 If you are using FlexiClip runners depending on model fit them one level lower...

Page 56: ...40 50 325 340 160 170 2 1 45 55 Apple turnovers 1 tray 300 325 150 160 2 1 25 30 325 340 160 170 2 1 2 25 30 Apple turnovers 2 trays 300 325 150 160 1 3 1 25 30 3 Function Convection Bake Surround Temperature Shelf level Duration 1 If you are using FlexiClip runners depending on model fit them one level lower 2 For yeast dough For quark dough use shelf level 3 3 Take the baking trays out of the ov...

Page 57: ...90 1 2 2 3 25 35 340 350 170 180 2 2 30 40 Proving dough Warm 4 15 30 Warm 4 15 30 Function Convection Bake Surround Intensive Temperature Shelf level Duration 1 Preheat the oven Do not use the Rapid PreHeat function for this 2 If you are using FlexiClip runners depending on model fit them one level lower 3 For yeast dough For quark dough use shelf level 3 4 The dish can be placed on the oven floo...

Page 58: ...35 300 325 150 160 1 1 30 45 Whisked sponge 340 170 2 30 40 300 340 150 170 1 1 30 45 Swiss roll 340 350 170 180 1 2 2 10 20 350 375 180 190 1 2 2 10 15 Function Convection Bake Surround Temperature Shelf level Duration 1 Preheat the oven Do not use the Rapid PreHeat function for this 2 If you are using FlexiClip runners depending on model fit them one level lower ...

Page 59: ... 350 170 180 1 3 2 20 30 3 Macaroons 1 tray 250 265 120 130 2 2 25 50 250 265 120 130 1 2 2 25 45 Macaroons 2 trays 250 265 120 130 1 3 2 25 50 3 Function Convection Bake Surround Temperature Shelf level Duration 1 Preheat the oven Do not use the Rapid PreHeat function for this 2 If you are using FlexiClip runners depending on model fit them one level lower 3 Take the baking trays out of the oven ...

Page 60: ... a covered oven dish as this will ensure that enough stock will be prepared to make gravy The oven will also stay cleaner than when roasting on the rack Tips Browning Browning only occurs towards the end of the roasting time Remove the lid about halfway through the roasting time if a more intensive browning result is desired Standing time At the end of the program take the roast out of the oven wr...

Page 61: ...an when using Surround Preheating Preheating is generally only required when roasting beef sirloin joints and fillet Roasting duration The roasting time can be determined by multiplying the thickness of the roast cm with the time per cm min cm stated below depending on the type of meat Beef Venison 15 18 min cm Pork Veal Lamb 12 15 min cm Sirloin joints Fillets 8 10 min cm Roasting times are appro...

Page 62: ...210 2 90 110 3 Function Temperature Shelf level Cooking duration Convection Bake Surround If you are using FlexiClip runners depending on model fit them one level lower 1 Use the universal tray Sear the meat on the cooktop first 2 Preheat the oven Do not use the Rapid PreHeat function for this 3 Roast with the lid on first Remove the lid halfway through the cooking duration and add approx 0 5 l of...

Page 63: ...160 2 60 80 2 340 350 170 180 2 80 100 2 Meat loaf approx 1 kg 340 350 170 180 2 60 70 2 400 410 200 210 2 70 80 2 Function Temperature Shelf level Cooking duration Convection Bake Surround If you are using FlexiClip runners depending on model fit them one level lower 1 Roast with the lid on first Remove the lid halfway through the cooking duration and add approx 0 5 l of liquid 2 Add approx 0 5 l...

Page 64: ...0 210 2 80 100 1 400 410 200 210 2 80 100 1 Function Temperature Shelf level Cooking duration Convection Bake Surround If you are using FlexiClip runners depending on model fit them one level lower 1 Roast with the lid on first Remove the lid halfway through the cooking duration and add approx 0 5 l of liquid 2 Preheat the oven Do not use the Rapid PreHeat function for this 3 Add approx 0 5 l of l...

Page 65: ...75 180 190 2 110 130 375 400 190 200 2 110 130 Poultry approx 4 kg 325 340 160 170 2 120 160 1 350 375 180 190 2 120 160 1 Fish whole approx 1 5 kg 325 340 160 170 2 45 55 350 375 180 190 2 45 55 Function Temperature Shelf level Cooking duration Convection Bake Surround If you are using FlexiClip runners depending on model fit them one level lower 1 Add approx 0 5 l of liquid halfway through roast...

Page 66: ...the meat during cooking The cooking duration is approx 2 4 hours and depends on the weight and size of the meat as well as the desired degree of doneness and browning Procedure Use the universal tray with the rack placed on top of it Do not use the Rapid PreHeat function to preheat the oven Place the rack together with the universal tray on shelf level 2 Select Surround and a temperature of 265 F ...

Page 67: ...rature to eat straight away Serve on preheated plates with very hot sauce or gravy to prevent it cooling down too quickly Cooking durations core temperatures Meat min F C Fillet of beef 80 100 138 59 Sirloin of beef rare 50 70 118 48 medium 100 130 135 57 well done 160 190 156 69 Pork fillet 80 100 145 63 Gammon 140 170 154 68 Veal fillet 80 100 140 60 Saddle of veal 100 130 145 63 Saddle of lamb ...

Page 68: ... Do not use the baking tray Preparing food for broiling Trim the meat Do not season the meat with salt before broiling as this will draw out the juices Add a little oil to lean meat if necessary Do not use other types of fat as they can easily burn and cause smoke Clean fish as usual To enhance the flavour salt or lemon can be added Broiling Place the rack or the anti splash insert if available on...

Page 69: ...r approx 5 minutes with the door closed Shelf level Select the shelf level according to the thickness of the food Thinner cuts shelf level 4 or 5 Thicker cuts shelf level 2 or 3 Broiling duration Thinner cuts of meat slices of fish require approx 6 8 minutes per side Thicker pieces require more time per side It is best to broil food of a similar thickness at the same time so that the broiling time...

Page 70: ...25 Maxi Broil 20 30 Sausages 5 Maxi Broil 8 15 475 240 10 15 Fish fillet 4 2 Maxi Broil 15 25 Maxi Broil 15 25 Trout 4 2 Maxi Broil 15 25 Maxi Broil 15 25 Toast 3 Maxi Broil 4 8 Hawaii toast 4 2 Maxi Broil 6 10 475 240 10 13 Tomatoes 4 2 Maxi Broil 10 15 Maxi Broil 12 17 Peaches 3 4 2 Maxi Broil 7 12 475 240 10 15 Thicker cuts Chicken approx 1 2 kg 2 2 Maxi Broil 55 65 375 190 55 65 Pork knuckle a...

Page 71: ...frosting poultry catch the defrosting liquid in a suitable dish Heating dishes Use Convection Bake for preheating dishes Only preheat heat resistant dishes Place the rack on shelf level 2 and place the dishes to be preheated on it Depending on the size of the dishes you can also place it on the oven floor and take the side runners out to make more room Select Convection Bake Set the temperature to...

Page 72: ...ved in this case The oven lighting does not switch on in this function For optimum savings in energy usage keep the door shut whilst cooking Examples of use Food F C min Biscuits 325 160 22 27 Ratatouille 350 180 40 60 Fish fillet in foil approx 500 g 400 200 25 35 Frozen pizza precooked 410 210 20 25 Ham roast approx 1 5 kg 325 160 115 145 Braised beef approx 1 5 kg 350 180 160 180 Temperature Du...

Page 73: ...st temperature recommended by the manufacturer Turn small frozen items several times during cooking Method Handling food carefully will help protect your health Cakes pizzas and french fries should be cooked until golden not dark brown Select the oven function and temperatures recommended on the food s packaging Preheat the oven Place the food in the preheated oven on the shelf level recommended o...

Page 74: ...niversal tray You can also use the Gourmet perforated baking tray if you have one Select Convection Bake or Surround Select a temperature of 175 210 F 80 100 C Place the universal tray on shelf level 2 If you are using Convection Bake you can dry produce on levels 1 3 at the same time Food min Fruit 120 480 Vegetables 180 480 Herbs 50 60 Function Drying time Convection Bake Surround Reduce the tem...

Page 75: ...e forming evenly in the jars Reduce the temperature in good time to prevent the contents from boiling over Fruit pickles Turn the function selector to Oven lighting as soon as you can see the bubbles forming in the jars Leave the jars to stand for a further 25 30 minutes in the warm oven cavity Vegetables Reduce the temperature to 210 F 100 C as soon as you can see the bubbles forming in the jars ...

Page 76: ...ances lead to breakage Remove all cleaning agent residues immediately Unsuitable cleaning agents To avoid damaging the surfaces do not use cleaning agents containing soda ammonia acids or chlorides cleaning agents containing descaling agents on the oven front abrasive cleaning agents e g scouring powder scouring cream bath bricks solvent based cleaning agents stainless steel cleaning agents dishwa...

Page 77: ...er the browning broiling element Normal soiling See Cleaning catalytic enamelled panels for instructions on how to keep catalytic panels clean Remove normal soiling immediately with warm water liquid dish soap and a clean sponge or a clean damp microfibre cloth Remove all cleaning agent residues thoroughly with clean water This is particularly important for any parts with a PerfectClean finish as ...

Page 78: ...ckaging Non Miele oven cleaner must only be used in a cold oven and for no longer than a maximum of 10 minutes You can then also use the scouring pad on the back of a washing up sponge to remove the soiling After cleaning remove all oven cleaning agent residues thoroughly with clean water and dry with a soft cloth Stubborn soiling on the FlexiClip runners Do not wash the FlexiClip runners in the d...

Page 79: ...he oven Removing oil and grease Remove any accessories from the oven including the side runners Before starting the cleaning process remove any large deposits of soiling from the inside of the door and the PerfectClean surfaces to prevent them burning on Select the Convection Bake function and a temperature of 475 F 250 C Then heat the empty oven for at least 1 hour The length of time required wil...

Page 80: ...lly Release the locking clamps by turning them as far as they will go Do not pull the door horizontally off its retainers as they will spring back against the oven Do not pull the door off the retainers by the handle as the handle could break off Close the door to the point where resistance is felt when it is almost closed Hold the door on either side and pull it upwards off the hinge retainers Ma...

Page 81: ...ge retainers Make sure that you do not tilt the door Open the door fully If the locking clamps are not locked the door could work loose resulting in damage Ensure that the locking clamps are locked after refitting the door To relock the locking clamps turn them back up to the horizontal position as far as they will go ...

Page 82: ...e the FlexiClip runners separately beforehand please follow the instructions in Features Fitting and removing FlexiClip runners Danger of burning Make sure the oven heating elements are switched off The oven must be cool Pull the side runners out of the holder 1 and remove them 2 Reassemble by following these instructions in reverse order Insert the components carefully ...

Page 83: ...nd Care Cleaning catalytic enamelled panels Reassemble by following these instructions in reverse order Refit the back panel carefully Make sure the openings are located as illustrated in Oven overview Refit the side runners Reconnect the appliance to the power supply Lowering the browning broiling element Danger of burning Make sure the oven heating elements are switched off The oven must be cool...

Page 84: ...s not heat up You have only selected an oven function or a temperature Select a function and a temperature The system lock has been activated Turn the system lock off see Clock timer Changing settings There is no power to the oven Check whether the mains fuse has tripped Contact a qualified electrician or Miele Service is flashing in the display There has been a power failure Reset the time of day...

Page 85: ...ish soap applied with a soft brush see Cleaning catalytic enamelled panels Cakes and biscuits are not baked properly after following the times given in the baking chart A different temperature than that given in the recipe was used Select the temperature required for the recipe The ingredient quantities are different from those given in the recipe Check if you have amended the recipe The addition ...

Page 86: ...rvice The top oven lighting does not turn on The halogen lamp is faulty Danger of burning Make sure the oven heating elements are switched off The oven must be cool Disconnect the appliance from the power supply Switch off at the wall and withdraw the plug from the socket or switch off at the circuit breaker Turn the lamp cover a quarter turn counter clockwise to release it and then pull it downwa...

Page 87: ...g Miele please have the model and serial number of your appliance ready This information is given on the data plate which is visible on the front frame of the oven when the door is fully open For appliances with cooktop controls also quote the model and serial number of the cooktop see the separate operating and installation instructions included with the cooktop Warranty For further information p...

Page 88: ...e connecting the appliance to the power supply make sure that the voltage and frequency listed on the data plate correspond with the household electrical supply This data must correspond to prevent machine damage Consult an electrician if in doubt Only operate the appliance after it has been installed into cabinetry The plug must be inserted into a suitable outlet that has been installed and groun...

Page 89: ...connected load 3 600 W Electrical connection 240 V The oven is equipped with a 6 3 1 9 m long flexible power cord with a NEMA 14 30P plug ready for connection to a 120 240 V 60 Hz 20 A power supply Maximum connected load 3 800 W H2265E Electrical connection 208 V Do not connect the oven to a 240 V power supply The oven is equipped with a 6 3 1 9 m long flexible power cord with a NEMA 14 50P plug r...

Page 90: ...3 mm 16 407 mm 510 mm 21 1 2 546 mm 23 7 16 595 mm 23 7 16 596 mm A A 20 1 16 22 1 16 560 mm 4 100 mm 23 5 8 600 mm 21 5 8 550 mm 22 11 16 577 mm 22 5 8 575 mm Cut out 4 x 22 100 mm x 560 mm in the bottom of the cabinet for power cord and ventilation Power cord with plug Oven with glass front Oven with metal front Front design may vary depending on model For the more current specifications please ...

Page 91: ... 577 mm 22 5 8 575 mm A A 22 1 16 560 mm 4 100 mm 23 3 8 23 7 16 593 595 mm 21 5 8 550 mm Cut out 4 x 22 100 mm x 560 mm in the bottom of the cabinet for power cord and ventilation Power cord with plug Oven with glass front Oven with metal front Front design may vary depending on model For the more current specifications please visit the Miele website ...

Page 92: ...2 Dimensions of oven front Dimensions are given in mm 1 16 2 mm B 22 5 8 575 mm A 4 3 8 111 mm 3 16 4 mm 18 5 8 473 mm 23 5 16 592 mm 23 7 16 596 mm A H22xx 42 mm B Ovens with glass front 2 2 mm Ovens with metal front 1 2 mm ...

Page 93: ...ical supply Place the cooker in front of the cabinet carcase Insert the plug of the built in cooktop into the connection on the cooker Lifting the cooker by the door handle could cause damage to the door Use the handle cut outs on the side of the housing to lift the appliance It is a good idea to remove the door see Cleaning and care Removing the door and to remove the accessories before installin...

Page 94: ...nstalling the oven Connect the oven to the electrical supply Lifting the oven by the door handle could cause damage to the door Use the handle cut outs on the side of the housing to lift the appliance It is a good idea to remove the door see Cleaning and care Removing the door and to remove the accessories before installing the appliance The oven is then easier to push into the cabinet carcase and...

Page 95: ... Headquarters and Miele Centre 161 Four Valley Drive Vaughan ON L4K 4V8 www miele ca Customer Care Centre Phone 800 565 6435 customercare miele ca Miele Cie KG Carl Miele Straße 29 33332 Gütersloh Germany Manufacturer Canada ...

Page 96: ...M Nr 10 571 570 00 en CA H2265E H2265B ...

Reviews: