6
Getting Started
Inserting the Memory Card
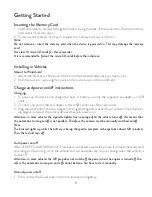
1. Insert the memory card with the gold contacts facing the back of the camcorder. Push the memory
card until it clicks into place.
2. To remove the memory card: push to eject the memory card out of the slot.
Note:
Do not remove or insert the memory card when the device is powered on. This may damage the memory
card.
Use class 10 micro SD cards for this camcorder.
It is recommended to format the micro SD cards before the initial use.
Installing in Vehicles
Mount to Windshield
1. Attach the bracket to the device. Slide it into the bracket holder until you hear a click.
2. With the suction-cup laying flat, position the suction-cup on the windshield.
Charge and power on/off instructions
Charging
1. To power up the device and charge the built-in battery use only the supplied car adapter or USB
cable.
2. Connect one end of the car adapter to the USB connector of the camcorder.
3. Plug the other end of the car charger to the cigarette lighter socket of your vehicle. Once the vehi-
cle engine is started, the camcorder automatically powers on.
Attention: in some vehicles the cigarette lighter has no outage after the vehicle turns off, this means that
the automatic turning on/off is not possible. Therefore the camera must be manually switched on/off.
Note
The blue led lights up while the battery is being charged (a complete recharge takes about 120 minutes).
Then the led will turn off.
Auto power on/off
After STREET GUARDIAN NIGHT has been connected to vehicle’s power, it will automatically start
recording at the turning on of the vehicle and will automatically stop recording when the vehicle is
turned off.
Attention: in some vehicles the 12V plug does not switch off the power when the engine is turned off, the-
refore the automatic turning on and off cannot be done. You have to do it manually.
Manual power on/off
1. Press shortly the Power button: the red indication will light up.


