MicroLux Laserkinfe 2525 Owner'S Manual And Instructions Download Page 6

CorelLASER Installation

Please follow the software download
sheet included elsewhere in this manual.

After  the  software  is  downloaded  to  your  computer,
you’ll  need  to  reset  or  confirm  certain  settings  of
CorelLASER so that the computer can communicate
with  and  control  the  LaserKnife  2525.  Proceed  as
follows:

Insert the USB “key” into a USB port on your computer.

Start  CorelLASER  (give  it  time  to  load)  and  you
should ultimately see the CorelLASER controls in the
upper  right  corner  of  the  Corel  window…just  below
the  blue  bar.  This  means  CorelDRAW  is  open  and
functioning and the CorelLASER plug-in is operating.

The LaserKnife 2525 is controlled by a plug-in program for CorelDRAW called CorelLASER, which is included with the
purchase of the machine and downloaded from the Micro-Mark web site at 

http://www.micromark.com/downloads.dlp.

It has been designed to work with CorelDRAW versions 11 and later, including X3, X4, X5, X6, etc. (Version X3 is version
13, X4 is 14, and so on) running on Windows 2000 and later operating systems.

Please note: CorelLASER software is not compatible with Home & Student versions of CorelDRAW.

CorelDRAW  must  be  loaded  onto  the  computer  before  CorelLASER  can  be  downloaded.  The  user  needs  to  supply  the
CorelDRAW program. It is available for download from the Internet. To prevent unauthorized use of CorelLASER, a USB “key”
is provided with the LaserKnife 2525. After the software is in place, be sure to plug the key into a USB port on your computer
or CorelLASER will not be accessible. A warning message or window will pop up in case you forget. Don’t lose the “key!”

LaserKnife 2525 Software Set Up

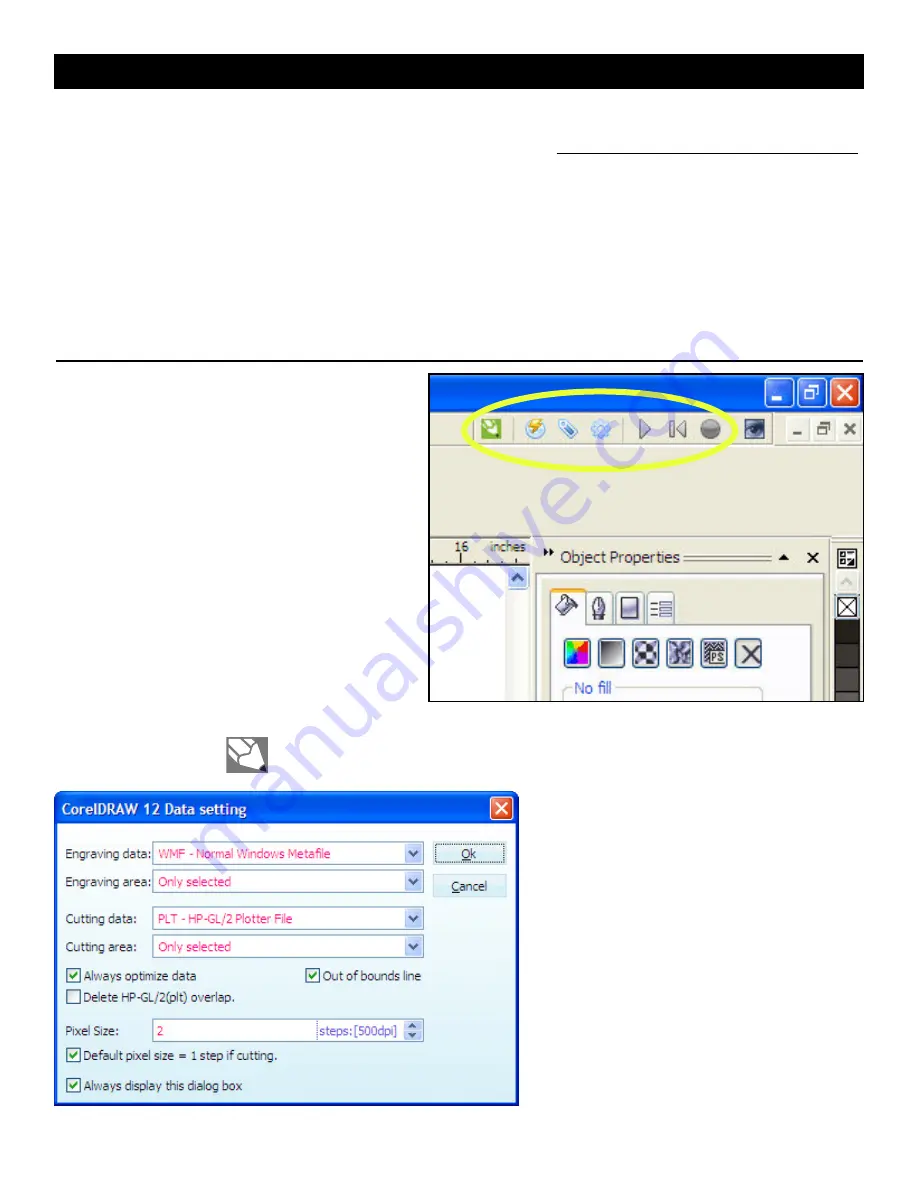
Click on the green pencil

(the bubble should say CorelDRAW setting) and a window will open that looks like the
following:

For  the  initial  use  of  the  LaserKnife  2525,  we
suggest you use the pull-down menus to choose
settings  that  match  those  at  left.  Later,  you  can
change  the  settings  based  on  the  type  of  files
you are using, and whether or not you want the
machine  to  engrave/cut  everything  on  the  page
or only what you have selected.

You  can  later  experiment  with  the  effects  of
changing  the  various  settings…  a  rather  fun
exercise!

Click OK to accept and save.

6

Summary of Contents for Laserkinfe 2525

Page 1: ...wners manual What s included on the Micro Mark web site 1 CorelLASER software 1 Set of sample part drawings What you ll need to provide 1 Computer running Windows 2000 or later 1 CorelDRAW software ve...

Page 2: ...ood and plastic It will easily cut and or burn human flesh and will cause injury if you are not careful to avoid contact with the laser beam Do NOT reach into the cabinet unless the machine is switche...

Page 3: ...r OFF whenever the main power cord has power no matter whether the position of the Master switch is set to ON or OFF Ancillary equipment provided with the machine includes A small air pump to blow deb...

Page 4: ...nto the socket on the rear of the cabinet labeled Fan or Exhaust Note this equipment operates on 220vAC do not plug into 110vAC wall outlet Tip if the equipment plugs enter the sockets a bit too loose...

Page 5: ...to the pump for leakage IMPORTANT You may also have to gently lift the pump out of the water and set it back in to prime the pump for proper water flow which is critical to the life of the laser tube...

Page 6: ...ws 2000 and later operating systems Please note CorelLASER software is not compatible with Home Student versions of CorelDRAW CorelDRAW must be loaded onto the computer before CorelLASER can be downlo...

Page 7: ...to activate the new device ID and initialize installation of the software OK now it s time to open a drawing file and cut out some parts We ve included a couple of simple sample files to get you star...

Page 8: ...t of bounds match the settings and in no case should either dimension exceed 250 mm 9 84 inches Tip The Common Parameter Release button allows the lens to be pushed by hand out of the way Make sure po...

Page 9: ...o they are aligned when you again perform a test fire In this way you ll be able to pinpoint the starting point of the laser Going back to the computer screen In the upper left corner of the object im...

Page 10: ...press Delete on your keyboard Select the rear wall and cut again in a blank spot on the material The window opening is no longer cut into the wall For another example try dragging the window to a diff...

Page 11: ...ning magnets around the edges of the material and in the center as well obviously avoiding the cut lines will help hold the material from shifting after being cut Adding frets to the drawing will keep...

Page 12: ...se restrained by the system drive belts motors If you will be cutting multiple pieces of material in the same pattern devise a little fixture to position new pieces of material when loading the cuttin...

Page 13: ...B port Also check that the USB cable is still connected properly and the machine is powered up If the laser tube is replaced or the machine experiences strong shock and no longer cuts properly is ther...

Page 14: ...I cut materials of different thickness the cutting or engraving isn t as sharp as it should be Can I compensate for this The lens can be shifted up or down to accommodate workpieces of different thic...

Page 15: ...or outline and adjust each mirror in sequence using the jack screws and lock nuts so that the burn mark is centered in the outline This will assure full laser output is reaching the lens and subsequen...

Page 16: ...T H E S M A L L T O O L S P E C I A L I S T S 340 Snyder Avenue Berkeley Heights NJ 07922 www micromark com Tech Support 908 464 1094 weekdays 1pm to 5pm ET MMTechService micromark com...

Page 17: ...d download the files to your computer under the default settings which should put the zip files into your Documents Downloads folder of your computer Double left click CorelLASERMasterFiles zip Double...

Reviews: