background image

microHAM © 2010 All rights reserved

Minimize: Clicking this will minimize Router to the

system tray at the bottom right corner of the
Windows Taskbar (the "System Notification
Area").

TIP: When Router is minimized you can restore it by double-clicking on the Router tray icon.      You can
also restore Router by double-clicking on the Router icon on the desktop or restarting Router from the
Programs menu.

Exit: Clicking on this item will terminate Router.  

NOTE: when Router is terminated, application software will be unable to communicate with

DIGI KEYER II and the radio.


PRESET MENU


The requirements of each program are different and each one may handle radio control, CW  and PTT in its
own way.  In some cases  what works for one application may not work properly with another.  To get
maximum performance from CW Keyer, you may wish to customize the settings for each application.

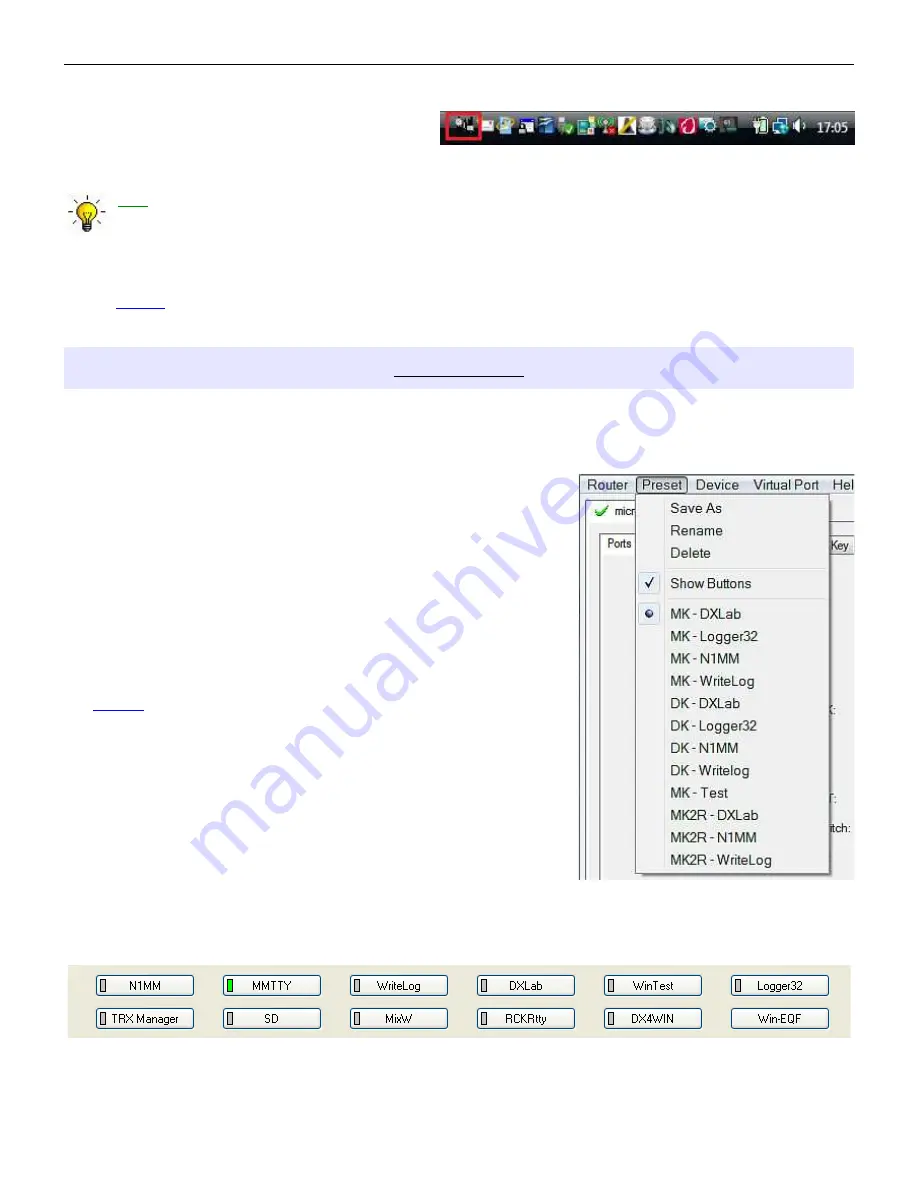
For easy switching among applications, Router supports up to 12
user definable Presets.  Different configurations can be stored in
these presets and recalled almost instantly simply by clicking on the
preset button.

Each preset contains the settings for all devices connected to, and
controlled by, Router.  For example, if Router controls a
microKEYER, a DIGI KEYER II and a USB Interface, each  preset
remembers the settings for all devices including the assignment of
COM ports and the contents of all sub-tabs except  the FSK/CW
Messages and DVK tabs.

NOTE: Presets do not appear until they have been saved by the

user using  Preset | Save as.  Example configurations for
several popular loggin and digital programs are availble in
Router's Help menu.  Use “Help | Download Documents“ if
the setup guides are not available or are incomplete. 

There are three ways to apply a preset once it is created:

1. Click on Preset and select the desired preset from the pull-

down menu.

2. Click on a preset button.  To have buttons visible in Router, Preset | Show Buttons must be

checked. When the settings from a preset are applied, a green light located in the preset button is
lit.  This green light is on ONLY when all settings in Router are same as those stored in the preset. 

14

Summary of Contents for Digi Keyer II

Page 1: ...microHAM 2010 All rights reserved DIGI KEYER II microHAM fax 421 2 4594 5100 e mail support microham com homepage www microham com Version 7 9 5 Decenber 2010 1...

Page 2: ...oHAM USB DEVICE ROUTER 13 Menu Router 13 Menu Preset 14 Menu Device 15 Menu Virtual Port 16 Menu Help 17 Device Configuration 17 Ports Tab 18 CAT 2nd CAT 19 FSK 2nd FSK 21 CW 23 PTT 2nd PTT 23 Foot Sw...

Page 3: ...0 FT 5000 FT 2000 FT 1000D MP Mark V Kenwood TS 2000 and Elecraft K3 independent front panel level controls for each receiver Front Panel Level Adjustments Pots for Transmit level Main Receiver level...

Page 4: ...B port Controller is powered from transceiver or transceiver power supply Strong immunity from RFI integrated chokes and filters for best RFI immunity advanced shielding and circuit design to suppress...

Page 5: ...TX Transmit Audio Level 6 FSK LED flashes with FSK output On indicates closed regardless of mark space polarity 7 PTT LED lights when PTT is active 8 RX MAIN Adjusts receive audio level from the main...

Page 6: ...SHELL Ground If the jumper is in the SS position the switching transistor open collector is connected to the PA PTT jack The transistor can switch up to 45V 0 8A This position is appropriate for mode...

Page 7: ...oftware for your operating system 3 configure the microHAM CODEC and USB Device Router for Windows if applicable Preparing DIGI KEYER II for Use 1 Remove the top cover from DIGI KEYER II and set the C...

Page 8: ...wer connect these leads to a 12 16V DC power supply Be sure to observe the proper polarity NOTE DO NOT use the same power supply as the transceiver 8 Locate but do not connect the USB cable from DIGI...

Page 9: ...ou download an updated package click on urouter_release_xx_xx exe xx_xx is version to start the installation The Windows setup utility will start and ask into which folder Router and its supporting fi...

Page 10: ...ds would be played through DIGI KEYER II and onto the air In Windows XP open Sounds and Audio Devices in the Control Panel or right click on the Speaker icon on the Taskbar and select Adjust Audio Pro...

Page 11: ...are DIGI KEYER II Status When the USB driver is installed correctly and DK II is powered from a radio or external 12V DC supply Router will show a device tab with a GREEN check beside the device name...

Page 12: ...creating virtual COM ports attach all external devices you use with the computer and allow them to connect to the system Restart Router and then create the virtual COM ports Virtual ports are created...

Page 13: ...operation These settings are used for the optional automatic selection of audio switching and PTT mode based on operating frequency Careful selection of the Digital band is necessary for transceivers...

Page 14: ...ferent configurations can be stored in these presets and recalled almost instantly simply by clicking on the preset button Each preset contains the settings for all devices connected to and controlled...

Page 15: ...tifiable names as shown here Delete Removes a device from the Router Only disconnected devices those with a RED X on the device tab can be removed To disconnect a device from Router unplug the USB cab...

Page 16: ...II when the new version of Router connects for the first time you have just to allow the upgrade when prompted VIRTUAL PORT MENU It is necessary to create several virtual serial ports COM ports in ord...

Page 17: ...Router About Shows the Router s internal version number Change logs Shows the Router and firmware changes DEVICE CONFIGURATION TABS There are nine 9 tabs for configuring DIGI KEYER II Each tab contro...

Page 18: ...de softwre Read the following information carefully DIGI KEYER II has eleven functions with indication of the state and settings applied by the host application CAT uses RxD and TxD 2nd CAT virtual fo...

Page 19: ...hing back to receive There is a dedicated T R switching channel for this purpose called PTT NOTE If your radio does not support handshake most do not Configure DTR and RTS settings in your application...

Page 20: ...n monitor The monitor uses colors and tags to indicate which device is responsible for the data Black queries H1 TX or H2 TX and gray radio responses H1 RX or H2 TX are from the host application e g l...

Page 21: ...th many transceivers particularly Icom split mode must be initiated and ended by only one application and manual split control from the front panel of the radio should not be used NOTE Despite extensi...

Page 22: ...no parity 1 5 stop bits The second FSK port is useful when operating split with radios that have two receivers e g FT 1000 FT 2000 FT 9000 K3 Orion or IC 7800 The second instance of the RTTY program s...

Page 23: ...when the port is properly configured To test CW operation click on the Test button with no port assigned or the port closed PTT 2nd PTT PORTS The PTT channel is used for T R switching of the transcei...

Page 24: ...foot switch but the application does not support foot switch status or no application is running Router reports the channel as closed When an application opens the COM port usually at start up Router...

Page 25: ...or closed Mon WinKey Monitor allows capturing communications between Router or the application and WinKey Controls for the monitor include Start Stop Clear and Save WinKey Monitor should not be used u...

Page 26: ...s are controlled from the Audio tab Use Q CW connects the right channel tone decoder to the CW output to allow audio tones to be used for hard keyed CW This permits CW decoding software that only gene...

Page 27: ...rating configuration Select microHAM CODEC to use the internal soundcard in DIGI KEYER II Router displays separate controls for the left and right Wave Line Out Volume and Line In channels DIGI KEYER...

Page 28: ...r This change in power is correct If you do NOT see a 50 or more change you are probably over driving the radio Please note that some radios have inbuilt power meters which give a PEAK reading and the...

Page 29: ...before the transceiver PTT by the time selected for PTT Lead and and will open after the transceiver PTT by the time selected for LNA PTT Tail PTT output generally folows the PTT inputs PTT port PTT I...

Page 30: ...ady ended If Restore serial CW is not checked application generated CW will remain suppressed until the application releases PTT Mute serial FSK if checked the FSK ports will be blocked while the foot...

Page 31: ...ority for dual lever paddles If no priority is selected the keyer works in a last paddle wins mode Paddle set point controls when WinKey begins looking for a new paddle press after sensing the current...

Page 32: ...eed knob Set Key close CW output for selected time in seconds Set Wait wait selected seconds during playback Jump to used for looping a message or calling another message Delay sets the delay in secon...

Page 33: ...n a memory are CR LF Insert Carriage Return Line Feed Jump to used for looping a message or calling another message Delay sets the delay in seconds before looping or calling another message Store save...

Page 34: ...pace word mode or when the buffer has reached its limit 16 characters CW from keyboard Type ahead enables type ahead when using a PS 2 keyboard Characters are transmitted after a space word mode or wh...

Page 35: ...ustment of the audio from the radio main receiver to the sound card computer left channel The RX SUB Pot provides adjustment of the audio from the radio sub receiver or a second receiver to the sound...

Page 36: ...TIP When you start to create your own presets always begin by selecting the default preset This will configure the audio levels to the proper state before starting any customization Setting audio lev...

Page 37: ...DIG or DATA for Yaesu LSB D or USB D for current Icom transceivers RTTY or RTTY R on K2 and USB or LSB for Kenwood TenTec and older Icom transceivers Do not select RTTY or FSK they do not use the audi...

Page 38: ...e can be aborted with the ESC key or the zero key on the number pad Messages may be made to repeat loop by pressing DEL period on the number pad while the message is playing The default minimum wait t...

Page 39: ...without transmitting PG DN DN NUM WPM control Decrease CW speed step defined by configuration S N mode Decrement number by one HOME ENTER NUM ENTER WPM control Reset CW speed to pot knob value S N mod...

Page 40: ...lication programs has not been determined microHAM Router is not supported on any 16 bit version of Windows 95 98 ME SE In order to provide sufficient performance for simultaneous operation of microHA...

Page 41: ...omputer s 2 damage caused by misuse negligence user modifications or failure to follow the user manual 3 connection to improper or excessive voltage or voltage surges 4 the incorrect installation of a...

Page 42: ...from the transceiver and transfers it via USB to the computer where the operating system processes that data as a sound card The USB sound processor also receives digital audio from any applications r...

Page 43: ...vice may not cause harmful interference and 2 this device must accept any interference received including interference that may cause undesired operation European Union Declaration of Conformity micro...

Page 44: ...signal 6 AUDIO OUT GND Radio AUDIO input ground 14 AUDIO IN MAIN S Radio AUDIO output signal main receiver 7 AUDIO IN MAIN G Radio AUDIO output ground 15 AUDIO IN SUB S Radio AUDIO output signal sub...

Page 45: ...wered from the same branch circuit It is always better to avoid this source of noise interference It is also a good idea to check the power distribution for loose connections reversed neutral ground o...

Page 46: ...ture The initial version has been tested with Perseus SDR only PERSEUS Radio PERSEUS Port COM10 Source QRG Defines which frequency will be used for SDR tracking Offset Specifies frequency offset from...

Reviews: