Microframe Corporation 6500 Series Installation And Specification Manual Download Page 6


Microframe Corporation 


6


604 South 12

th

 Street 

Broken Arrow, OK  74012 
800-635-3811 
www.microframecorp.com 


           Series 6500 


Summary 
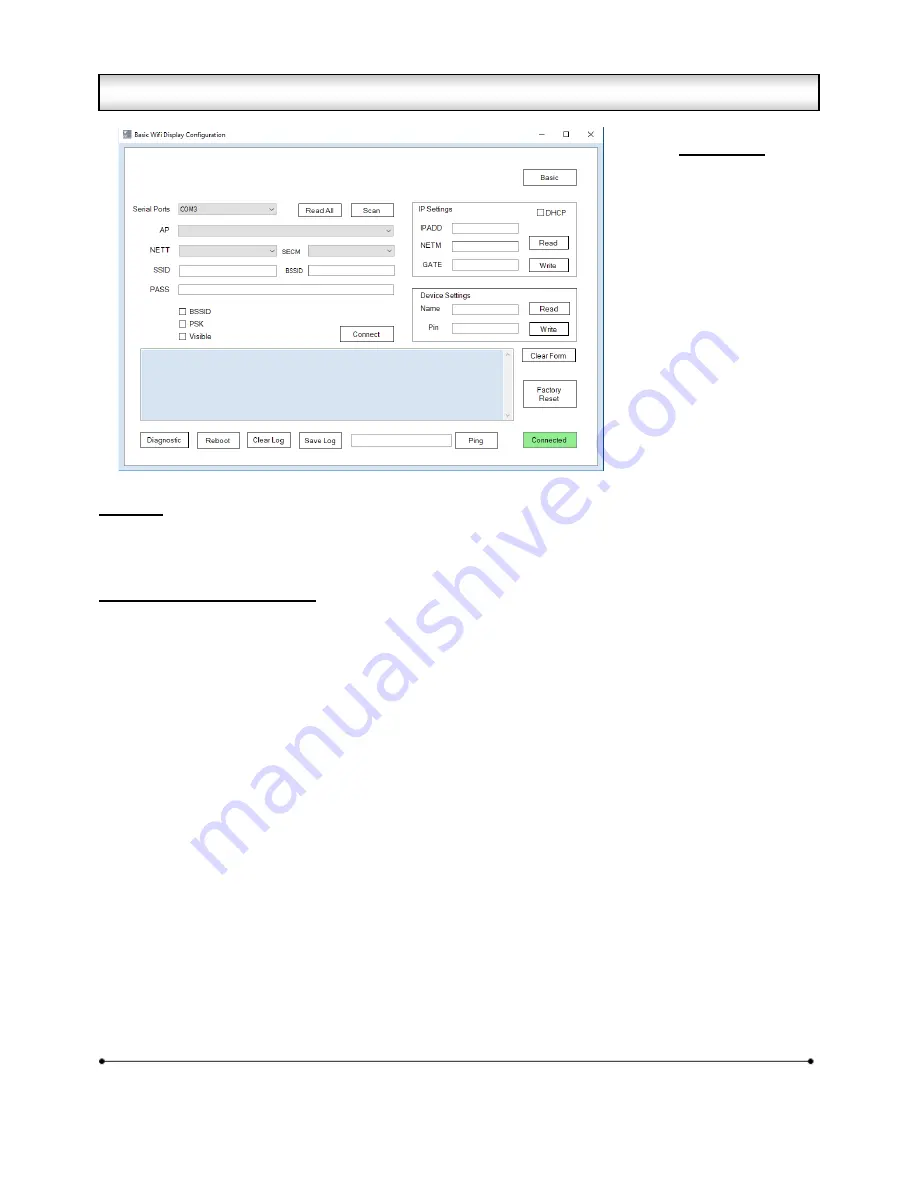
The “Advanced” version of the Config Utility allows for configuration of all Wi-Fi settings.  It can also be left 
running, and will log messages printed from the display.  These messages are useful to have in case you 
should need Technical Support. 
 

Utility Button and Field Details 

[Serial] – Shows the currently connected serial port. 
 
[Connected/Disconnected] - Automatically scans for devices and prints results to the log.  It will select the 
device found last. 
 
[Read All] - Reads back settings for all three panels of the utility.  Optionally, you can read/write individual 
panels using their respective buttons. 
 
[Scan] - In Setup Mode it reads back the pre-scan list.  If connected to an Access Point, will do a new scan 
each time the button is clicked. 
 
[SAVE] - Used to save settings if specific options are changed.  Generally this will turn green if a save is 
required. 
 
[AP] - A list of Access Points (Wi-Fi networks) in range of the display.  If blank try clicking the [Scan] button.  
Stronger signals are indicated by a higher RSSI number.  Selecting an entry from this list will automatically 
set [NETT], [SECM], [SSID], and [BSSID]. 
 
[NETT] - Network type.  Generally set to Infrastructure. 
 
[SECM] - Security mode.  Options are "Open" and "WPA/WPA2".  WEP is insecure and not supported.  WPA-
Personal mode is supported, but WPA-Enterprise mode is not. 
 
[SSID] - The name of your organization’s Wi-Fi network. 


Setup Order 

1) Power Disp 
2) Open Prog 
3) Find 
4) Read All 
5) Scan 
6) Select AP 
7) Password 
8) [Connect] 


2.2 Wi-Fi Display Config Utility - Advanced


Summary of Contents for 6500 Series

Page 1: ...d SPECIFICATION GUIDE D6500 7010 Microframe Corporation 604 South 12th Street Broken Arrow OK 74012 Local 918 258 4839 Toll Free 800 635 3811 Website www microframecorp com E mail support microframecorp com Manual No D6500 7010 Revision Date 06 2018 Control 1 4 ...

Page 2: ...ust use plenum rated cable The cable supplied from Microframe is rated CL2 and is approved for indoor installation everywhere except plenum areas Life Support Policy Microframe s products are not authorized for use as components in life support devices or systems without the express written approval of the President of Microframe Corporation As used herein 1 Life support devices or systems are def...

Page 3: ...ay InstallationandSpecificationGuide Table of Contents 1 1 Wi Fi Display Overview 4 1 2 Quick Install 4 2 1 Wi Fi Display Config Utility Basic__ 5 2 2 Wi Fi Display Config Advanced 6 3 1 Setting up the Display from the App 8 4 1 Installation Operation Options 9 5 1 UsingtheApp_______________________________________ 12 Display Specifications 13 ...

Page 4: ...on next to the display you want to setup 6 Tap the Display Setup button 7 Select the name of your Wi Fi network from the list or type it in manually 8 Type in the Wi Fi password 9 Optionally set the display name and PIN number 10 Press Save then wait 30 seconds for the display to connect Option 2 Quick Setup from computer 1 Plug in the display 2 Connect the USB cable between the display and your c...

Page 5: ...r this mode to work properly the display must be in setup mode Details The SSID and Password are used to connect to your network If your network does not show up in the list you can type it in manually under SSID If a password is entered the utility will assume WPA WPA2 security If no password is entered it will assume no security The Device Name is used in the app The app PIN must match the PIN n...

Page 6: ...eir respective buttons Scan In Setup Mode it reads back the pre scan list If connected to an Access Point will do a new scan each time the button is clicked SAVE Used to save settings if specific options are changed Generally this will turn green if a save is required AP A list of Access Points Wi Fi networks in range of the display If blank try clicking the Scan button Stronger signals are indica...

Page 7: ...SK to additional displays Connect Click this to apply the Wi Fi Settings and connect to the new network See the log to verify if the connection was successful DHCP To specify a static IP address for this display uncheck this box IPADD The static IP address for this display When read back the current IP address NETM The netmask for this display When read back the current netmask GATE The gateway fo...

Page 8: ...rd 9 Optional Set Display Network Name 10 Recommended Set Security PIN 11 Tap SAVE button 12 Close app and reconnect to your Wi Fi network 13 Open app and verify display now shows up under Displays Be sure to change the PIN if it is not default 0000 Setup Buttons Wi Fi SSID A list of the Wi Fi networks in range Wi Fi Password The password for the network Display Network Name This name is used to i...

Page 9: ...fundamental behavior of the display Wall Clock Shows the current time or date Count Up Counts up by time or interval Countdown Counts down by time or interval Takt Timer Keeps track of Takt time Clock Format Allows the clock to show time in standard 12 hour format or in 24 hour military time Leading Zeros Shows or hides the leading zeros for timers Takt time modes always suppress the leading zeroe...

Page 10: ...al chime External Chime Duration Sets the duration of the external chime This is actually an external chime driver circuit that may be purchased at the time of order For AC loads such as a doorbell the triac option is recommended For DC loads the relay option is recommended Chime Time The display can chime at six chime times when in clock mode The display can chime at three chime times when in tim...

Page 11: ...open Display Settings Smallest Type Sets the smallest time unit that will be shown by the display e g to have a 4 digit display show hours and minutes never seconds Set this value to Minutes Largest Type Sets the largest time unit that will be shown by the display e g to have a 4 digit display show hours and minutes never Days Set this value to Hours Display Size This is the display s factory set ...

Page 12: ...d set the time of each count the counter that shows on the display Also you will see the timer indicating how much time until the next count Day Counter Page On this page you can change set how many days you want to count down or what day you want to start the timer for count up Displays Page This page contains a list of all the Wi Fi Timer Displays that the app finds on the network This list show...

Page 13: ...Manual 1 Microframe Screwdriver 1 Configuration CD 1 USB A to B cable Model 6500 Specifications Voltage Input Requirements 14 24 VAC 16 28VDC Character Height 5 5 inches Character Viewing Distance 125 feet Temperature Parameters 4ºF to 140ºF 20ºC to 60ºC Casing Aluminum extrusion Color Black frame with dark red acrylic faceplate Environment Indoor use Outdoor case available Wi Fi Backup Battery Li...

Reviews: