WIRING MME10T24 ONLY (NON-POWERED)
RGB WIRING
The MME10T24 is a non amplified loaded enclosure. You must connect your own amplifier to this unit to provide
power. To do so, connect the included wires from the back of your MME10T24 enclosure to your amplifier of
choice. Connect the RED wire to the + terminal and the black wire to the - Terminal. Follow your amplifiers wiring
instructions to complete your installation.
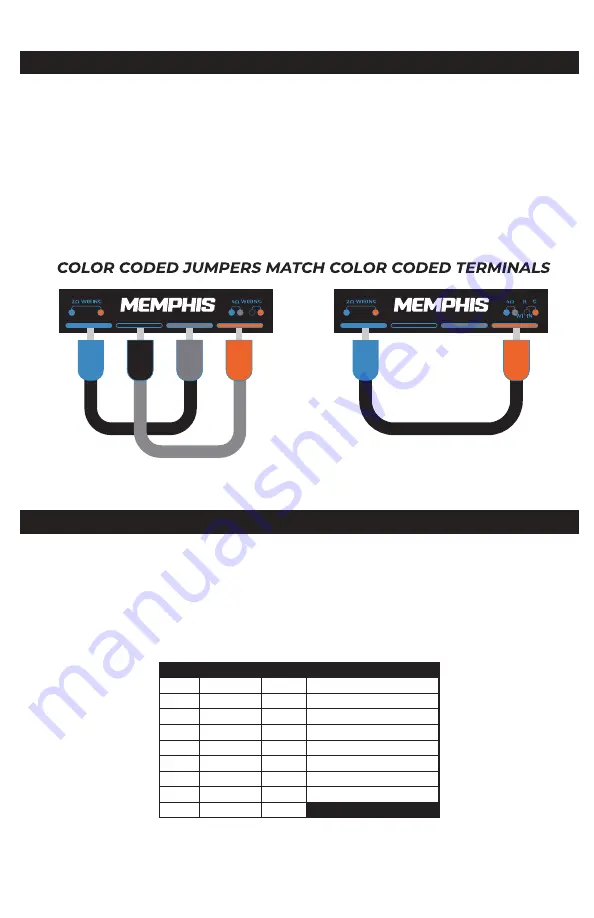
Once you have your MME10T24 connected to your amplifier, you can now adjust your impedance using the
included Memphis FLEX
TM
Selectable Impedance Technology terminal located on the back of the enclosure. This
simple system allows you to effortlessly adjust your impedance to maximize your systems performance by
adjusting the color coded jumper cables to a predefined location on the terminal.
This impressively engineered design allows you to effortlessly change the impedance of your subwoofer to match
the needs of your system. Simply reconfigure your existing sub by repositioning the color coded jumper to the
correct impedance setting and you are ready to play.
2Ω WIRING
4Ω WIRING
HARD WIRING
To hard wire your LED’s to emit one of 7 different colors. To hard wire a specific color, wire the BLACK wire from the
harness directly to the 12V+ from the battery. Be certain to wire a fuse in between the pigtail and the battery to
avoid accidental damage to your vehicle and audio system.
Choose the color you wish to emit from the chart below. Wire the correct wires from the chart to ground.
Example: For a YELLOW light you would wire the Red and Green wires to ground and not wire the blue wire. The
black wire would be wired to 12V+.
RGB CONTROLLER WIRING
If you want to be able to control and adjust light colors you can purchase a separate RGB controller. The RGB
controller would be wired directly to the battery of your vehicle and the harness would be wired directly to your
RGB controller.
RGB COLORS
None
x
Red
x
Green
x
Blue
x
x
Yellow
x
x
Cyan
x
x
Magenta
x
x
x
White
RED
GREEN
BLUE
EMITTED COLOR


