background image

19

DÉCONNEXION DE L’APPAREIL

POUR DÉCONNECTER VOTRE APPAREIL DE L’ORDINATEUR EN TOUTE

SÉCURITÉ.

REMARQUE :

Pour éviter d’endommager votre appareil ou de perdre des données,

suivez toujours la procédure ci-dessous avant de

déconnecter l’appareil du port USB de votre

ordinateur.

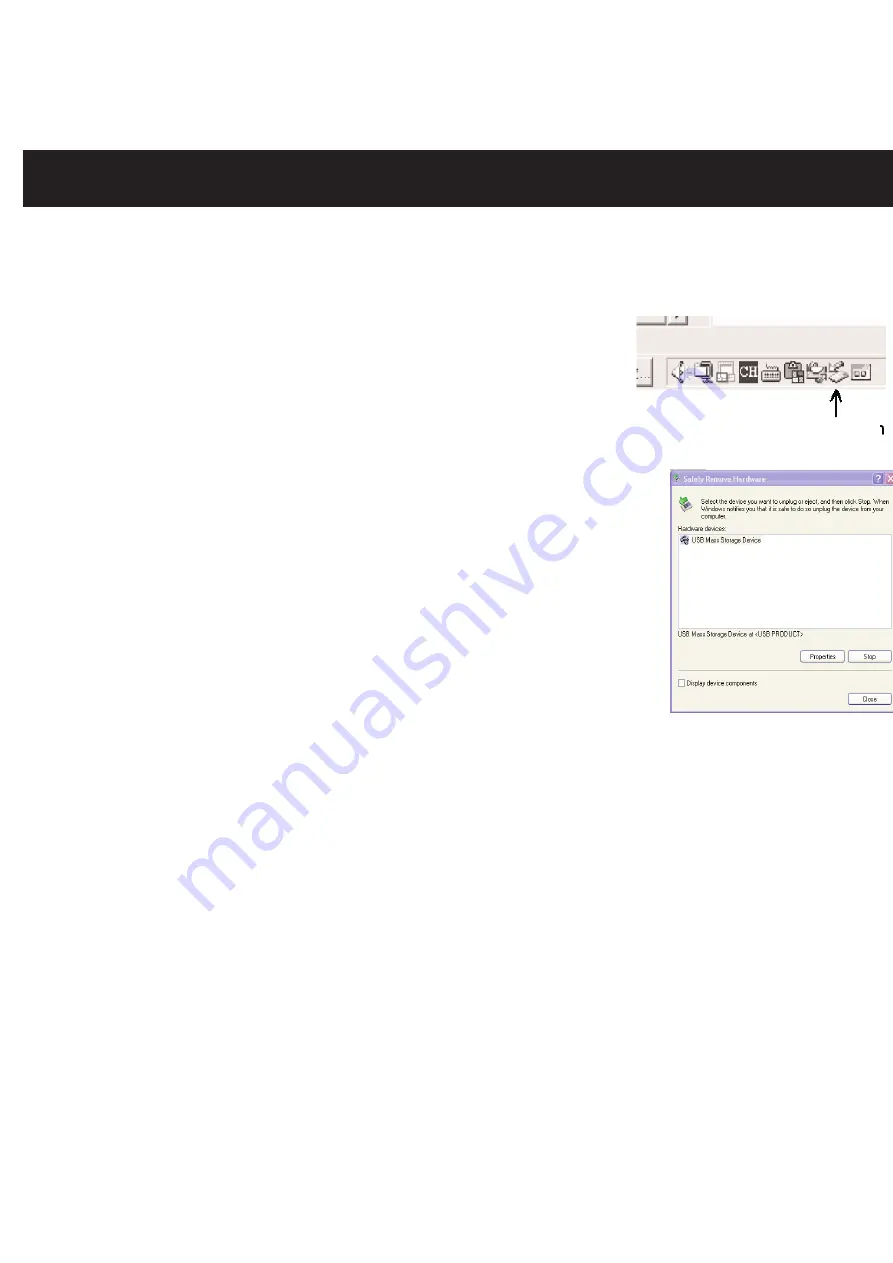
À l’aide de la souris, double-cliquez sur l’icône

“Retirer le périphérique en toute sécurité” dans

la barre des tâches.

À partir de la fenêtre “Supprimer le périphérique en toute sécurité”

(Safely Remove Hardware) figurant dans le coin inférieur droit,

sélectionnez “Périphérique de stockage de masse USB” (USB Mass

Storage Device) et cliquez sur la touche “Arrêter” (Stop). La fenêtre

“Arrêt d’un périphérique matériel” (Stop a Hardware Device)

s’affichera. Cliquez sur “OK”. Lorsque la fenêtre “Le matériel peut

être retiré en toute sécurité” s’affichera, déconnectez le câble USB

de l’appareil ou de l’ordinateur.

REMARQUE :

Si l’icône “Retirer un périphérique en toute sécurité” n’est pas affichée dans la barre des

tâches, double-cliquez sur le Poste de travail. Cliquez avec le bouton droit de la souris

sur “Memorex”, puis cliquez avec le bouton gauche sur “Éjecter”. Vous pourrez alors

déconnecter l’appareil de l’ordinateur en toute sécurité.

Icône “Retirer le périphérique en toute sécurité”

All manuals and user guides at all-guides.com

Summary of Contents for MCC228RSBLK - Camcorder - 720p

Page 1: ...operating this product Por favor lea toda las instruciones antes de tratar de usar este producto memorexelectronics com MCC228RSBLK Avant d utiliser cet appareil veuillez lire attentivement toutes le...

Page 2: ...ct Mode Setting Menu 41 General Setting Menu 42 Operation 46 Opening the Viewfinder 46 Headphones 46 Turning the Power On 46 Turning the Power Off 46 Macro Switch 47 Zoom Control 47 On Screen Display...

Page 3: ...htning flash with arrowhead symbol within an equilateral triangle is intended to alert the user to the presence of uninsulated dangerous voltage within the product s enclosure that may be of sufficien...

Page 4: ...ket or table The product may fall causing serious injury or serious damage to the product Use only with a cart stand tripod bracket or table recommended by the manufacturer or sold with the product An...

Page 5: ...g periods of time unplug it from the wall outlet and disconnect the antenna or cable system This will prevent damage to the product due to lightning and power line surges 14 POWER LINES An outside ant...

Page 6: ...RVICE Unplug the product from the wall outlet and refer servicing to qualified service personnel under the following conditions a When the power supply cord or plug is damaged b If liquid has been spi...

Page 7: ...are designed to provide reasonable protection against harmful interference in a residential installation This equipment generates uses and can radiate radio frequency energy and if not installed and u...

Page 8: ...leted Be sure to always keep backup copies of data by transferring to a personal computer In an environment with electrostatic discharge the user may have to reset the unit by removing the battery and...

Page 9: ...rd against this by setting your equipment at a safe level BEFORE your hearing adapts To establish a safe level Start your volume control at a low setting Slowly increase the sound until you can hear i...

Page 10: ...clock at two feet THE FOLLOWING NOISES CAN BE DANGEROUS UNDER CONSTANT EXPOSURE 90 Subway motorcycle truck traffic lawn mower 100 Garbage truck chain saw pneumatic drill 120 Rock band concert in fron...

Page 11: ...2 Lens 3 Light Flash 4 Microphone 5 Display 6 Power Button RECHARGEABLE BATTERY PART NO 084 07042L 019 AC ADAPTER PART NO 199A04220L B09 Consumer Replaceable Part See page 70 to order FRONT SIDE All m...

Page 12: ...0950A7356L A02 6 Record Start Stop Button 7 Flash Left Button 8 TV Out Headphones Jack AV CABLE PART NO 0950A7356L A01 9 HDMI Out Jack 10 Battery Compartment BATTERY COVER PART NO 6086A8321L A04 11 Ha...

Page 13: ...arrow and insert the battery pack included as shown making sure to observe the correct polarities indicated inside the compartment and replace the Compartment cover Eject 1 To charge the rechargeable...

Page 14: ...end of the Strap through the rope s loop until snug USING A TRIPOD To use a tripod not included simply screw the unit onto the tripod then extend the tripod legs NOTE It is recommended to use camera...

Page 15: ...A FILES SUPPORTED FORMATS Audio Formats MP3 files Photo Format Baseline JPEGs Video Format AVI H 264 max 1280 x 720 resolution 30 fps For Windows Windows will automatically detect the unit and SD Card...

Page 16: ...en will appear NOTE If the setup does not start automatically run the Autorun program on the installation CD to run the installer 2 Click the INSTALL DEVICE DRIVER button and follow the on screen inst...

Page 17: ...Impression checkboxes then click INSTALL APPLICATION SOFTWARE 2 Follow the on screen instructions to start the installation process The installer will install one application at a time 3 When finished...

Page 18: ...will spring out Carefully remove the card When an SD Card is inserted files are automatically stored on it instead of the internal memory INSERTING THE SD MEMORY CARD MEMORY FULL When the internal an...

Page 19: ...orex The photo name must be PICTXXXX jpg For example PICT0001 jpg PICT0002 jpg etc 5b MUSIC FILES Locate the folder where your MP3 files are stored on your computer s hard drive Simply drag and drop t...

Page 20: ...window shown lower right select USB Mass Storage Device and click the Stop button The Stop a Hardware Device window will pop up Click OK When the Safe to Remove Hardware window is displayed you may r...

Page 21: ...ee page 14 click START menu c PROGRAMS c ARCSOFT MEDIACONVERTER c MEDIA CONVERTER You can also double click the MediaConverter shortcut on your desktop the application will open 2 Click Add File Add F...

Page 22: ...ask window will appear Click CLOSE or SAVE REPORT 10 Rename the new file Clip0001 avi so it is compatible with this unit If Clip0001 avi is used then rename to Clip0002 avi 11 Connect the unit to your...

Page 23: ...After installing see page 14 click START menu c PROGRAMS c ARCSOFT MEDIAIMPRESSION You can also double click the MediaImpression shortcut on your desktop the application will open 2 Click MAKE MOVIE 3...

Page 24: ...he storyboard to preview and trim it Double click a picture in the storyboard to preview it ROTATE Click the Rotate Left or Rotate Right icon to rotate the selected photo or video file in your movie T...

Page 25: ...ny desired information then click Start to start burning 10b To burn to a VCD insert a VCD then select VCD tab Enter any desired information then click Start to start burning ALL EXTRA FEATURES There...

Page 26: ...PICTURES 3 Select a folder on the left the viewable files will appear in the display area 4 Double click any picture to open it and make any modifications Simply click EXTRAS menu top right of the wi...

Page 27: ...rd Video Stop the recording by clicking Stop recording 6 SETTINGS Use the settings to adjust the capture settings such as video device burst number etc 7 WEBCAM SETTINGS Use to adjust your WebCam rela...

Page 28: ...page 44 then connect as follows 1 Power on the unit and connect the single plug to the unit s TV OUT Headphones jack and the other to the television s AV IN jack 2 The Earphone TV option will appear C...

Page 29: ...he HDMI cable not included to the HDMI jack on the unit and the other end to the HMDI IN jack on your HD TV 2 Set the TV s video input to the HMDI jack 3 Operate the unit as described in this manual b...

Page 30: ...Enter the Movie mode menu as shown above Select Resolution using the Navigation Zoom OK control then press the Navigation Zoom OK control the Resolution menu will appear Select the desired movie reso...

Page 31: ...1 0 or Exit using the Navigation Zoom OK control Then press the Navigation Zoom OK control 1 LIGHT This setting will turn the front light on or off Enter the Movie mode menu as shown on the previous p...

Page 32: ...on Zoom OK control 1 WHITE BALANCE This setting will allow you to set the white balance Enter the Movie mode menu as shown on page 29 Select White Balance using the Navigation Zoom OK control then pre...

Page 33: ...re on or off Enter the Movie mode menu as shown on page 29 Select Motion Detect using the Navigation Zoom OK control 1 then press the Navigation Zoom OK control 1 the Motion Detect menu will appear Se...

Page 34: ...wn on page 29 Select Night Mode using the Navigation Zoom OK control then press the Navigation Zoom OK control the Night Mode menu will appear Select ON to turn the night mode on or OFF to turn the ni...

Page 35: ...exit press the Record Play Mode Return button 2 Enter the Camera mode menu as shown above Select Resolution using the Navigation Zoom OK control then press the Navigation Zoom OK control the Resolutio...

Page 36: ...er the Camera mode menu as shown on the previous page Select Two In One using the Navigation Zoom OK control 1 then press the Navigation Zoom OK control 1 the Two In One menu will appear Select ON to...

Page 37: ...ures taken until the unit is turned off or the photo frame screen is reset to normal 1 FLASH Select the desired Flash mode Enter the Camera mode menu as shown on page 34 Select Flash using the Navigat...

Page 38: ...Navigation Zoom OK control 1 If activated press the Record Play Mode Return button 2 to return to the Picture Taking mode When a picture is taken the self timer will activate and take a picture in 10...

Page 39: ...oors Use with Fluorescent lights Use with Halogen lights Exit MULTI SNAP When enabled the camera will take five continuous pictures Enter the Camera mode menu as shown on page 34 Select Multi snap usi...

Page 40: ...ng the Navigation Zoom OK control Then press the Navigation Zoom OK control 1 DATE PRINTING When enabled the date will be shown on each picture taken Enter the Camera mode menu as shown on page 34 Sel...

Page 41: ...34 Select Night Mode using the Navigation Zoom OK control then press the Navigation Zoom OK control the Night Mode menu will appear Select ON to turn Night mode on or OFF to turn Night Mode off using...

Page 42: ...the HD Right 2 and Flash Left 3 button 1 3 2 1 EFFECT MODE CAMERA OR VIDEO TAKING To exit press the Record Play Mode Return button 3 Select the desired effect Normal B W Classic Negative or Exit using...

Page 43: ...OF VIDEO TAKING SOUND Select to turn the sound of the functions off To exit press the Record Play Mode Return button 2 Enter the Setting mode menu as shown above Select Sound using the Navigation Zoo...

Page 44: ...be highlighted Set the month using the Navigation Zoom OK control then press the Navigation Zoom OK control the day will be highlighted Repeat this procedure to set the day hour and minute After setti...

Page 45: ...using the Navigation Zoom OK control Then press the Navigation Zoom OK control 1 TV SYSTEM When connecting the unit to a TV using the AV Headphones Out jacks select the TV System used in your area En...

Page 46: ...hen press the Navigation Zoom OK control 1 DEFAULT Returns the setting to the factory default settings Enter the Setting mode menu as shown on page 42 Select Default Setting using the Navigation Zoom...

Page 47: ...iewfinder simply pull upwards as shown the unit will automatically tun on Rotate to the desired viewing angle Do not try to open further than it will allow 1 OPENING THE VIEWFINDER For private listeni...

Page 48: ...ictures of subjects that are very close Rotate to the Down position when taking normal pictures 1 MACRO SWITCH While viewing a photo or while in the Video Stop mode push the Navigation Zoom OK control...

Page 49: ...the Record mode 2 Rotate the Macro switch to the Up position when taking pictures of subjects that are very close Rotate to the Down position when taking normal pictures When taking video pictures pus...

Page 50: ...2 1 Select Enter using the Navigation Zoom OK control Then press the Navigation Zoom OK control the Voice screen will appear 2 Press the Record Start Stop button to start recording and speak into the...

Page 51: ...ht green The unit will automatically enter the Record mode 1 If not already in the Record mode press the Record Play Mode Return button repeatedly to enter the Record mode 2 When ready press the Recor...

Page 52: ...Movie mode 1 2 2 Press the Record Start Stop button playback of the selected movie will begin During playback press the Record Start Stop button to pause playback 3 During playback the buttons will fu...

Page 53: ...t video or push the Navigation Zoom OK control up to delete all the videos 3 Select YES to delete or NO to NOT delete using the Navigation Zoom OK control Then press the Navigation Zoom OK control Pre...

Page 54: ...the HD Right 1 and Flash Left 2 buttons then press the Navigation Zoom OK control 3 to select it 3 2 1 2 Select a video using the HD Right 1 and Flash Left 2 buttons You can also push the Navigation Z...

Page 55: ...3 2 1 2 Push the Navigation Zoom OK control down to Lock the current video or push the Navigation Zoom OK control up to lock all the videos 3 Select YES to lock or NO to unlock using the Navigation Zo...

Page 56: ...t the current video or Repeat All option to repeat all the videos using the HD Right 1 and Flash Left 2 buttons Then press the Navigation Zoom OK control 3 to select it 3 2 1 2 Repeat playback will st...

Page 57: ...ter the Picture mode 2 1 2 Push the Navigation Zoom OK control 1 up to zoom in or down to zoom out then press the Navigation Zoom OK control 1 the navigation control will be activated Push the Navigat...

Page 58: ...ture or push the Navigation Zoom OK control up to delete all the pictures 3 Select YES to delete or NO to NOT delete using the Navigation Zoom OK control Then press the Navigation Zoom OK control Pres...

Page 59: ...1 Select the Thumbnail option using the HD Right 1 and Flash Left 2 buttons then press the Navigation Zoom OK control 3 to select it 3 2 1 2 Select a picture using the HD Right 1 and Flash Left 2 butt...

Page 60: ...2 Push the Navigation Zoom OK control down to Lock the current picture or push the Navigation Zoom OK control up to lock all the pictures 3 Select YES to lock or NO to unlock using the Navigation Zoo...

Page 61: ...how option using the HD Right 1 and Flash Left 2 buttons then press the Navigation Zoom OK control 3 to select it 3 2 1 2 The slideshow will start automatically To stop playback press the Navigation Z...

Page 62: ...Return button 1 to enter the Play mode Select MUSIC using the Navigation Zoom OK control 2 then press the Navigation Zoom OK control 2 to enter the Music mode 2 1 2 Locate an MP3 file to play using t...

Page 63: ...P3 file 2 1 6 Press the Navigation Zoom OK control and the Repeat option will appear at the lower left of the display Push the Navigation Zoom OK control down once to activate Repeat One Press twice t...

Page 64: ...rd mode 1 Press the Record Play Mode Return button 1 to enter the Play mode Select VOICE using the Navigation Zoom OK control 2 then press the Navigation Zoom OK control 2 to enter the Voice mode 2 1...

Page 65: ...ol down once to activate Repeat One Press twice to activate Repeat All Press again to cancel Repeat function 7 Push the Navigation Zoom OK control up and the Delete option will appear at the bottom of...

Page 66: ...e picture in better lighting and or adjust the EV setting Lens is dirty Clean lens with a soft cloth Subject too close Rotate the Macro switch to the Up position Subject or unit moved as picture was t...

Page 67: ...ures videos Power is off Press the Power button for one second to turn on Unit taking picture in Black and White Effect mode is not set to normal Set Effect mode to Normal No sound during playback The...

Page 68: ...t 3 At the Format window click OK to confirm and the player will start to format see figure to the right When finished click OK to close the Format window NOTE Make sure you have selected FAT 32 at th...

Page 69: ...GRADE Please visit our Web site at www memorexelectronics com to check if there is new firmware available IMPORTANT NOTE Before upgrading the firmware please backup all of your media files on your com...

Page 70: ...x 480 VGA 320 X 240 QVGA File Format JPEG Baseline MP3 WAV AVI H 264 Display 2 4 Measured Diagonally Video Frame Rate 30fps Focus Range 20cm Macro 200cm Normal Digital Zoom 8x Self timer 10 seconds d...

Page 71: ...L PACKAGING MATERIAL FOR AT LEAST 90 DAYS IN CASE YOU NEED TO RETURN THIS PRODUCT TO YOUR PLACE OF PURCHASE OR IMATION ELECTRONIC PRODUCTS FOR CONSUMER REPLACEABLE PART S SEE PART NUMBER S ON PAGES 10...

Page 72: ...ic Products A Division of Imation Enterprises Corp Weston Florida Printed in China Memorex the Memorex logo and Is it live or is it Memorex are trademarks of the affiliates of Memorex Products Inc All...

Page 73: ...del usario Please read these instructions completely before operating this product Por favor lea toda las instruciones antes de tratar de usar este producto memorexelectronics com MCC228RSBLK All manu...

Page 74: ...Modo efectos 41 Men de configuraci n general 42 Funcionamiento 46 Abrir el visor 46 Auriculares 46 Encendido de la unidad 46 Apagado de la unidad 46 Activaci n de macro 47 Control de zoom 47 Visualiz...

Page 75: ...DESCARGA EL CTRICA NO ABRIR ADVERTENCIA La figura del rayo con punta de flecha dentro de un tri ngulo est hecha para alertar al usuario de la presencia de cables sin aislar con voltaje peligroso dentr...

Page 76: ...na piscina o lugares similares 8 Accesorios Coloque la unidad en una mesa soporte o repisa estables donde no hay vibraci n Cuando coloque la unidad en un carro o estante aseg rese de seguir las recome...

Page 77: ...de tiempo es recomendable que desconecte la unidad de la pared la antena o el cable As evitar da os producidos por descargas el ctricas 14 L neas a reas de energ a el ctrica Como medida de precauci n...

Page 78: ...ectamente 21 Montaje en pared o techo Este producto deber montarse en el techo o pared siguiendo las instrucciones dadas por el fabricante 22 Da os que requieren servicio Siempre desenchufe su unidad...

Page 79: ...de la FCC Estas limitantes est n dise adas para ofrecer una protecci n razonable contra interferencia da ina en una instalaci n residencial Este equipo genera usa y puede irradiar energ a de radiofrec...

Page 80: ...memoria Aseg rese de realizar copias de seguridad de la informaci n cuando realice una transferencia a una computadora personal En un ambiente con descarga electroest tica el usuario puede que tenga...

Page 81: ...umen de su equipo a un nivel bajo antes de acostumbrarse a escuchar siempre la m sica a un volumen alto Para establecer un nivel auditivo seguro Ponga el control de volumen en posici n baja Lentamente...

Page 82: ...LIGROSOS SI SE SOMETE A ELLOS EN FORMA CONSTANTE 90 Metro motocicletas tr fico de camiones podadora de c sped 100 Cami n de basura sierra el ctrica perforadora neum tica 120 Concierto de rock frente a...

Page 83: ...te 3 Luz Flash 4 Micr fono 5 Pantalla 6 Bot n de Encendido Apagado Power PILA RECARGABLE PIEZA NO 084 07042L 019 ADAPTADOR DE CA PIEZA NO 199A04220L B09 Pieza reemplazable por el consumidor Consulte l...

Page 84: ...2 6 Bot n Iniciar Detener Start Stop 7 Bot n Flash Izquierdo 8 Conector de Salida de TV Auriculares CABLE AV PIEZA NO 0950A7356L A01 9 Conector de Salida de HDMI 10 Compartimiento de las pilas TAPA DE...

Page 85: ...a asegur ndose de respetar las polaridades como se indica dentro del compartimiento y coloque nuevamente la tapa Eject 1 Para recargar las pilas simplemente conecte el adaptador de CA en el conector U...

Page 86: ...e la cuerda hasta que quede ajustado UTILIZACI N DEL TR PODE Para utilizar un tr pode no incluido simplemente atornille la unidad al mismo Luego estire las patas del tr pode NOTA Se recomienda utiliza...

Page 87: ...MULTIMEDIA Formatos de Audio Archivos MP3 Formatos de Fotograf a Baseline JPEGs Formatos de Video AVI H 264 max 1280 x 720 resoluci n 30 fps Para Windows Windows detectar la unidad autom ticamente y...

Page 88: ...TA Si la configuraci n no se inicia autom ticamente inice el programa de ejecuci n autom tica en el CD de instalaci n para ejectuar el instalador 2 Haga clic en el bot n de INSTALACI N DE DISPOSITIVO...

Page 89: ...go haga clic en INSTALAR EL PROGRAMA DE APLICACI N INSTALL APPLICATION SOFTWARE 2 Siga las instrucciones que aparecen en pantalla para iniciar el proceso Se instalar una aplicaci n a la vez 3 Cuando h...

Page 90: ...Quite la tarjeta con cuidado Cuando se coloca una Tarjeta SD los archivos se almacenan autom ticamente en dicha tarjeta en vez de hacerlo en la memoria interna COLOCAR LA TARJETA DE MEMORIA SD LA MEMO...

Page 91: ...e ser PICTXXXX jpg Por ejemplo PICT0001 jpg PICT0002 jpg etc 5b ARCHIVOS DE M SICA Ubique la carpeta en donde se guardan sus archivos MP3 en el disco duro de su computadora Simplemente arrastre y suel...

Page 92: ...ne Dispositivo de almacenamiento masivo USB USB Mass Storage Device y haga clic en el bot n Detener Stop Aparecer la ventana Detener un dispositivo de Hardware Stop a Hardware Device Haga clic en OK C...

Page 93: ...START c PROGRAMAS c ARCSOFT CONVERTIDOR MULTIMEDIA c CONVERTIDOR MULTIMEDIA Tambi n podr hacer doble clic en el acceso directo del Convertidor multimedia en el escritorio se abrir la aplicaci n 2 Hag...

Page 94: ...a clic en CERRAR CLOSE o GUARDAR INFORME SAVE REPORT 10 Renombre el nuevo archivo Clip0001 avi para que sea compatible con esta unidad Si Clip0001 avi ya est siendo utilizado entonces ren mbrelo Clip0...

Page 95: ...haga clic en el men INICIO START c PROGRAMAS c ARCSOFT IMPRESI N MULTIMEDIA Tambi n podr hacer doble clic en el acceso directo de Impresi n multimedia en el escritorio se abrir la aplicaci n 2 Clic en...

Page 96: ...para previsualizarla ROTAR ROTATE Haga clic en el cono Rotar hacia la izquierda Rotate Left o Rotar hacia la derecha Rotate Right para girar la fotograf a o archivo de video seleccionado en su pel cul...

Page 97: ...i n deseada luego haga clic en Iniciar Start para comenzar a grabar 10b Para grabar en un VCD coloque el VCD luego seleccione la solapa VCD Ingrese la informaci n deseada luego haga clic en Iniciar St...

Page 98: ...ccione una carpeta a la izquierda los archivos visibles aparecer n en el rea de visualizaci n 4 Haga doble clic en cualquier fotograf a para abrirla y realice cualquier modificaci n Simplemente haga c...

Page 99: ...en Detener grabaci n Stop recording 6 CONFIGURACIONES SETTINGS Utilice las configuraciones para ajustar las configuraciones de captura tales como el dispositivo de video n mero de grabaci n etc 7 CONF...

Page 100: ...necte la unidad de la siguiente manera 1 Encienda la unidad y conecte el enchufe simple al conector de Auriculares SALIDA DE TV y el otro al conector de ENTRADA DE AV del televisor 2 Aparecer la opci...

Page 101: ...o del cable HDMI no incluido al conector HDMI en la unidad y el otro extremo al conector de ENTRADA HMDI en su TV de ALTA DEFINICI N HD 2 Configure la entrada de video de la TV al conector de HMDI 3 U...

Page 102: ...men de modo Pel cula como se muestra m s arriba Seleccione la Resoluci n con el control de Navegaci n Zoom OK Navigation Zoom OK y luego oprima este control para confirmar aparecer el men de Resoluci...

Page 103: ...eccione la exposici n de pel cula deseada 1 0 to 1 0 o Salga con el control de Navegaci n Zoom OK Luego presione nuevamente el control 1 LUZ Esta configuraci n encender o apagar la luz frontal Ingrese...

Page 104: ...a configuraci n le permitir configurar el balance de blancos Ingrese al men de modo pel cula como se muestra en la p gina 29 Seleccione Balance de blancos con el control de Navegaci n Zoom OK luego op...

Page 105: ...stra en la p gina 29 Seleccione Detecci n de movimiento con el control de Navegaci n Zoom OK 1 luego oprima nuevamente para confirmar 1 aparecer el men de Detecci n de movimiento Seleccione ENCENDIDO...

Page 106: ...tra en la p gina 29 Seleccione Modo noche con el control de Navegaci n Zoom OK luego oprima nuevamente para confirmar aparecer el men Modo noche Seleccione ENCENDIDO ON para activar el modo noche o AP...

Page 107: ...ir oprima el bot n Modo Grabaci n Reproducci n Volver Record Play Mode Return 2 Ingrese al men de modo C mara como se muestra m s arriba Seleccione la Resoluci n con el control de Navegaci n Zoom OK l...

Page 108: ...n de modo C mara como se muestra en la p gina anterior Seleccione Dos en uno con el control de Navegaci n Zoom OK 1 y oprima nuevamente para confirmar aparecer el men Dos en uno Seleccione ENCENDIDO O...

Page 109: ...hasta que la unidad se apague o la pantalla de marco de la foto se reestablezca a normal 1 FLASH Seleccione el modo de Flash deseado Ingrese al men de modo C mara como se muestra en la p gina 34 Selec...

Page 110: ...vegaci n Zoom OK 1 Luego oprima nuevamente este control para confirmar Si est activado oprima el bot n Modo Grabar Reproducir Retomar 2 para volver al modo Tomar fotograf as Cuando se tome una foto el...

Page 111: ...s WB Utilice en exteriores Utilice con luces fluorescentes Utilice con luces hal genas Salir Exit DISPARADOR M LTIPLE Cuando est activado la c mara tomar cinco fotos cont nuas Ingrese al men modo C ma...

Page 112: ...tivarla con el control de Navegaci n Zoom OK Luego presione nuevamente este control 1 FECHA DE IMPRESI N Cuando est activado la fecha aparecer en cada foto tomada Ingrese al men modo C mara como se mu...

Page 113: ...el modo nocturno con el control de Navegaci n Zoom OK Navigation Zoom OK control y luego opr malo nuevamente para confirmar a continuaci n aparecer el men modo Nocturno Con el control de Navegaci n Z...

Page 114: ...ion Derecho Right 2y Flash Izquierdo Left 3 1 3 2 1 MODO EFECTO C MARA DE FOTOS O GRABACI N DE VIDEO Para salir oprima el bot n Modo Grabaci n Reproducci n Volver Record Play Mode Return 3 Elija el ef...

Page 115: ...EO SONIDO Selecci nelo para apagar el sonido de las funciones Para salir oprima el bot n Modo Grabaci n Reproducci n Volver Record Play Mode Return 2 Ingrese en el men del modo Configuraci n como se e...

Page 116: ...gaci n Zoom OK Navigation Zoom OK control y luego opr malo nuevamente para confirmar aparecer resaltado el d a Repita estos pasos para configurar d a hora y minutos Luego de configurar los minutos apa...

Page 117: ...ccione S YES para formatear borrar o NO para NO hacerlo Luego presione nuevamente el control 1 SISTEMA DE TV Cuando conecte la unidad a la TV con los conectores de Salida de AV Auriculares elija el si...

Page 118: ...1 PREDETERMINADO Restablece la configuraci n predeterminada de f brica Ingrese en el men del modo Configuraci n como se explica en la p gina 42 Seleccione la opci n Configuraci n predeterminada Defau...

Page 119: ...i n se apagar 1 Para abrir el visor simplemente bralo como se indica en la ilustraci n la unidad se encender autom ticamente G relo para obtener el ngulo de visi n deseado No intente abrirlo m s de lo...

Page 120: ...n cerca G relo hacia abajo posici n Down para tomar fotograf as comunes 1 ACTIVACI N DE MACRO Mientras mira una foto o mientras se encuentra en el modo de Detener de video empuje hacia abajo el contro...

Page 121: ...Return 2 Gire el Macro hacia arriba posici n Up para tomar fotograf as de personas objetos que est n cerca G relo hacia abajo posici n Down para tomar fotograf as comunes Cuando grabe videos o tome f...

Page 122: ...inition Derecho Right 2 y Flash Izquierdo Left 3 3 1 2 1 Seleccione Aceptar Enter con el control de Navegaci n Zoom OK Navigation Zoom OK control Luego opr malo nuevamente y a continuaci n aparecer la...

Page 123: ...algunos segundos y luego de color verde La unidad ingresar autom ticamente en el modo Grabaci n 1 Si no lo hace oprima varias veces el bot n de Modo Grabaci n Reproducci n Volver Record Play Mode Ret...

Page 124: ...ecord Start Stop empezar a reproducirse la pel cula seleccionada Durante la reproducci n oprima Iniciar Detener grabaci n Record Start Stop para pausarla 3 Durante la reproducci n los botones funciona...

Page 125: ...el video actual o hacia arriba para borrar todos los videos 3 Con el control de Navegaci n Zoom OK Navigation Zoom OK control seleccione S YES para borraroNOparaNOhacerlo Luegopresionenuevamenteel co...

Page 126: ...t 1 y Flash Izquierdo Left 2 luego oprima el control de Navegaci n Zoom OK Navigation Zoom OK control 3 para confirmar 3 2 1 2 Elija un video con los botones HD Alta definici n High Definition Derecho...

Page 127: ...confirmar 3 2 1 2 Oprima el control de Navegaci n Zoom OK Navigation Zoom OK control hacia abajo para bloquear el video actual o hacia arriba para bloquear todos los videos 3 Con el control de Navegac...

Page 128: ...i n Repetir todos Repeat All para repetir todos los videos usando los botones HD Alta definici n High Definition Derecho Right 1 y Flash Izquierdo Left 2 Luego oprima el control de Navegaci n Zoom OK...

Page 129: ...trol de Navegaci n Zoom OK Navigation Zoom OK control 1 para acercar el zoom o b jelo para alejar el zoom Luego oprima el control nuevamente y se activar el control de navegaci n Levante el control de...

Page 130: ...raf a actual o hacia arriba para borrar todas las fotograf as 3 Con el control de Navegaci n Zoom OK Navigation Zoom OK control seleccione S YES para borrar o NO para NO hacerlo Luego presione nuevame...

Page 131: ...inici n High Definition Derecho Right 1 y Flash Izquierdo Left 2 luego oprima el control de Navegaci n Zoom OK Navigation Zoom OK control 3 para confirmar 3 2 1 2 Seleccioneunafotograf aconlosbotonesH...

Page 132: ...2 1 2 Oprima el control de Navegaci n Zoom OK Navigation Zoom OK control hacia abajo para bloquear la fotograf a actual o hacia arriba para bloquear todas las fotograf as 3 Con el control de Navegaci...

Page 133: ...definici n High Definition Derecho Right 1 y Flash Izquierdo Left 2 luego oprima e control de Navegaci n Zoom OK Navigation Zoom OK control 3 para confirmar 3 2 1 2 La presentaci n de fotograf as emp...

Page 134: ...ara ingresar en el modo Reproducci n Seleccione la opci n M SICA MUSIC con el control de Navegaci n Zoom OK Navigation Zoom OK control 2 y luego opr malo nuevamente para ingresar en el modo M sica 2 1...

Page 135: ...n Zoom OK control aparecer la opci n Repetir Repeat en el extremo inferior izquierdo de la pantalla Oprima una vez el control de Navegaci n Zoom OK Navigation Zoom OK control hacia abajo para activar...

Page 136: ...Play Mode Return 1 para ingresar en el modo Reproducci n Seleccione la opci n VOZ VOICE con el control de Navegaci n Zoom OK Navigation Zoom OK control 2 y luego opr malo nuevamente para ingresar en...

Page 137: ...ara activar la funci n Repetir una Repeat One Opr malo dos veces para activar la funci n Repetir todas Repeat All Presi nelo una vez m s para cancelar la operaci n Repetir 7 Oprima hacia arriba el con...

Page 138: ...ajuste el EV El lente est sucio Limpie el lente con un pa o suave La persona objeto a fotografiar est demasiado cerca Gire el Macro hacia arriba posici n Up La persona objeto o la unidad se movi cuand...

Page 139: ...agada Oprima durante un segundo el bot n de Encendido Apagado Power para encenderla La unidad est tomando las fotograf as en blanco y negro El modo Efecto no est configurado en Normal Configure el mod...

Page 140: ...ormatear Format haga clic en OK para confirmar El reproductor comenzar a formatearse vea la ilustraci n a la derecha Cuando finalice haga clic en OK para cerrar la ventana de Formatear NOTA Aseg rese...

Page 141: ...io web www memorexelectronics com para revisar si existe una versi n m s nueva del firmware NOTA IMPORTANTE Antes de actualizar el firmware respalde todos sus archivos en su computadora Despu s de la...

Page 142: ...o del Archivo JPEG Baseline MP3 WAV AVI H 264 Pantalla 2 4 medida diagonalmente Velocidad de imagen de video 30fps Alcance del enfoque 20 cm Macro 200 cm Normal Zoom digital 8x Disparador autom tico C...

Page 143: ...MENOS 90 D AS EN CASO QUE NECESITE DEVOLVER EL PRODUCTO AL LUGAR DE COMPRA O IMATION ELECTRONIC PRODUCTS PARA OBTENER PIEZAS REEMPLAZABLES POR EL CONSUMIDOR CONSULTE EL N MERO DE PIEZA EN LA P GINA 10...

Page 144: ...ve or is it Memorex are trademarks of the affiliates of Memorex Products Inc Imation Electronic Products A Division of Imation Enterprises Corp Weston Florida Impreso en China Memorex el logotipo de M...

Page 145: ...ode effet 41 Menu de r glage g n ral 42 Utilisation 46 Ouvrir le viseur 46 couteurs 46 Allumer l appareil 46 teindre l appareil 46 S lecteur Macro 47 R glage de Zoom 47 Affichage l cran 47 Retour au m...

Page 146: ...IQUE NE PAS OUVRIR TENSION DANGEREUSE Le symbole repr sentant un clair dans un triangle quilat ral a pour but d avertir l utilisateur du danger pr sent par des pi ces non isol es l int rieur de l appa...

Page 147: ...iot support tr pied ou une table instable car il pourrait en tomber se briser et blesser s rieusement quelqu un se trouvant proximit 8A Si vous voulez d placer l appareil avec le chariot sur lequel il...

Page 148: ...rieure et veillez ne pas toucher ces lignes ou circuits car leur contact peut tre fatal 15 SURCHARGE Ne surchargez pas les prises lectriques murales ni les cordons de rallonge car cela risque de cause...

Page 149: ...RATIONS L appareil doit tre d branch de la prise lectrique et confi un r parateur qualifi si a La fiche ou le cordon d alimentation a t endommag b Un objet est tomb sur l appareil ou un liquide a p n...

Page 150: ...aux quipements num riques de classe B d apr s l article 15 des r glementations de la FCC Ces normes sont labor es afin de vous prot ger contre toute interf rence nuisible en installation r sidentiell...

Page 151: ...transf rant vos donn es sur un ordinateur personnel Dans un environnement o il y a un risque de d charge lectrostatique il est possible que l utilisateur doive r initialiser l appareil en retirant les...

Page 152: ...anger et ce AVANT que votre ou e ne s y adapte Pour d terminer quel niveau est sans danger Mettez l appareil en marche alors que la commande de volume est un bas niveau Augmentez le volume jusqu ce qu...

Page 153: ...SUIVANTS PEUVENT PR SENTER UN DANGER EN CAS D EXPOSITION PROLONG E 90 M tro motocyclette camion tondeuse 100 Camion servant la collecte de d chets scie m canique perforatrice pneumatique 120 Devant l...

Page 154: ...tille 2 Lentille 3 Lumi re Flash 4 Micro 5 Afficheur 6 Touche Power alimentation BLOC PILES RECHARGEABLE PI CE n 084 07042L 019 ADAPTATEUR CA PI CE n 199A04220L B09 Pi ce de rechange disponible voir p...

Page 155: ...2 6 Touche Record Start Stop d buter arr ter enregistrement 7 Touche Flash Gauche 8 Sortie TV Out Headphones couteurs C BLE PI CE n 0950A7356L A01 9 Sortie HDMI Out 10 Compartiment de piles COUVERCLE...

Page 156: ...u en respectant les rep res de polarit l int rieur du compartiment Replacez ensuite le couvercle du compartiment 1 Pour charger le bloc piles rechargeable connectez simplement l adaptateur CA au port...

Page 157: ...la courroie dans la boucle puis tirez pour la serrer UTILISATION D UN TR PIED Pour utiliser un tr pied non fourni vissez simplement l appareil sur le tr pied puis ouvrez les pattes REMARQUE Nous vous...

Page 158: ...CHIERS M DIAS COMPATIBLES Format audio fichiers MP3 Format photo fichiers JPEG de base Format vid o AVI H 264 max r solution 1280 x 720 30 images sec Pour Windows Windows d tectera automatiquement l a...

Page 159: ...s affichera REMARQUE Si la configuration ne commence pas automatiquement ouvrez le programme Autorun du CD d installation pour lancer l installateur 2 Cliquez sur INSTALL DEVICE DRIVER installer le pi...

Page 160: ...installer logiciel d application 2 Suivez les instructions l cran pour lancer la proc dure d installation Le programme installera une application la fois 3 Une fois la proc dure termin e cliquez sur...

Page 161: ...te avec soin Lorsqu une carte SD est ins r e les fichiers sont a u t o m a t i q u e m e n t sauvegard s sur celle ci plut t que sur la m moire interne INSERTION D UNE CARTE M MOIRE SD M MOIRE PLEINE...

Page 162: ...Par exemple PICT0001 jpg PICT0002 jpg etc 5b FICHIERS AUDIO Localisez le dossier dans lequel les fichiers MP3 sont sauvegard s sur le disque dur de l ordinateur Glissez d posez simplement les fichier...

Page 163: ...ique de stockage de masse USB USB Mass Storage Device et cliquez sur la touche Arr ter Stop La fen tre Arr t d un p riph rique mat riel Stop a Hardware Device s affichera Cliquez sur OK Lorsque la fen...

Page 164: ...MARRER c TOUS LES PROGRAMMES c ARCSOFT MEDIACONVERTER c MEDIA CONVERTER Vous pouvez galement double cliquer le raccourci MediaConverter sur le bureau pour ouvrir l application 2 Cliquez sur Add File...

Page 165: ...fermer ou SAVE REPORT sauvegarder rapport 10 Renomez le nouveau fichier Clip0001 avi pour qu il soit compatible avec cet appareil Si le nom Clip0001 avi est utilis renomez le Clip0002 avi 11 Connecte...

Page 166: ...d aide d taill Graver la vid o enregistr e sur un DVD VCD 1 Apr s l installation voir page 14 cliquez sur le menu D MARRER c TOUS LES PROGRAMMES c ARCSOFT MEDIAIMPRESSION Vous pouvez galement double c...

Page 167: ...ouble cliquez sur une vid o dans le sc narimage pour l afficher et l diter Double cliquez sur une photo dans le sc narimage pour l afficher ROTATE Cliquez sur l ic ne Rotate Left Right rotation gauche...

Page 168: ...souhait es puis cliquez sur Start pour commencer la gravure 10b Pour graver sur un VCD ins rez un VCD puis s lectionnez l onglet VCD Entrez les informations souhait es puis cliquez sur Start pour comm...

Page 169: ...quez sur PICTURES photos 3 S lectionnez un dossier gauche les fichiers affichables appara tront dans la zone d affichage 4 Double cliquez une photo pour l ouvrir et la modifier Cliquez simplement sur...

Page 170: ...istrement en cliquant sur Stop recording arr ter l enregistrement 6 SETTINGS Utilisez ces r glages pour modifier les param tres de capture ex appareil vid o nombre d images par groupe etc 7 WEBCAM SET...

Page 171: ...et connectez une fiche la prise TV OUT Headphones sortie TV couteurs de l appareil et l autre fiche la prise AV IN du t l viseur 2 L option couteurs TV appara tra S lectionnez l option TV en utilisant...

Page 172: ...non compris la prise HDMI de l appareil et l autre extr mit la prise HMDI IN de votre t l viseur HD 2 S lectionnez la prise HMDI comme entr e vid o sur le t l viseur 3 Utilisez l appareil de la fa on...

Page 173: ...our 2 Acc dez au menu du mode Movie film tel qu indiqu ci dessus S lectionnez Resolution en utilisant le r glage Navigation Zoom OK puis appuyez sur le r glage Navigation Zoom OK le menu Resolution ap...

Page 174: ...vid o souhait 1 0 1 0 ou Exit quitter en utilisant le r glage Navigation Zoom OK Appuyez ensuite sur le r glage Navigation Zoom OK 1 LIGHT Ce r glage permet d allumer teindre la lumi re l avant Acc de...

Page 175: ...ANCE Ce r glage permet de d terminer la balance des blancs Acc dez au menu du mode Movie film tel qu indiqu la page 29 S lectionnez White Balance balance des blancs en utilisant le r glage Navigation...

Page 176: ...etect d tection de mouvement en utilisant le r glage Navigation Zoom OK 1 puis appuyez sur le r glage Navigation Zoom OK 1 le menu Motion Detect appara tra S lectionnez ON pour activer la fonction Mot...

Page 177: ...ectionnez Night Mode mode de nuit en utilisant le r glage Navigation Zoom OK puis appuyez sur le r glage Navigation Zoom OK le menu Night Mode appara tra S lectionnez ON pour activer le mode de nuit o...

Page 178: ...ouche Record Play Mode mode enregistrement lecture Retour 2 Acc dez au menu du mode Camera photo tel qu indiqu ci dessus S lectionnez Resolution en utilisant le r glage Navigation Zoom OK puis appuyez...

Page 179: ...ionnez Two In One deux en un en utilisant le r glage Navigation Zoom OK 1 puis appuyez sur le r glage Navigation Zoom OK 1 le menu Two In One appara tra S lectionnez ON pour activer cette fonction ou...

Page 180: ...appareil soit teint ou l cran du cadre de photo r tabli sur normal 1 FLASH S lectionnez le mode de Flash souhait Acc dez au menu du mode Camera photo tel qu indiqu la page 34 S lectionnez Flash en uti...

Page 181: ...i la minuterie est activ e appuyez sur la touche Record Play Mode mode enregistrement lecture Retour 2 pour retourner au mode de prise de photo Lorsque vous prendrez la photo la minuterie sera activ e...

Page 182: ...orescentes Utilisation avec lampes halog nes Quitter MULTI SNAP Lorsque cette fonction est activ e l appareil prend cinq photos cons cutives Acc dez au menu du mode Camera photo tel qu indiqu la page...

Page 183: ...ant le r glage Navigation Zoom OK Appuyez ensuite sur le r glage Navigation Zoom OK 1 DATE PRINTING Lorsque cette fonction est activ e la date est affich e sur chaque photo prise Acc dez au menu du mo...

Page 184: ...u la page 34 S lectionnez Night Mode mode de nuit en utilisant le r glage Navigation Zoom OK puis appuyez sur le r glage Navigation Zoom OK le menu Night Mode appara tra S lectionnez ON pour activer l...

Page 185: ...roite 2 et Flash gauche 3 1 3 2 1 MODE EFFET POUR LES PHOTOS OU VID OS Pour quitter appuyez sur la touche Record Play Mode mode enregistrement lecture Retour 3 S lectionnez l effet souhait Normal B W...

Page 186: ...glage permet d activer d sactiver le son Pour quitter appuyez sur la touche Record Play Mode mode enregistrement lecture Retour 2 Acc dez au menu du mode Setting r glage tel qu indiqu ci dessus S lec...

Page 187: ...ce S lectionnez le mois en utilisant le r glage Navigation Zoom OK puis appuyez sur le r glage Navigation Zoom OK le jour sera en surbrillance R p tez cette proc dure pour r gler le jour l heure et le...

Page 188: ...Zoom OK Appuyez ensuite sur le r glage Navigation Zoom OK 1 TV SYSTEM Lorsque vous reliez l appareil un t l viseur en utilisant les sorties AV Headphones couteurs s lectionnez le syst me TV de votre...

Page 189: ...ur le r glage Navigation Zoom OK 1 R GLAGES PAR D FAUT Vous pouvez r tablir les r glages sur leur valeur par d faut Acc dez au menu du mode Setting r glage tel qu indiqu la page 42 S lectionnez Defaul...

Page 190: ...ent vers le haut tel qu illustr l appareil s allumera automatiquement Tournez le pour obtenir l angle de visionnement souhait Ne tentez pas de l ouvrir plus qu il ne le permet 1 OUVRIR LE VISEUR Pour...

Page 191: ...photos de sujets situ s tr s pr s Tournez le sur la position basse pour prendre des photos normales 1 S LECTEUR MACRO Pendant que vous affichez une photo ou arr ter une vid o appuyez sur le r glage Na...

Page 192: ...pour le s lectionner 2 Tournez le s lecteur Macro sur la position haute pour prendre des photos de sujets situ s tr s pr s Tournez le sur la position basse pour prendre des photos normales Lorsque vo...

Page 193: ...3 3 1 2 1 S lectionnez Enter en utilisant le r glage Navigation Zoom OK Appuyez ensuite sur le r glage Navigation Zoom OK le menu Voice voix appara tra 2 Appuyez sur la touche Record Start Stop d bute...

Page 194: ...lectionnera automatiquement le mode enregistrement 1 S il n est pas d j en mode enregistrement appuyez plusieurs reprises sur la touche Record Play Mode mode enregistrement lecture Retour pour le s le...

Page 195: ...glage Navigation Zoom OK 2 pour acc der au mode Movie 1 2 2 Appuyez sur la touche Record Start Stop d buter arr ter enregistrement la lecture du film d butera Pendant la lecture appuyez sur la touche...

Page 196: ...d os 3 S lectionnez YES pour supprimer ou NO pour ne PAS supprimer en utilisant le r glage Navigation Zoom OK Appuyez ensuite sur le r glage Navigation Zoom OK Appuyez sur le r glage Navigation Zoom O...

Page 197: ...HD droite 1 et Flash gauche 2 puis appuyez sur le r glage Navigation Zoom OK 3 3 2 1 2 S lectionnez une vid o en utilisant les touches HD droite 1 et Flash gauche 2 Vous pouvez aussi appuyer sur le r...

Page 198: ...ge Navigation Zoom OK vers le bas pour verrouiller la vid o en cours ou vers le haut pour verrouiller toutes les vid os 3 S lectionnez YES pour verrouiller ou NO pour d verrouiller en utilisant le r g...

Page 199: ...id o en cours ou Repeat All r p ter toutes pour r p ter toutes les vid os en utilisant les touches HD droite 1 et Flash gauche 2 Appuyez sur le r glage Navigation Zoom OK 3 pour confirmer la s lection...

Page 200: ...OK 2 pour acc der au mode Picture 2 1 2 Appuyez sur le r glage Navigation Zoom OK 1 vers le haut pour agrandir l image ou vers le bas pour la r duire puis appuyez sur le r glage Navigation Zoom OK 1...

Page 201: ...photos 3 S lectionnez YES pour supprimer ou NO pour ne PAS supprimer en utilisant le r glage Navigation Zoom OK Appuyez ensuite sur le r glage Navigation Zoom OK Appuyez sur le r glage Navigation Zoom...

Page 202: ...s menu 1 S lectionnez Thumbnail miniature en utilisant les touches HD droite 1 et Flash gauche 2 puis appuyez sur le r glage Navigation Zoom OK 3 3 2 1 2 S lectionnez une photo en utilisant les touche...

Page 203: ...Navigation Zoom OK vers le bas pour verrouiller la photo en cours ou vers le haut pour verrouiller toutes les photos 3 S lectionnez YES pour verrouiller ou NO pour d verrouiller en utilisant le r gla...

Page 204: ...nez Slideshow pr sentation en utilisant les touches HD droite 1 et Flash gauche 2 puis appuyez sur le r glage Navigation Zoom OK 3 3 2 1 2 La pr sentation d butera automatiquement Pour arr ter la lect...

Page 205: ...ure Retour 1 pour s lectionner le mode de lecture S lectionnez MUSIC musique en utilisant le r glage Navigation Zoom OK 2 puis appuyez sur le r glage Navigation Zoom OK 2 pour acc der au mode Music 2...

Page 206: ...at r p tition apparaisse dans le coin inf rieur gauche de l afficheur Appuyez une fois sur le r glage Navigation Zoom OK vers le bas pour activer la fonction Repeat One Appuyez deux fois pour activer...

Page 207: ...Play Mode mode enregistrement lecture Retour 1 pour s lectionner le mode de lecture S lectionnez VOICE voix en utilisant le r glage Navigation Zoom OK 2 puis appuyez sur le r glage Navigation Zoom OK...

Page 208: ...yez deux fois pour activer la fonction Repeat All Appuyez nouveau pour d sactiver la fonction Repeat 7 Appuyez sur le r glage Navigation Zoom OK vers le haut pour que Delete supprimer apparaisse dans...

Page 209: ...renez la photo avec un meilleur clairage et ou ajustez le r glage EV Les lentilles sont sales Nettoyez les avec un chiffon doux Le sujet est trop pr s Tournez le s lecteur Macro sur la position haute...

Page 210: ...areil n est pas allum Appuyez sur la touche Power pendant une seconde pour l allumer L appareil prend les photos en noir et blanc Le mode Effect n est pas r gl sur normal R glez le mode Effect sur Nor...

Page 211: ...Lorsque la fen tre Formater appara tra cliquez sur OK pour confirmer l op ration L appareil sera alors format voir illustration de droite Une fois le formatage termin cliquez sur OK pour fermer la fen...

Page 212: ...RE T l chargez le microprogramme le plus r cent sur le site www memorexelectronics com REMARQUE IMPORTANTE Avant de mettre le microprogramme jour faites une copie de s curit de vos fichiers sur un ord...

Page 213: ...ats de fichiers JPEG de base MP3 WAV AVI H 264 Afficheur 2 4 pouces mesur la diagonale Cadence vid o 30 images seconde Longueur focale 20 cm Macro 200 cm Normal Zoom num rique 8x Minuterie D lai de 10...

Page 214: ...ONSERVER LES MAT RIAUX D EMBALLAGE PENDANT AU MOINS 90 JOURS AU CAS O VOUS DEVRIEZ RETOURNER CE PRODUIT O VOUS L AVEZ ACHET OU IMATION ELECTRONIC PRODUCTS POUR OBTENIR DES PI CES DE REMPLACEMENT CONSU...

Page 215: ...ston Florida Impreso en China www memorexelectronics com Memorex el logotipo de Memorex y la frase Is it live or is it Memorex son marcas registradas de las empresas afiliadas a Memorex Products Inc I...

Reviews: