background image

INSTRUCTIONS FOR USE

Before using for the first time, run for a few
minutes without bread. Some smoke may appear
at first, this is normal and will disappear after a
short while.

Plug into a power outlet and turn the power
outlet to on position.

Place the bread in the openings. Adjust the
selector knob to your desired toast colour
position. Turn the selector knob to the right
between 1 and 6. The browning level will
increase in relation to the numbers. Push
down the carriage. Be aware that the
carriage will not latch down unless the plug
is in the power outlet and turned on. 

When the toasting is done, the carriage
returns to its initial position and the toast will
appear at the openings. The toaster
automatically switches off. If the bread
becomes stuck inside the toaster, switch it
off and unplug, allow cooling and remove the
bread.

Do not use the toaster if the crumb-tray is
not in its correct position.

Use of Cancel button

When pressing the Cancel button, the automatic
cycle stops and ejects the bread. You can
interrupt the toasting process by pressing the
cancel button. The toaster is ready for immediate
re-use.

Use of Defrost button

To toast frozen bread, you do not have to adjust
the browning control. Place the bread in the bread
slots as usual ,depress the bread carriage lever
and press the defrost button. The toaster will
automatically toast for an extended period of
time.

Use of Re-heat button

If your toast has popped up and gone cold, the
toaster offers a re-heat facility. To use it, depress
the bread carriage lever and press the re-heat
button immediately, The toaster will operate for a
short period, re-heating the bread.

CLEANING

Ensure that the toaster is unplugged before
cleaning.

Never place in water or any other liquid.

Before cleaning, unplug and allow to cool,
then remove the crumb-tray by pulling it
outward.

Clean off remains of bread, burns, etc.

-

Never insert any object, even a cloth, into the
toaster.

Once the crumbs have been removed, refit
the tray, ensuring that it is in the correct
position.

14

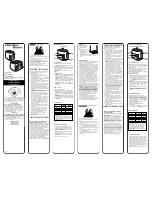
FOR UNITED KINGDOM ONLY

Plug wiring:

This product is fitted with a BS 1363 13-amp plug. If 
you have to replace the fuse, only those that are 
ASTA or BSI approved to BS1362 and with a rated 
current of 13 amps should be used. If there is a fuse 
cover fitted, this cover must be refitted after 
changing the fuse. 
If the fuse cover is lost or damaged, the plug must 
not be used. You must also check if the socket 
outlets in your home fit with the plug of the 
appliance. If the socket outlet in your home does 
not fit with the plug,  the plug must be removed and 
disposed of safely as insertion of the plug into the 
socket is likely to cause electric hazard. A replace-
ment plug should be wired according to following 
description.

Important

This appliance must be earthed. The wires in the 
cord set are coloured
thus:  

BLUE- Neutral, Brown-Live, Green& Yellow-
earth 
(For detachable plug only)

As the colours of the wires in the mains lead of this 
appliance may not correspond with the coloured 
markings identifying the terminals in your plug, 
proceed as follows:

The wire that is coloured Green& Yellow must be 
connected to the terminal in the plug that is marked 

The wire that is coloured blue must be connected to 
the terminal that is marked with the letter N or 
coloured black.

The wire that is couloured brown must be 
connected to the terminal that is marked with the 
letter L or coloured red.

If the bread gets stuck in the toaster, remove
the plug from the power outlet and let the
toaster cool off. 

Move the carriage up and down a couple of
times to release the bread. Do never use
metal objects to remove the bread.

Summary of Contents for 143-089

Page 1: ...143 089 643 222 643 223 643 235 643 251 www adexi eu DK Br drister 2 SE Br drost 5 NO Br drister 8 FI Leiv npaahdin 10 UK Toaster 13 DE Toaster 16 PL Elektroniczny toster 19...

Page 2: ...i brug Br dristeren m aldrig v re tild kket n r den er i brug Fors g ikke at fjerne br det mens br dristeren er aktiveret For at afbryde ristningen trykkes p Fortryd knappen Br dristeren skal j vnlig...

Page 3: ...ristningstid RENG RING Tag altid stikket ud af stikkontakten og lad br dristeren afk le helt Br dristeren skal t mmes for br dkrummer j vnligt T r ydersiden af med en t r eller h rdt opvreden klud Anv...

Page 4: ...m tte opst grundet fejl p ledningsnettet hvis der har v ret foretaget uautoriseret indgreb i apparatet Grundet konstant udvikling af vore produkter p funktions og designsiden forbeholder vi os ret ti...

Page 5: ...bruk Br drosten f r aldrig vara vert ckt n r den anv nds F rs k inte att ta ur br det medan br drosten r aktiv Tryck p Avbrytarknappen f r att avbryta rostningen Avl gsna regelbundet smulor fr n br dr...

Page 6: ...r dsmulor Torka av yttersidan med torr eller h rt urvriden trasa Anv nd inga former av starka eller slipande reng ringsmedel Anv nd inte st lborste till reng ring Reng r aldrig med skurborste H r kan...

Page 7: ...m uppst tt p grund av fel p eln tet Om det f retagits oauktoriserade ingrepp i apparaten P grund av konstant utveckling av v ra produkter vad g ller funktion och design f rbeh ller vi oss r tten att n...

Page 8: ...r dristeren m aldri v re tildekket n r den er i bruk Ikke fors k fjerne br det mens br dristeren er i bruk For avbryte ristingen trykker du p avbryterknappen Br dristeren skal t mmes regelmessig for b...

Page 9: ...Ta alltid st pselet ut av stikkontakten og la br dristeren avkj le helt T m br dristeren regelmessig for br dsmuler T rk br dristeren utvendig med en t rr eller hardt vridd klut Ikke bruk noen former...

Page 10: ...yvill ole palavia materiaaleja sen ollessa k yt ss Leiv npaahdinta ei saa koskaan peitt sen ollessa k yt ss Leip ei saa ottaa leiv npaahtimesta paahtimen ollessa p ll Keskeyt paahto painamalla keskeyt...

Page 11: ...tkin alas T m n j lkeen paina v litt m sti uudelleenl mmityspainiketta Painikkeen merkkivalo syttyy ja leiv npaahdin l mmitt leip hetken ajan HYVI NEUVOJA T ss leiv npaahtimessa voi paahtaa monenlaisi...

Page 12: ...OJA TUOTTEEN H VITT MISEST JA KIERR TYKSEST T m Adexi tuote on merkitty seuraavalla symbolilla Tuotetta ei siis saa h vitt tavallisen kotitalousj tteen mukana vaan s hk ja elektroniikkaj te on h vitet...

Page 13: ...on Do not attempt to dislodge food when the toaster is plugged in Do not place anything on top of the toaster when in use This appliance must not be left unattended during use Never use the toaster wi...

Page 14: ...r place in water or any other liquid Before cleaning unplug and allow to cool then remove the crumb tray by pulling it outward Clean off remains of bread burns etc Never insert any object even a cloth...

Page 15: ...with this symbol This means that this product must not be disposed of together with ordinary household waste as electrical and electronic waste must be disposed of separately In accordance with the W...

Page 16: ...aster angeschaltet ist Zum Abbrechen des Toastvorganges die Stop Taste dr cken Der Toaster ist regelm ig von Kr meln zu entleeren um Brandgefahr zu vermeiden Der Toaster ist nur haushalts blich zu ver...

Page 17: ...Tiefk hlfach kommendes Brot auftauen Dazu das Brot in den Toaster stecken Schlitten nach unten dr cken und sofort die Auftautaste bet tigen Die Taste beginnt zu leuchten und der R stvorgang wird nun...

Page 18: ...nen gebrauchte Ger te in bestimmten F llen bei dem Einzelh ndler bei dem sie gekauft wurden kostenfrei wieder abgegeben werden sofern man ein neues Ger t kauft Bitte nehmen Sie mit Ihrem Einzelh ndler...

Page 19: ......

Page 20: ......

Page 21: ...owskie zapewnia w a ciw zbi rk odzysk przetwarzanie i recykling zu ytego sprz tu elektrycznego i elektronicznego Prywatne gospodarstwa domowe na obszarze UE mog nieodp atnie oddawa zu yty sprz t do sp...

Page 22: ...643070_IM_new 30 01 07 8 48 Side 22...

Reviews: