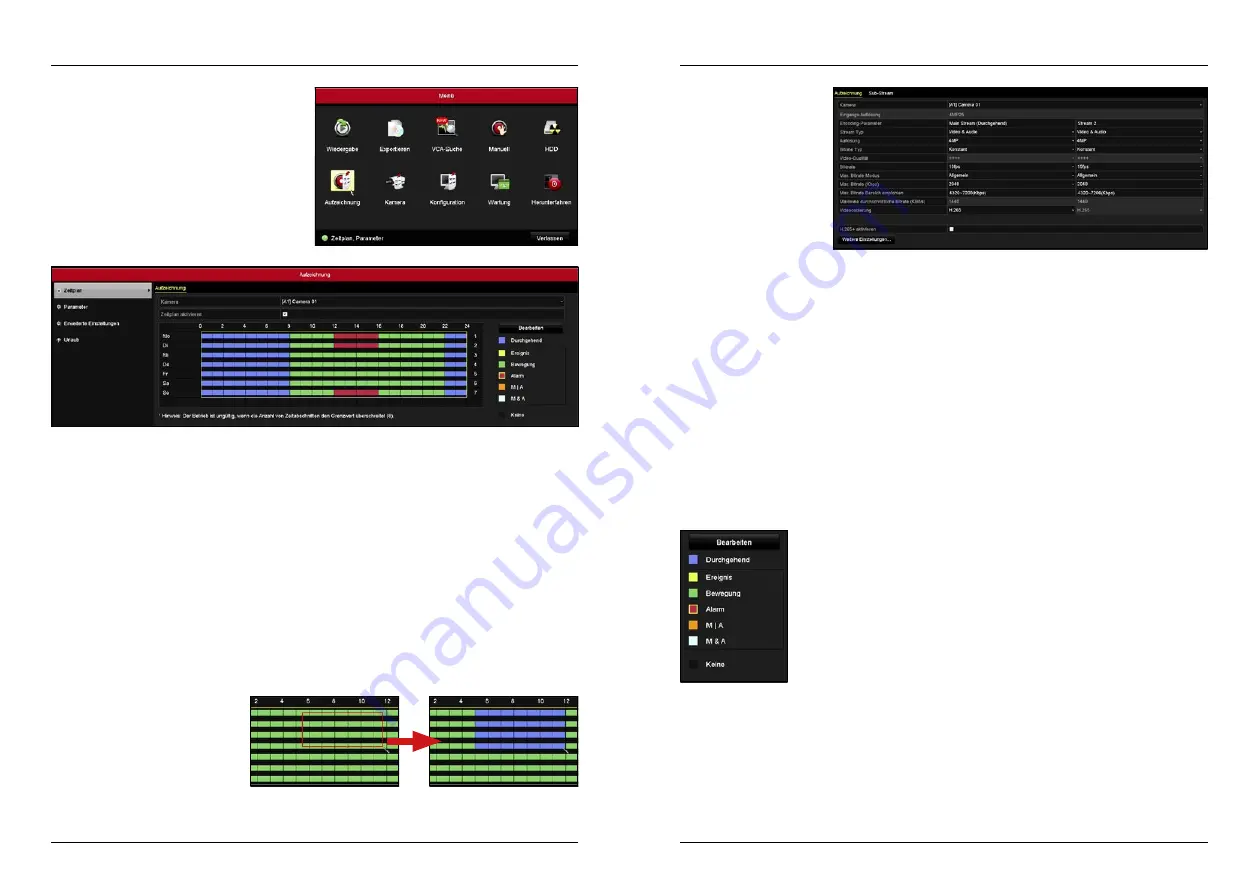
8. Set recording schedule
8. Set recording schedule
ENGLISH
ENGLISH
12
13
You can create a recording schedule to associate
each camera with a recording mode at a specific
time.
Go to the main menu and select the menu item:
Recording
Under Parameter you can
set with which resolution,
with which video quality
and if only video or video +
audio should be recorded.
First select a camera on the
top screen wheel and then
change the values according
to your needs.
Note
: Audio recording is
only possible if the camera supports audio recording. Check the technical data of the camera.
Here you can enable or disable the video codec for all analogue cameras on H.264 + / H.265 +. You can also
choose to overwrite recordings when the disk is full. This means older recordings will be overwritten first.
Define the vacation mode. During this time you can temporarily change the behavior of the recording mode.
This is useful if you are in the house for a long time and there is no need to start recording.
1. First, you must define the times for the holiday mode. To do so, click on „Edit“ in the
schedule and select on the day of the week: Holiday.
2. Here you can set the start and end time as well as the recording mode (eg recording
only with motion detection).
3. Switch back to the menu item Holiday and click on the first holiday mode (Holi-
day1). You can change the name as you like. Choose a model if you want to set
vacation mode by date, by week, or by year. Then select the start and end time of
the holiday mode.
Under „Additional settings“ you can set the pre-run and post-run time. This means, if you For example, if you
have scheduled a continuous recording from 8:00 am to 8:00 pm and set the lead time and follow-up time to 30
seconds each, the recording will start 30 seconds earlier and stop 30 seconds later.
1. At the top of the screen, select the camera you want to adjust (eg Camera 01).
2. With Enable Schedule, you can enable or disable the schedule for each individual camera.
3. The presentation of the schedule is arranged as follows:
-
Week days:
vertical arrangement (Monday - Sunday)
-
Hours
:
horizontal arrangement (0:00 - 24:00 o‘clock)
4. Click an appropriate recording mode on the right side:
-
Continuous:
The recording is continuous.
-
Event:
The recording is triggered by all event-controlled alarms.
-
Move:
The recording is only triggered if motion detection is detected.
-
Alarm:
The recording is triggered by an alarm (when operating with an alarm system).
- M / A:
The recording is triggered by a motion detection or an alarm.
- M & A:
The recording is triggered by a motion detection and an alarm.
- None:
There is no recording.
Schedule
Parameter
Advanced settings
Holiday
If you have selected a recording mode,
mark the corresponding days of the
week and hours. To do this, click in the
schedule, hold down the mouse but-
ton and drag the marker to suit your
needs. If necessary, repeat the process
with additional recording modes.
Note:
Repeat the process if you want to set other holiday modes. In total, you can use up to 32 holiday modes.
Summary of Contents for HSC 7800
Page 1: ...HSC 7800 Kurzanleitung...


