background image

5. Getting Started

5. Getting Started

ENGLISH

ENGLISH

08

09

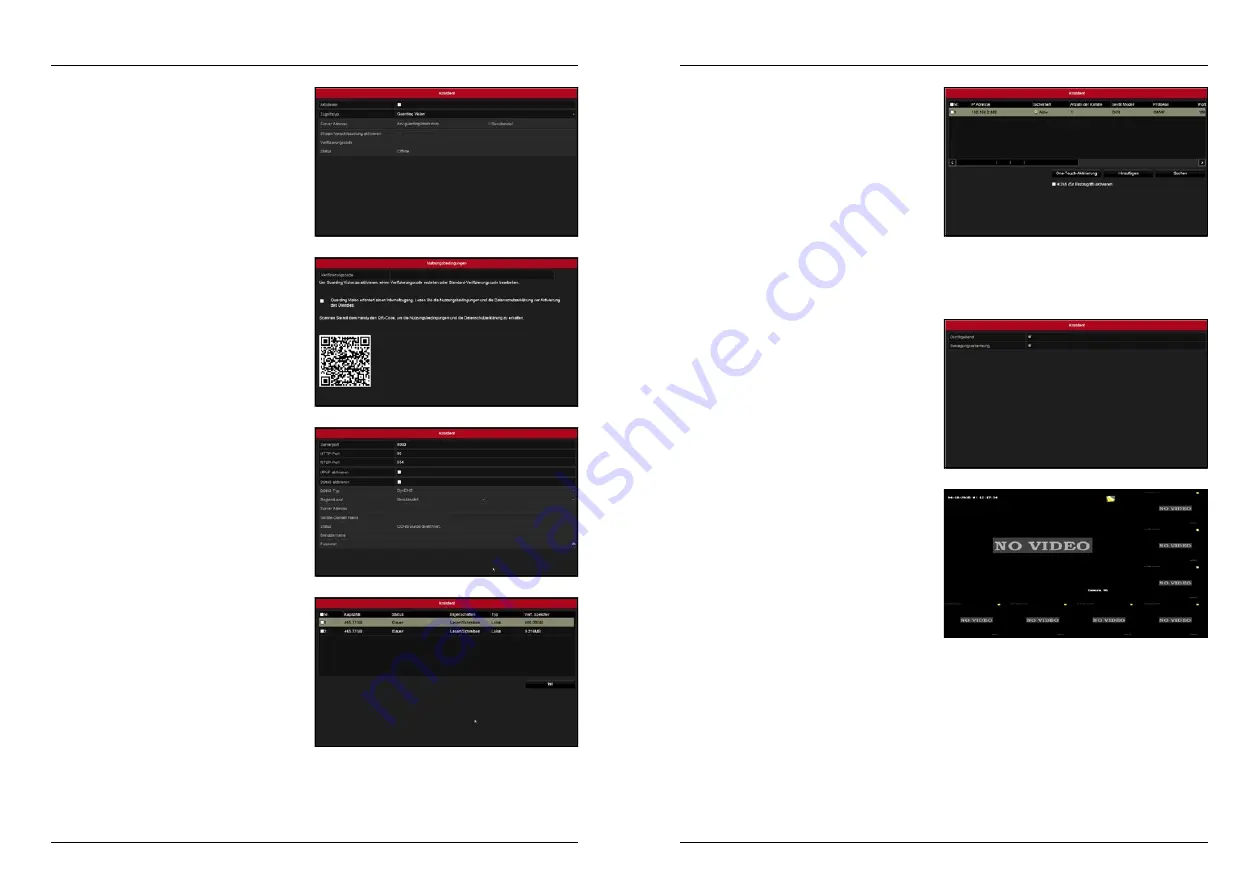
Activate Guardian Vision service

Select the check box to access the system in future 
with your mobile device (eg smartphone).

If you would like to start without the Guardian Vision 
service for the time being, skip the item by leaving 
the check box cleared.

Add IP cameras

If you want to integrate IP cameras into the system, 
click on „Search“. Now all found IP cameras are listed 
in the network.
Select the camera and click „Add“. If you want to add 
more than one camera at a time, highlight all and 
click on „One Touch Activation“.
Make sure the IP cameras are activated in advance. 
This can be seen under the column „Security“ (active 
or inactive). If the camera is inactive, first click on the 
„inactive“ icon and then enter the device password 
of the camera. Read more about this in the manual 
of the respective IP camera.

Recording status

Select whether to record the camera (s) continuous-
ly or only after motion detection. To set the respecti-
ve function, click on the gearwheel symbol.

Home screen

After completing the wizard, you will see the main 
screen of the system.

Advanced network settings

In this window you can make further settings for the 
network.

Initialize hard disk(s)

If you have installed a hard disk, it will be listed here. 
Select a hard disk with the check box, and then press 
„Init“. The hard disk is now formatted and adapted to 
the system.

Warning:

 All data on the hard disk will be deleted.

If you‘ve enabled the Guardian Vision service, enter 
a verification code that you‘ll need to verify later in 
your mobile app. The code must be between 6-12 
digits.

The QR code can be scanned with the mobile de-
vice to connect the DVR main unit to the app.

Summary of Contents for HSC 7800

Page 1: ...HSC 7800 Kurzanleitung...

Page 2: ...ikt einhalten Detaillierte Informationen finden Sie in den technischen Daten Die Eingangsspannung sollte sowohl die SELV Spannung Safety Extra Low Voltage als auch die begrenzte Stromquelle mit 100 24...

Page 3: ...tzliche Ger te z B Maus Tastatur Leuchtet rot wenn das Ger t am Strom angeschlossen wurde und sich im Standby befindet Leuchtet blau wenn das Ger t eingeschaltet ist Leuchtet rot wenn Daten von der F...

Page 4: ...ssistenten fortzufahren m ssen Sie zun chst noch einmal das Admin Passwort einge ben das Sie zum Aktivieren des Ger tes vergeben haben Alternativ k nnen Sie auch an dieser Stelle das Pass wort ndern d...

Page 5: ...Ger tepasswort der Kame ra ein Lesen Sie hierzu mehr in der Anleitung der jeweiligen IP Kamera Aufnahmezustand W hlen Sie ob die Kamera s durchgehend aufneh men sollen oder nur nach Bewegungserkennun...

Page 6: ...n Exportiert Aufnahmen auf einen externen Datentr ger VCA Suche Sucht Aufnahmen nach diversen Mustern Verhaltenssuche Gesichtssuche Diese Funktion ist nur m glich wenn die Kamera einen dieser Modis un...

Page 7: ...ubsmodus nach Datum nach Woche oder nach Jahr einstellen m chten Anschlie end w hlen Sie die Start und Endzeit des Urlaubsmodus Unter Weitere Einstellungen k nnen Sie die Vorlauf und Nachlaufzeit eins...

Page 8: ...zuf gen 2 W hlen Sie den Festplatten Typ NAS 3 Geben Sie die IP Adresse der NAS Festplatte ein 4 Geben Sie das Netzwerk Verzeichnis ein Allgemein Netzwerk Festplatte hinzuf gen NAS 10 Wiedergabe von A...

Page 9: ...380 x 48 x 320mm B H T Gewicht ca 2kg Material Geh use Metall Sensor 2 Megapixel Progressive Scan CMOS Video Aufl sung 1920 x 1080 Pixel Lichtempfindlichkeit 0 05 Lux F1 2 AGC ON 0 Lux mit IR Verschl...

Page 10: ...Version 1 0 Mai 2018 Technische nderungen Druckfehler und Irrt mer vorbehalten Megasat Werke GmbH Industriestra e 4a D 97618 Niederlauer HSC 7800 quick start guide...

Page 11: ...cal safety regulations of your area Detailed information can be found in the technical data The input voltage should meet both SELV Safety Extra Low Voltage and Limited Current 100 240V AC 48V DC IEC6...

Page 12: ...mouse keyboard Lights red when the device is plugged in and in standby Lights up blue when the device is on Lights red when data is being read from the hard disk or written to the hard disk Flickers...

Page 13: ...word and unlock pattern To continue with the wizard you must first enter the admin password that you have assigned to activate the device Alternatively you can also change the password here activate d...

Page 14: ...n and then enter the device password of the camera Read more about this in the manual of the respective IP camera Recording status Select whether to record the camera s continuous ly or only after mot...

Page 15: ...h Searches recordings according to various patterns behavior search face search This function is only possible if the camera supports one of these modes Manual Manual settings for recording continuous...

Page 16: ...acation mode by date by week or by year Then select the start and end time of the holiday mode Under Additional settings you can set the pre run and post run time This means if you For example if you...

Page 17: ...at the bottom of the screen 2 Select the disk type NAS 3 Enter the IP address of the NAS hard disk 4 Enter the network directory General Add Network Disk NAS 10 Playback of recordings In Playback Vie...

Page 18: ...wer switch yes Dimensions 380 x 48 x 320mm W H D Weight about 2kg Material housing Metal Sensor 2 Megapixel Progressive Scan CMOS Video Resolution 1920 x 1080 Pixel Photosensitivity 0 05 Lux F1 2 AGC...

Page 19: ...Version 1 0 May 2018 Technical changes misprints and errors reserved Megasat Werke GmbH Industriestra e 4a D 97618 Niederlauer...

Reviews: