


ENGLISH
19
9.
Mop the floor in the work area to remove all residual paint and paint dust. Use a damp cloth to
remove dust from the walls, window frames and other surfaces. Avoid brushing, dry wiping or
vacuum cleaning. Use detergent with a high content of phosphate or trisodium phosphate.
10.
Place flaking paint and dust in double plastic bags, seal with tape or bag sealers, and recycle in
accordance with local regulations.
11.
Remove protective clothing and shoes inside the work area to avoid spreading dust to other areas.
Wash work clothes separately. Wipe shoes with a wet cloth, which should be washed with your
work clothes. Wash your hair and body with plenty of soap and water.
Removing the heat guard
The heat guard can be removed for work in confined spaces.
NOTE!
The nozzle is very hot!
Risk of burn injuries when the heat guard is removed.
Switch off the tool and allow it to cool before removing or fitting the heat guard. You can run the
tool without heat to cool it.
Turn the heat guard anti-clockwise to remove, and clockwise to fit.
Positioning the tool
The tool can be placed in an upright position to cool and when you need to have both hands free.
Always be careful near the upright tool. The nozzle and hot air flow can cause burn injuries.
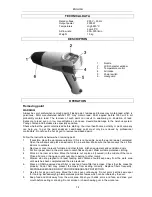
Uses
The temperature settings in the example are only guidelines and can vary depending on the material. A
suitable distance between the nozzle and workpiece depends on the material being treated. Practise until
you find a suitable temperature. Start with a low temperature and increase if necessary. The
recommended accessories simplify the work and produce better results.
Always be careful when replacing the nozzle
– risk of burn injuries. Do not touch the nozzle when it is hot.
Allow the tool to cool. Wear protective gloves.
The hot air gun has three working modes:
I.
Thawing. The temperature is kept constant at 60°C.
II.
Low airflow. The temperature can be adjusted between 60
–650°C.
III.
High airflow. The temperature can be adjusted between 60
–650°C.
The temperature can only be adjusted in working modes II and III.
Paint removal/glue softening
Fit the wide nozzle. Soften the paint with hot air and remove it with a scraper. Do not heat the paint
for too long. This causes it to burn and makes it more difficult to remove. Keep the scraper sharp
and clean.
Many types of glue, e.g. on stickers, become softer when heated, allowing the glued objects to be
separated or surplus glue removed.
Always use the glass protector nozzle. Paint can be removed from irregular surfaces using a
scraper or wire brush.
NOTE!
There is a risk of cracking the glass when heating window frames.
Shaping plastic pipes
Fit the reflector nozzle. Fill the pipe with sand and seal the ends to prevent it from bending. Heat the pipe
evenly by moving it back and forth.
Welding plastic
Fit the reducer nozzle and welding cone. The objects to be welded together must be of the same material
as the welding wire. The joint must be clean and free from grease. Heat the joint until it becomes tacky.
Note that there is a very small difference in temperature between tacky and liquid plastic. Apply the
welding wire and let it flow into the gap and form an even weld bead.
Shrink fitting
Fit the reducer nozzle. Select the diameter of the shrink hose in relation to the workpiece (e.g. a cable
lug). Heat the shrink sleeve evenly.


