background image

SETUP: 

CONNECTING TO TV OR OTHER AUDIO DEVICE

The 

Connect

 includes three connection options. Consult the user manual 

for your television or other device to find the appropriate connector to use for 

audio output (Audio Out).

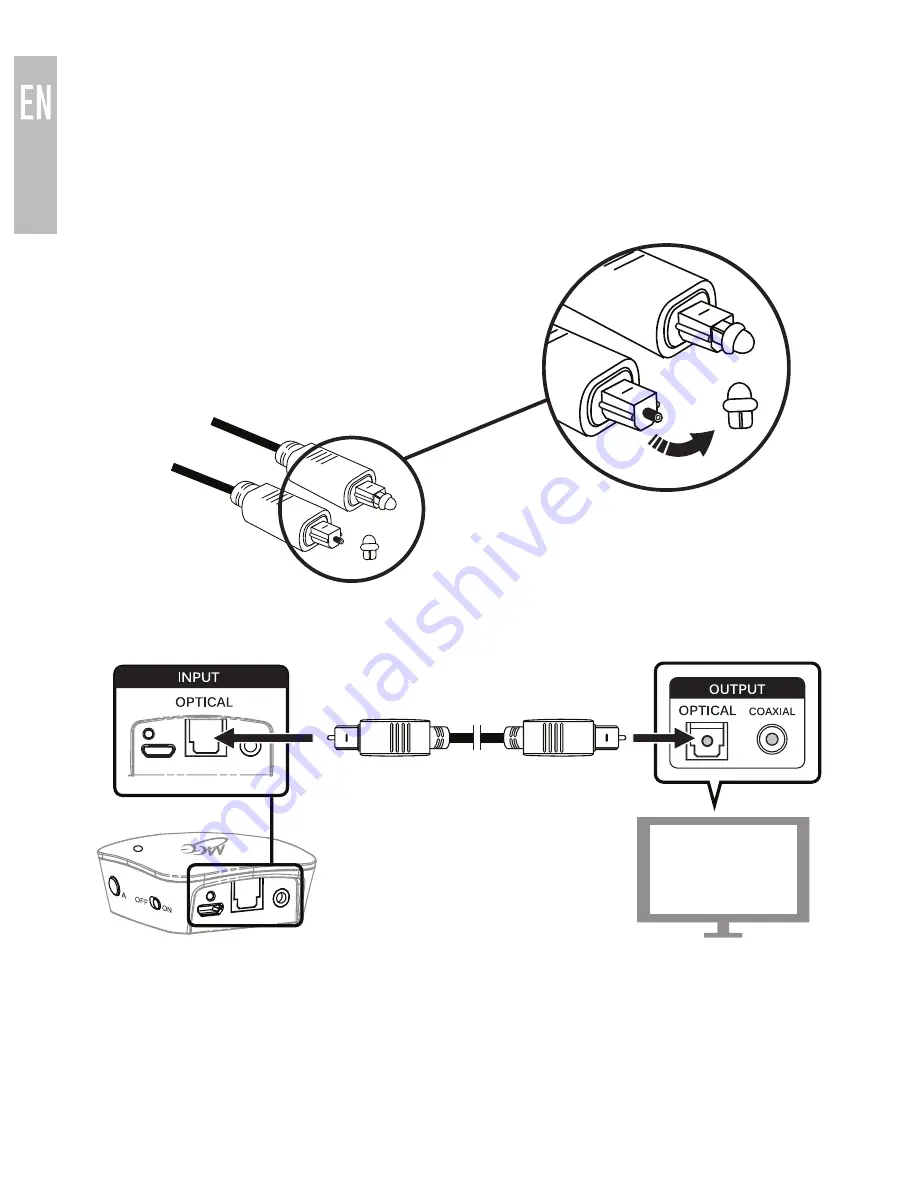
Option 1: Digital optical audio out (TOSLINK)

Newer TVs are usually outfitted with a TOSLINK 

digital optical (SPDIF) connector. 

A. 

Remove the protective 

caps from the included 

fiber optic TOSLINK cable

B. 

Plug the cable firmly into the optical audio output on the TV and the 

optical input of the 

Connect

The volume of optical output is typically fixed and TV speakers can be 

controlled independently as necessary.

Note:

 If something is plugged into both the optical and 3.5mm input jacks of 

the 

Connect

, the analog (3.5mm) input will have priority and the optical input 

will be muted. To use the optical input, unplug the 3.5mm connector from the 

transmitter.

continue to next page

5

Summary of Contents for connect AF-T1

Page 1: ...Universal Dual Headphone Bluetooth Wireless Audio Transmitter Model AF T1 USER MANUAL...

Page 2: ...NTS Bluetooth Transmitter 3 5mm audio cable TOSLINK digital optical S PDIF audio cable Micro USB charging cable 3 5mm to RCA adapter 1 B Quick start guide Universal Dual Headphone Bluetooth Wireless A...

Page 3: ...icator light B Indicator light A Pairing button A On Off switch 6 7 8 9 Analog audio input 3 5mm Digital audio input TOSLINK optical S PDIF Power charging indicator light Micro USB power charging port...

Page 4: ...er The Connect also supports aptX and aptX Low Latency more efficient Bluetooth audio codecs capable of transmitting CD quality audio that also provide lower and much lower latency smaller delay respe...

Page 5: ...t off after each use When used while plugged in the Connect will use USB power and the internal battery will be charged When unplugged from USB power the Connect will use the internal battery When bat...

Page 6: ...Remove the protective caps from the included fiber optic TOSLINK cable B Plug the cable firmly into the optical audio output on the TV and the optical input of the Connect The volume of optical output...

Page 7: ...se the RCA output attach the included RCA adapter to the 3 5mm stereo audio cable Plug the connectors of the RCA adapter into the matching color RCA jacks on the TVs and plug the attached 3 5mm cable...

Page 8: ...plug the included 3 5mm stereo audio cable into the headphone jack on the TV and the 3 5mm input on the rear of the transmitter A adapter not included may be used with receivers that have a jack TV sp...

Page 9: ...airing mode press pairing button A located on the right side of the Connect A blue light will blink rapidly on the top of the unit to indicate that the Connect is ready to pair It will pair automatica...

Page 10: ...ct A blue light will flash to indicate that the Connect is in pairing mode and the second headphone will be paired Note During the pairing process the sound may have a brief intermittent period Note W...

Page 11: ...ECONNECTING HEADPHONES The Connect will stay connected until either the unit or headphones are turned off or taken out of range It is not necessary to turn off the Connect or headphones after each use...

Page 12: ...e controls on the headphone With some TVs and connection options TV volume may be further raised or lowered to change the volume of all headphones paired with the Connect In this case volume should be...

Page 13: ...indicator light on the rear of the unit and two blue indicator lights on the top They indicate the status of the headphones as follows Indicator Light s Connect Status Green power indicator light on U...

Page 14: ...er such as a phone or tablet Issue Headphones are connected blue light solid but audio is not heard Ensure that either the analog 3 5mm or digital TOSLINK audio cable is plugged in to both the Connect...

Page 15: ...ected to another device If the headphones are still unable to connect power them off and then turn them back on If problems persist create a new pairing between the Connect and your headphones Issue L...

Page 16: ...ised to adjust the volume to a comfortable listening level before putting on your headphones SPECIFICATIONS See the Connect product page at www MEEaudio com for product specifications WARRANTY MEE aud...

Page 17: ...www MEEaudio com support meelec com...

Reviews: