background image

40 of 108

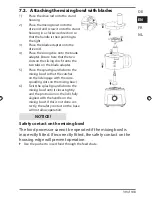
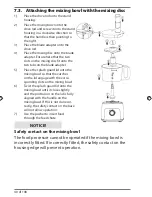
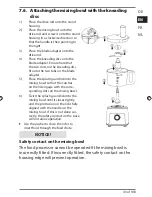
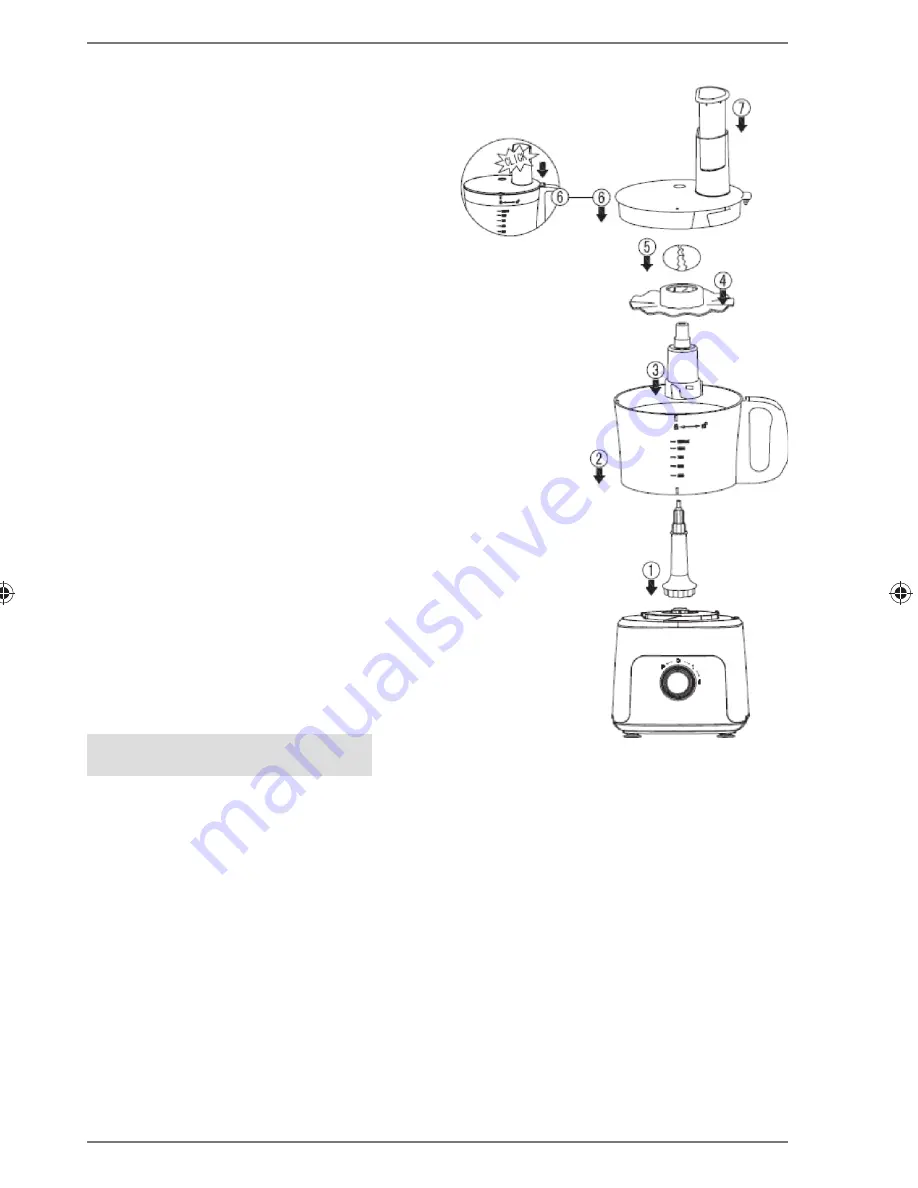
7.3.  Attaching the mixing bowl with the mixing disc

1) 

Place the drive rod onto the stand 
housing. 

2) 

Place the mixing bowl onto the 
drive rod and screw it onto the stand 
housing in a clockwise direction so 
that the handle is then pointing to 
the right.

3) 

Place the blade adapter onto the 
drive rod.

4) 

Place the mixing disc onto the blade 
adapter. Ensure here that the two 
slots on the mixing disc fit onto the 
two tabs on the blade adapter.

5) 

Place the splash guard lid onto the 
mixing bowl so that the catches 
on the lid engage with the corre-
sponding slots on the mixing bowl.

6) 

Twist the splash guard lid onto the 
mixing bowl until it closes tightly 
and the protrusion on the lid is fully 
aligned with the handle on the 
mixing bowl. If this is not done cor-
rectly, the safety contact on the base 
will not allow operation.

7) 

Use the pusher to insert food 
through the feed chute.

NOTICE!

Safety contact on the mixing bowl

The food processor cannot be operated if the mixing bowl is 
incorrectly fitted. If incorrectly fitted, the safety contact on the 
housing edge will prevent operation.

15482 DE EN FR NL ECommerce Content RC1.indb   40

15482 DE EN FR NL ECommerce Content RC1.indb   40

14.09.2015   13:47:51

14.09.2015   13:47:51

Summary of Contents for micromaxx MD 1548

Page 1: ...K chenmaschine micromaxx MD 15482 Bedienungsanleitung Handleiding Mode d emploi Instruction Manual Food Processor Robot m nager Keukenmachine...

Page 2: ...rieb 10 7 2 R hrsch ssel mit Messern montieren 11 7 3 R hrsch ssel mit Verr hrscheibe montieren 12 7 4 R hrsch ssel mit Halter f r Raspeln und Schneiden montieren 13 7 5 R hrsch ssel mit Zitruspresse...

Page 3: ...ort bezeichnet eine Gef hrdung mit einem hohen Risikograd die wenn sie nicht vermieden wird den Tod oder eine schwere Verletzung zur Folge hat WARNUNG Dieses Signalwort bezeichnet eine Gef hrdung mit...

Page 4: ...Gebrauch Die Knetr hreinheit des Ger ts darf nur zum Kneten R hren bzw Raspeln und Schneiden von Lebensmitteln wie Teig Cremes Sahne oder Eischnee verwendet werden Die Mixeinheit ist f r das P rieren...

Page 5: ...Temperaturen Direkte Sonneneinstrahlung Offenes Feuer 4 Sicherheitshinweise WARNUNG Verletzungsgefahr durch unsachgem e Behandlung Ger t und Zubeh r an einem f r Kinder unerreichbaren Platz aufbewahre...

Page 6: ...ng nicht zur Stol perfalle wird Die Anschlussleitung darf nicht geklemmt und gequetscht werden Ger t nicht in Betrieb nehmen wenn die K chenmaschine oder das Netzkabel sichtbare Sch den aufweisen Im I...

Page 7: ...im Betrieb bewegt werden muss das Ger t ausgeschaltet und vom Netz getrennt werden Stellen Sie vor dem Einschalten sicher dass der Zubeh r aufsatz korrekt angebracht ist und festsitzt Sobald Sie das...

Page 8: ...das Ger t nicht im Freien Lassen Sie das Ger t w hrend des Betriebs nicht unbeaufsich tigt Achten Sie darauf dass sich w hrend des Betriebs keine Fremdgegenst nde L ffel Teigschaber o in der R hr sch...

Page 9: ...el 5 Antriebsstab 6 Standgeh use 7 Zitruspresse 8 Schneidmesser 9 Grobe Raspel 10 Feine Raspel 11 Messerhalter 12 Verr hrscheibe 13 Knetscheibe 14 Messerscheibe 15 Messbecher 16 Deckel des Mixerbeh lt...

Page 10: ...9 von 108 DE EN FR NL 1 2 3 4 5 6 7 8 9 10 11 12 13 14 16 15 17 18 19...

Page 11: ...ine Haushalts steckdose mit 220 240 V 50 60 Hz an 7 1 Kurzzeitbetrieb HINWEIS Gefahr der berhitzung durch berm igen Betrieb Benutzen Sie das Ger t ohne Unterbrechung nicht l nger als im Folgenden ange...

Page 12: ...assen 5 Setzen Sie den Spritzschutzdeckel so auf die R hrsch ssel dass die Haken des Deckels in die entsprechenden Vertiefungen an der R hrsch ssel einrasten 6 Drehen Sie den Spritzschutzde ckel auf d...

Page 13: ...en 5 Setzen Sie den Spritzschutzdeckel so auf die R hrsch ssel dass die Haken des Deckels in die entsprechenden Vertiefungen an der R hrsch ssel einrasten 6 Drehen Sie den Spritzschutzde ckel auf die...

Page 14: ...greifen 5 Setzen Sie den Spritzschutzdeckel so auf die R hrsch ssel dass die Haken des Deckels in die entsprechenden Vertiefungen an der R hrsch ssel einrasten 6 Drehen Sie den Spritzschutzde ckel auf...

Page 15: ...Zit ruspresse in die entsprechenden Ver tiefungen an der R hrsch ssel ein rasten Drehen Sie die Zitruspresse auf die R hr sch ssel bis sie dicht abschlie t und die Ausst lpung am Deckel sich mit dem...

Page 16: ...den Spritzschutzdeckel so auf die R hrsch ssel dass die Haken des Deckels in die entsprechenden Vertiefungen an der R hrsch ssel einrasten 6 Drehen Sie den Spritzschutzde ckel auf die R hrsch ssel bi...

Page 17: ...en Mixerbeh lter passen Bef llen Sie den Mixerbeh lter 2 Setzen Sie den Schutzdeckel mit Messbecher auf den Mixerbeh lter Je nach Verwendung w hlen Sie die geeignete Geschwindigkeitsstufe gem folgende...

Page 18: ...lter entgegen dem Uhrzeigersinn um ihn von der Antriebswelle zu entfernen Entfernen Sie den Deckel mit Messbecher und entleeren Sie den Mixerbeh lter 8 1 Messer des Mixerbeh lters demontieren Schalte...

Page 19: ...om Haupt ger t abnehmen HINWEIS Gefahr von Ger teschaden durch unsachgem e Behandlung Benutzen Sie keine Drahtb rste oder andere scheuernde Gegenst nde und auch keine scharfen oder scheuernden Reinigu...

Page 20: ...e Diese Zubeh rteile k nnen mit warmem Wasser und Sp l mittel oder in der Sp lmaschine gereinigt werden Ver wenden Sie kein Scheuermittel 10 Au erbetriebnahme Wenn Sie das Ger t ber l ngere Zeit nicht...

Page 21: ...funktio niert nicht Der Netzstecker ist nicht mit einer Steckdose verbunden Schlie en Sie das Ger t an eine ordnungsgem installierte Schutzkon taktsteckdose mit AC 220 240 V 50 60 Hz Wech selspannung...

Page 22: ...lauf zur ckgef hrt werden Ger t Werfen Sie Ihr Ger t am Ende seiner Lebenszeit keinesfalls in den nor malen Hausm ll Erkundigen Sie sich bei Ihrer Stadt oder Gemeindever waltung nach einer umwelt und...

Page 23: ...Firma Medion AG Am Zehnthof 77 45307 Essen Deutschland Technische und optische nderungen sowie Druckfehler vorbehalten Die Bedienungsanleitung kann ber die Service Hotline nachbestellt werden und steh...

Page 24: ...unden erfolgte Umfang Im Falle eines durch diese Garantie abgedeckten Defekts an ihrem Produkt gew hr leistet der Garantiegeber mit dieser Garantie die Reparatur oder den Ersatz des Pro duktes Die Ent...

Page 25: ...rtal an uns wenden Sie erhalten insoweit weiterge hende Informationen wie Sie Ihren Garantieanspruch geltend machen k nnen Die Inanspruchnahme der Hotline ist ggf kostenpflichtig Die Service Hotline e...

Page 26: ...w den Vorort Austausch Soweit sich ein Anspruch auf Vorort Reparatur bzw Vorort Austausch ergibt gelten die besonderen Garantiebedingungen f r die Vorort Reparatur bzw Vorort Aus tausch f r Ihr Produk...

Page 27: ...Multimedia 01805 633 466 01805 654 654 CE Produkte 01805 633 633 01805 665 566 0 14 Min aus dem dt Festnetz Mobilfunk max 0 42 Min Mo Fr 07 00 23 00 Sa So 10 00 18 00 www medion de Bitte benutzen Sie...

Page 28: ...r 08 00 21 00 Sa So 10 00 18 00 www medion at Bitte benutzen Sie das Kontaktformular unter www medion com contact 16 3 Belgien 022006198 022006199 Lokaltarif Premium Hotline 0900 51111 0 45 min Mo Fr...

Page 29: ...28 von 108...

Page 30: ...term operation 38 7 2 Attaching the mixing bowl with blades 39 7 3 Attaching the mixing bowl with the mixing disc 40 7 4 Attaching the mixing bowl with the holder for graters and blades 41 7 5 Attach...

Page 31: ...se instructions on the appli ance or on the packaging DANGER This signal word indicates a hazard with a high degree of risk that if not avoided will result in death or serious injury WARNING This sign...

Page 32: ...per use The appliance s kneading attachment should only be used to knead mix shred and cut foods such as dough mousse cream or egg whites The blender unit is intended for pur eing beating and mixing f...

Page 33: ...injury due to improper handling Store the appliance and its accessories out of the reach of children This appliance may be used by children over the age of 8 and by persons with reduced physical sens...

Page 34: ...ecome trapped or squashed Do not operate the appliance if there is any visible damage to the food processor or the mains cable There are dangerous voltages inside the appliance Never open the housing...

Page 35: ...Before switching on make sure that the accessory attach ment is correctly fitted and firmly seated As soon as you turn on the appliance its drive shaft will rotate During operation do not reach into t...

Page 36: ...on dough scraper or similar items are in the mixing bowl during operation There is a risk of scalding if the appliance is used with foodstuffs that are hotter than 60 C Do not fill the mixing bowl wit...

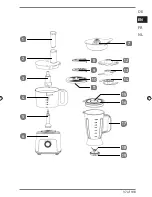
Page 37: ...ng bowl 5 Drive rod 6 Stand housing 7 Citrus press 8 Cutting blade 9 Coarse grater 10 Fine grater 11 Blade holder 12 Mixing disc 13 Kneading disc 14 Slicing disc 15 Measuring cup 16 Lid of the blender...

Page 38: ...DE EN FR 37 of 108 NL 1 2 3 4 5 6 7 8 9 10 11 12 13 14 16 15 17 18 19...

Page 39: ...nnect the food processor to a 220 240 V 50 60 Hz safety socket 7 1 Short term operation NOTICE Risk of overheating due to excessive operation Do not operate the appliance continuously for longer than...

Page 40: ...apter 5 Place the splash guard lid onto the mixing bowl so that the catches on the lid engage with the corre sponding slots on the mixing bowl 6 Twist the splash guard lid onto the mixing bowl until i...

Page 41: ...er 5 Place the splash guard lid onto the mixing bowl so that the catches on the lid engage with the corre sponding slots on the mixing bowl 6 Twist the splash guard lid onto the mixing bowl until it c...

Page 42: ...her 5 Place the splash guard lid onto the mixing bowl so that the catches on the lid engage with the corre sponding slots on the mixing bowl 6 Twist the splash guard lid onto the mixing bowl until it...

Page 43: ...hes on the citrus press engage with the corresponding slots on the mixing bowl Screw the citrus press onto the mixing bowl until it closes tightly and the pro trusion on the lid is in alignment with t...

Page 44: ...er 5 Place the splash guard lid onto the mixing bowl so that the catches on the lid engage with the corre sponding slots on the mixing bowl 6 Twist the splash guard lid onto the mixing bowl until it c...

Page 45: ...hat they are small enough to fit into the blender jug without squashing Fill the blender jug 2 Place the protective lid and measuring cup on the blender jug Select the appropriate speed based on the r...

Page 46: ...ug anticlockwise to remove it from the drive shaft Remove the lid and measuring cup and empty the blender jug 8 1 Dismantling the blade for the blender jug Switch the appliance off by moving the speed...

Page 47: ...tachments from the main appliance before cleaning NOTICE Risk of damage to the device due to improper handling Do not use a wire brush or other abrasive objects or any sharp or scouring cleaning agent...

Page 48: ...isc These accessory parts can be cleaned with hot water and washing up liquid or in the dishwasher Do not use any scouring agents 10 End of operation If you do not plan to use the appliance for a long...

Page 49: ...The appliance is not working The plug is not connected to the mains Connect the appliance to a properly installed AC 220 240 V 50 60 Hz safety socket The appliance has overheat ed Switch off the appl...

Page 50: ...er any circumstances dispose of the appliance with the household rubbish at the end of its service life Please consult your local authority for advice on correct and eco friendly methods of disposal 1...

Page 51: ...out a re pair under warranty if a valid proof of purchase cannot be produced If it is necessary to return your device for repair please ensure that it is suitably pa ckaged for transportation Unless o...

Page 52: ...already incurred in the form of a flat rate handling charge as well as to char ge the customer for the materials and labour required for the repair after submitting a cost estimate You will be informe...

Page 53: ...at this software shall function without interruption or errors or that it will meet your requirements In the case of map material supplied for a device with navigation functions no warranty is provide...

Page 54: ...arranty provider The free cancellation period for repairs or replacements on site is at least 48 hours thereafter we shall invoice you for any costs resulting from a late or mis sing cancellation 16 S...

Page 55: ...54 of 108...

Page 56: ...u bol m langeur avec disque minceur 65 7 3 Montage du bol m langeur avec disque m langeur 66 7 4 Montage du bol m langeur avec porte couteau pour r per et hacher 67 7 5 Montage du bol m langeur avec p...

Page 57: ...NGER Ce terme signal tique d signe un risque un degr lev qui si on ne l vite pas a comme cons quence la mort ou une grave blessure AVERTISSEMENT Ce terme signal tique d signe un risque un degr moyen q...

Page 58: ...tion conforme Le bol m langeur doit tre utilis uniquement pour p trir battre et m langer p ex p te cr me chantilly ou blancs en neige et pour r per hacher ou mincer des aliments Le bol mixeur sert r d...

Page 59: ...ect du soleil Feu nu 4 Consignes de s curit AVERTISSEMENT Risque de blessure en cas de manipulation incorrecte Conserver l appareil et les accessoires dans un endroit hors de la port e des enfants Le...

Page 60: ...par lectrocution Disposez le cordon d alimentation de mani re viter tout risque de tr buchement Le cordon d alimentation ne doit tre ni coinc ni cras Si l appareil ou le cordon d alimentation pr sente...

Page 61: ...nsi que couverts cuill res en bois etc distance afin d viter toute blessure ou tout dommage mat riel Avant de remplacer des accessoires ou pi ces rapport es qui sont mobiles lorsque le robot fonctionn...

Page 62: ...rit Ne plongez jamais l appareil dans des liquides N utilisez pas l appareil en plein air Ne laissez pas l appareil fonctionner sans surveillance Avant d utiliser l appareil v rifiez qu aucun objet tr...

Page 63: ...l m langeur 5 Tige d entra nement 6 Bo tier 7 Presse agrumes 8 Hachoir 9 R pe grossi re 10 R pe fine 11 Porte couteau 12 Disque m langeur 13 Disque p trisseur 14 Disque minceur 15 Gobelet mesureur 16...

Page 64: ...63 108 DE EN FR NL 1 2 3 4 5 6 7 8 9 10 11 12 13 14 16 15 17 18 19...

Page 65: ...qu apr s l avoir assembl 7 1 Fonctionnement de courte dur e REMARQUE Risque de surchauffe en cas de fonctionnement irr gulier N utilisez pas l appareil sans interruption plus longtemps qu indiqu ci a...

Page 66: ...eur de couteau 5 Mettez le couvercle anti clabous sures en place sur le bol m langeur de telle mani re que les crochets du couvercle se verrouillent dans les creux correspondants pr vus sur le bol 6 T...

Page 67: ...e couteau 5 Mettez le couvercle anti clabous sures en place sur le bol m langeur de telle mani re que les crochets du couvercle se verrouillent dans les creux correspondants pr vus sur le bol 6 Tourne...

Page 68: ...t 5 Mettez le couvercle anti clabous sures en place sur le bol m langeur de telle mani re que les crochets du couvercle se verrouillent dans les creux correspondants pr vus sur le bol 6 Tournez le cou...

Page 69: ...le mani re que les crochets du presse agrumes se verrouillent dans les creux correspondants pr vus sur le bol Tournez le presse agrumes sur le bol m langeur jusqu ce que ce dernier soit herm tiquement...

Page 70: ...outeau 5 Mettez le couvercle anti clabous sures en place sur le bol m langeur de telle mani re que les crochets du couvercle se verrouillent dans les creux correspondants pr vus sur le bol 6 Tournez l...

Page 71: ...ce qu ils rentrent dans le bol mixeur sans devoir forcer Remplissez le bol mixeur 2 Placez le couvercle de protection avec gobelet mesureur sur le bol mixeur S lectionnez un niveau de vitesse appropri...

Page 72: ...ire des aiguilles d une montre pour le retirer de l arbre d entra nement Enlevez le couvercle avec gobelet mesureur et videz le bol mixeur 8 1 D montage du couteau du bol mixeur teignez l appareil en...

Page 73: ...nt les accessoires de l appareil avant de le nettoyer REMARQUE Risque de dommages de l appareil en cas de manipulation incorrecte N utilisez pas de brosses m talliques et autres objets r cu rants ni d...

Page 74: ...uvent tre nettoy s dans de l eau chaude additionn e de produit vaisselle ou au lave vais selle N utilisez pas de d tergents r curants 10 Mise hors tension Si vous n utilisez pas l appareil pendant une...

Page 75: ...ne fonc tionne pas La fiche d alimentation n est pas branch e sur une prise de courant Branchez l appareil sur une prise de terre r gle mentaire courant alter natif de 220 240 V 50 60 Hz Surchauffe d...

Page 76: ...circuit des mati res premi res Appareil Une fois l appareil arriv en fin de vie ne le jetez en aucun cas avec les d chets domestiques Informez vous aupr s de votre municipalit des possibilit s de rec...

Page 77: ...e du fabricant Le copyright est la propri t de la soci t Medion AG Am Zehnthof 77 45307 Essen Allemagne Le mode d emploi peut tre nouveau command via la hotline SAV et t l charg sur le portail SAV Vou...

Page 78: ...istance SAV ou le por tail SAV Vous recevrez alors des informations sur la suite de la proc dure La pr sente garantie n a aucune incidence sur vos recours en garantie l gaux et elle est r gie par le d...

Page 79: ...tie s teint si le d faut du produit est survenu suite une tentative de r pa ration ou d entretien par une personne n appartenant pas l un des partenaires commerciaux agr s par le garant De m me la gar...

Page 80: ...nt stock es Par cons quent avant de renvoyer le produit au ga rant assurez vous que vous tes en possession d une sauvegarde de vos donn es Il est express ment pr cis que lors de la r paration le produ...

Page 81: ...nce 02 43 16 60 30 appel non surtax Service PREMIUM hors garantie 08 92 35 05 40 0 34 min co t d un appel depuis un t l phone mobile variable selon votre op rateur Lun Ven 09 00 19 00 www medion fr Ve...

Page 82: ...51111 0 45 min Lu Ve 09 00 19 00 www medion com be Veuillez utiliser le formulaire de contact sous www medion com contact 16 4 Luxembourg 34 20 808 664 34 20 808 665 Appel non surtax Lu Ve 09 00 19 0...

Page 83: ...82 108...

Page 84: ...bruik voor korte tijd 92 7 2 Mengkom met messen monteren 93 7 3 Mengkom met roerschijf monteren 94 7 4 Mengkom met houder voor raspen en snijden monteren 95 7 5 Mengkom met citruspers monteren 96 7 6...

Page 85: ...t signaalwoord geeft een gevaar aan met een hoog risico dat wanneer het niet wordt vermeden ernstig of dodelijk letsel tot gevolg heeft WAARSCHUWING Dit signaalwoord geeft een gevaar aan met een gemid...

Page 86: ...uik voor het beoogde doel De roer kneedunit van dit apparaat mag uitsluitend worden gebruikt voor het kneden roeren of raspen en snijden van levensmiddelen zoals deeg cr mes en room of het kloppen van...

Page 87: ...open vuur 4 Veiligheidsinstructies WAARSCHUWING Gevaar voor letsel door onjuiste bediening Apparaat en accessoires opbergen op een voor kinderen onbereikbare plaats Dit apparaat kan gebruikt worden do...

Page 88: ...ansluitsnoer mag niet worden ingeklemd of platgedrukt Neem het apparaat niet in gebruik wanneer het apparaat zelf of het netsnoer zichtbaar zijn beschadigd In het binnenste van het apparaat zijn gevaa...

Page 89: ...pparaat worden uitgeschakeld en moet de stekker uit het stopcon tact worden getrokken Controleer of de toebehoren en opzetstukken correct zijn aangebracht en goed vast zitten voordat u het apparaat in...

Page 90: ...open lucht Laat het apparaat tijdens gebruik niet zonder toezicht werken Let er op dat er tijdens gebruik geen vreemde voorwerpen lepels spatels etc in de mengkom aanwezig zijn Bij gebruik van levens...

Page 91: ...Mesadapter 4 Mengkom 5 Aandrijfas 6 Voet 7 Citruspers 8 Snijmes 9 Grove rasp 10 Fijne rasp 11 Messenhouder 12 Roerschijf 13 Kneedschijf 14 Messenschijf 15 Maatbeker 16 Deksel van de blenderkan 17 Blen...

Page 92: ...91 van 108 DE EN FR NL 1 2 3 4 5 6 7 8 9 10 11 12 13 14 16 15 17 18 19...

Page 93: ...gheidsstopcontact met 220 240 V 50 60 Hz 7 1 Gebruik voor korte tijd OPMERKING Gevaar door oververhitting door overmatig gebruik Gebruik de mixer niet ononderbroken gedurende een lan gere tijd dan hie...

Page 94: ...aats de spatbescherming zo op de mengkom dat de haken van de deksel in de uitsparingen op de mengkom vallen 6 Draai de deksel op de mengkom totdat deze dicht afsluit en de uitstul ping op de deksel is...

Page 95: ...spatbescherming zo op de mengkom dat de haken van de deksel in de uitsparingen op de mengkom vallen 6 Draai de deksel op de mengkom totdat deze dicht afsluit en de uitstul ping op de deksel is uitgeli...

Page 96: ...e spatbescherming zo op de mengkom dat de haken van de deksel in de uitsparingen op de mengkom vallen 6 Draai de deksel op de mengkom totdat deze dicht afsluit en de uitstul ping op de deksel is uitge...

Page 97: ...bijbehorende uitsparingen op de mengkom vallen Draai de citruspers op de mengkom totdat deze dicht afsluit en de uitstul ping op de deksel is uitgelijnd met de handgreep van de kom Alleen dan wordt he...

Page 98: ...herming zodanig op de mengkom dat de haken van de deksel in de uitsparingen op de mengkom vallen 6 Draai de deksel op de mengkom totdat deze dicht afsluit en de uitstul ping op de deksel is uitgelijnd...

Page 99: ...passen Vul de blenderkan 2 Plaats de veiligheidsdeksel met de maatbeker op de blenderkan Afhankelijk van het gebruik kiest u het toerental vol gens onderstaande tabel Toerental Levensmiddelen 1 Menge...

Page 100: ...op stand 0 en trek de stekker uit het stopcontact Draai de blenderkan linksom om de kan van de aandrijfas te verwijderen Verwijder de deksel met de maatbeker en leeg de blenderkan 8 1 Messen van de b...

Page 101: ...oires altijd uit het hoofdapparaat worden verwijderd OPMERKING Gevaar voor schade aan het apparaat door onjuiste behan deling Gebruik geen staalborstel of andere schurende voor werpen en ook geen sche...

Page 102: ...accessoires kunnen met warm water en afwasmiddel of in de vaatwasser worden gereinigd Gebruik geen schuurmiddelen 10 Buiten gebruik stellen Wanneer u het apparaat gedurende langere tijd niet wilt gebr...

Page 103: ...oorzaak Storingen verhelpen Het apparaat werkt niet De stekker zit niet in het stopcontact Sluit het apparaat aan op een correct ge nstal leerd stopcontat met ran daarde en met een wissel spanning va...

Page 104: ...p worden gebracht Apparaat Gooi het apparaat aan het einde van de levensduur in geen geval weg met het gewone huisvuil Informeer bij uw gemeente hoe u het appa raat op een milieubewuste en correcte wi...

Page 105: ...rboden Het copyright berust bij de firma Medion AG Am Zehnthof 77 45307 Essen Duitsland Technische wijzigingen voorbehouden De handleiding is via de Service Hotline te bestellen en is via het servicep...

Page 106: ...er worpen aan het geldend recht in het land waarin het apparaat in eerste instantie door een eindgebruiker is aangeschaft 15 1 1 Omvang In geval van een door deze garantie gedekt defect aan uw product...

Page 107: ...moet u via de Service Hotline of de Service Portal contact met ons opnemen U ontvangt dan verdere in formatie over de juiste manier om aanspraak te maken op uw garantie Voor het gebruik van de Hotlin...

Page 108: ...ns of software of overige gevolgschade 15 3 Bijzondere garantievoorwaarden voor reparatie of vervanging op locatie Indien er een recht op reparatie of vervanging op locatie bestaat gelden voor uw prod...

Page 109: ...18 00 Feestdagen 10 00 17 00 Premium Hotline 0900 543 3833 0 70 minuut Ma Vr 08 30 17 00 www medion nl Maak gebruik van het contactformulier onder www medion com contact 16 2 Belgi 022006198 02200619...

Page 110: ...11 2015...

Reviews: