background image

1.  Information about this user manual

Thank you for choosing our product. We hope you enjoy using this device.

Read the safety instructions carefully before using the device for the first time. Note the 
warnings on the device and in the user manual.
Always keep the user manual close to hand. If you sell the device or give it away, please 

ensure that you also pass on this user manual. It is an essential component of the product.

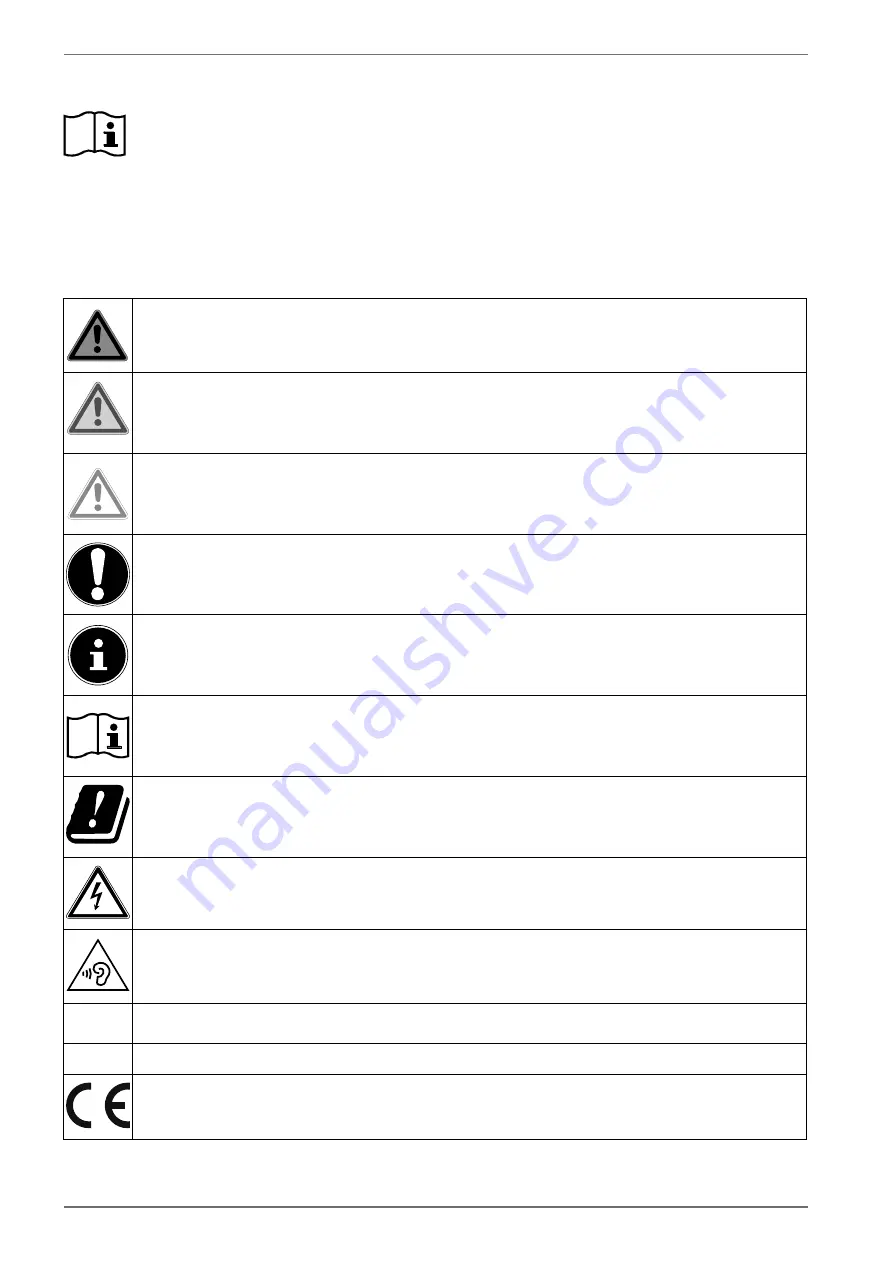
1.1.  Explanation of symbols

If a block of text is marked with one of the warning symbols listed below, the hazard described in 
that text must be avoided to prevent the potential consequences described there from occurring.

DANGER!

Warning: risk of fatal injury!

WARNING!

Warning: risk of possible fatal injury and/or serious irreversible injuries!

CAUTION!

Warning: risk of minor and/or moderate injuries!

NOTICE!

Follow these instructions to prevent damage to the device!

More detailed information on using the device!

Follow the instructions in the user manual!

Due to the 5 GHz frequency range of the wireless LAN solution used, the device may 
only be used inside buildings in the EU.

WARNING!

Warning: risk of electric shock!

WARNING!

Warning: danger due to loud volume!

•   

Bullet point/information on steps during operation


Instruction to be carried out

Declaration of Conformity (see “EU declaration of conformity” section): Products that feature 
this symbol meet the requirements of the EU directives.

Summary of Contents for MEDION LIFE MD 33980

Page 1: ...User manual X14320 MD 33980 X15011 MD 33981 X15520 MD 33982 X16505 MD 33990 MEDION LIFE Ultra HD AndroidTM LCD Smart TV ...

Page 2: ...cting the antenna 18 6 5 Connecting the power supply 18 6 6 Switching the Smart TV on and off 18 6 7 Initial installation after switching on for the first time 19 6 8 Using the multimedia connections 24 7 Operation 26 7 1 Channel selection 26 7 2 Sound settings 26 7 3 Screen settings 26 7 4 Displaying information 27 7 5 Selecting the source 27 8 Teletext 28 8 1 Using the teletext 28 9 Using the On ...

Page 3: ...ixel faults 70 18 Cleaning 71 19 Storing the device when not in use 71 20 Disposal 72 21 Technical specifications 73 22 Product data sheet 76 22 1 Trademark information 76 23 Privacy statement 77 24 Service information 78 25 Legal Notice 78 26 Index 79 ...

Page 4: ...l consequences described there from occurring DANGER Warning risk of fatal injury WARNING Warning risk of possible fatal injury and or serious irreversible injuries CAUTION Warning risk of minor and or moderate injuries NOTICE Follow these instructions to prevent damage to the device More detailed information on using the device Follow the instructions in the user manual Due to the 5 GHz frequency...

Page 5: ...r PC etc Your device can be used in a variety of ways The device is only intended for private use and not for industrial commercial use Please note that we shall not be liable in cases of improper use Do not modify the device without our express agreement and do not use any accessories that have not been supplied or approved by us Only use replacement parts or accessories that we have supplied or ...

Page 6: ...wing items are supplied with your product Smart TV Remote control RC1827 incl 2 x LR03 AAA 1 5 V batteries Feet incl fixing screws Documentation DANGER Risk of choking and suffocation Packaging film can be swallowed or used improperly creating a risk of choking and suffocation Keep packaging material such as plastic film or plastic bags away from children ...

Page 7: ... slots and openings WARNING Overheating Risk of fire Overheating may result in damage to the Smart TV and the risk of fire The slots and openings on the TV set are for ventilation purposes Do not cover these openings for example with newspapers table cloths curtains etc Do not subject the display to pressure There is a risk of the screen glass breaking The remote control has a Class 1 infrared dio...

Page 8: ... any liquid filled containers vases or similar on or next to the device Such containers may tip over and the liquid may impair the electrical safety of the device NOTICE Risk of damage Risk of injury due to candles and other open flames Keep candles and other open flames away from this product at all times to pre vent fire from spreading Make sure that there is enough clearance between the device ...

Page 9: ...eep the device at least one metre away from sources of high frequency or magnetic interference televisions loudspeakers mobile telephones etc to avoid malfunctions Remove the plug from the power socket and the antenna cable from the antenna socket during a thunderstorm or if the device is not going to be used for a long period NOTICE Risk of damage Major changes in temperature or fluctuations in h...

Page 10: ...nd using a surge protection device to protect your Smart TV against damage due to voltage spikes or lightening strike from the power supply Position the cables so that no one can tread on them or trip over them Do not place any objects on the cables as they may be damaged Never touch the plug with wet hands Always hold the housing and never pull on the cable when removing the plug from the socket ...

Page 11: ...tery fluid rinse the affected area with plenty of water and consult a doctor immediately Avoid heavy impacts and vibrations Always observe the correct polarity Take care to ensure that the plus and minus poles are correctly inserted to avoid short circuits Do not mix up new and old batteries or different types of batteries This could cause your remote control to malfunction In addition the weaker ...

Page 12: ...requency range of the integrated wireless LAN solution the device may only be used inside buildings in the EU see table AT BE BG CZ DK EE FR DE IS IE IT EL ES CY LV LI LT LU HU MT NL NO PL PT RO SI SK TR FI SE CH UK NI HR AT Austria BE Belgium BG Bulgaria CZ Czech Republic DK Denmark EE Estonia FR France DE Germany IS Iceland IE Ireland IT Italy EL Greece ES Spain CY Cyprus LI Liechtenstein LV Lat...

Page 13: ...EN 13 5 Device overview 5 1 Front 1 2 1 Screen 2 Infrared sensor Reception field for the infrared remote control signals Operating light lights up when the device is in standby mode ...

Page 14: ...open the function menu Then briefly press the button again to select the desired function Press and hold the button to open the menu for the selected function In the case of the standby func tion the device then switches to standby mode You can change the setting in the menu by briefly pressing the button Then press and hold the button to apply the settings made The function menu closes automatica...

Page 15: ...e TV must not be mounted at heights exceeding 2 m The device must be mounted on a solid surface such as cement or concrete 5 3 Remote control 1 2 3 4 6 8 9 11 12 16 17 18 21 22 7 20 5 10 13 14 15 19 1 Wall mount not supplied When mounting the device make sure that you use M6 MD 33980 M4 screws The maximum length of the screws corresponds to the thickness of the wall mount plus 10 mm MD 33980 7 mm ...

Page 16: ... Direction button move left in menu Teletext call up subpages Direction button move right in menu Teletext call up subpage 10 EXIT Exit the menu 11 YOUTUBE Open the YouTube app 12 SOURCE Select input signal of connected devices 13 Red button For teletext or menus HbbTV Green button For teletext or menus Yellow button For teletext or menus Blue button For teletext or menus 14 TEXT Switch teletext o...

Page 17: ...f small items including batteries Keep these out of the reach of children as they represent a choking hazard Store the packaging material in a safe place Only use this box to transport the TV DANGER Risk of choking and suffocation Packaging film can be swallowed or used improperly creating a risk of choking and suffocation Keep packaging material such as plastic film or plastic bags away from chil...

Page 18: ...tenna socket on the Smart TV You also have the option of connecting a digital satellite system to the socket labelled LNB Screw a coaxial antenna cable s F connector onto the connector on the Smart TV To receive encrypted subscription channels you will need to use a CI module Con ditional Access Module and an appropriate card Insert a CI module available in specialist shops in the slot provided fo...

Page 19: ... appears when the device is used for the first time Use the buttons to select CONTINUE and press OK or 6 7 1 Connecting accessories Next the device searches for Bluetooth accessories within range Devices that are ready to connect are then displayed Use the buttons to select the required device and press OK to establish the connection Make sure that the device in question is in pairing mode Otherwi...

Page 20: ... it may now be necessary to specify a password and parental control settings 6 7 3 Google sign in You can now sign in using your Google account to optimise your device with your apps films and recommendations etc You can do this using your smartphone computer by going to androidtv com setup and entering the six digit numerical code for your device This will be displayed as soon as you select USE Y...

Page 21: ... 6 Aerial Make sure that you have connected a DVB T2 antenna to the ANT connection If you do not want to set up any TV channels select SKIP SCAN and press the OK or button Select SCAN and press OK to start the channel search 6 7 7 Cable Make sure that your cable connection is connected to the ANT connection Select the desired provider If you do not want to set up any TV channels select SKIP SCAN a...

Page 22: ... satellite settings Otherwise skip DVBS configuration set ting by pressing the button Under SELECT SATELLITE you can if necessary configure settings for the following options Satellite Setup UNIVERSAL SATELLITE STATUS Activate deactivate the satellite status When deactivated LNB set tings can be changed or a search started LNB POWER Set the LNB power here LNB FREQUENCY You can set the centre frequ...

Page 23: ...he channels The complete search takes the longest NETWORK Activate deactivate the network scan CHANNELS Decide which channels you want to search for FREE free channels ONLY ENCRYPTED CHANNELS encrypted channels or ALL free and en crypted channels Press OK or to start the search If you do not want to set up any TV channels select SCIP SCAN and press the OK or button Once the search is complete conf...

Page 24: ...ion 2 0 Use a standard HDMI cable Connect the corresponding HDMI ports of the devices used with an HDMI cable 6 8 3 HDMI ARC Audio Return Channel If you want to use a TV set as a signal receiver AND signal source to transmit an audio signal to an audio receiver you must use the HDMI2 port with audio return channel ARC The HDMI connec tion to the TV then works in both directions It can receive imag...

Page 25: ... 8 VGA YPbPr The VGA connection of your TV can be used for the video transmission of the YPbPr signal Use a suitable YPbPr adapter Connect the VGA port of your TV to the YPbPr cinch connections red blue green of the video device Use the supplied YPbPr adapter optional Use the AV audio connections of your TV set red white for audio transmission and connect them with the YPbPr audio connections of t...

Page 26: ...7 3 Screen settings Depending on the programme the pictures are transmitted in the formats 4 3 or 16 9 As soon as the DISPLAY MODE menu is selected using the buttons the aspect ratio settings are dis played and you can adjust the picture format Automatic Full Super zoom Unscaled 4 3 Movie expand 14 9 Movie expand 14 9 Wide screen Display mode AUTOMATIC The format displayed is automatically adjuste...

Page 27: ...of the current TV channel is displayed if available This automatically scrolls through the text If the information changes too quickly you can use the and arrow buttons to scroll up and down through the text yourself 7 5 Selecting the source TV AV YPbPr VGA HDMI 1 HDMI 2 HDMI 3 HDMI 4 Inputs Use the SOURCE button to select the inputs for the connected devices If you call up the menu with the MENU ...

Page 28: ... that broadcasts teletext Press the TEXT button once to display the start index page for the teletext Pressing TEXT again makes the text transparent in front of the TV image Pressing the TEXT button a third time switches the device back into TV mode 8 1 1 Selecting a teletext page 8 1 2 Number buttons Enter the number of the desired teletext page as a three digit number using the number but tons T...

Page 29: ...page Home menu is the centre of your TV and is displayed as you switch on the device To access the home page during operation press the button Home button on the remote control From the Home menu you can start an application switch to a TV channel watch a film or switch to connected devices Depending on your TV setup and your country selection in the initial setup the Home menu may contain differe...

Page 30: ...nels SELECT MORE and select the FAVOUR ITES LIST entry 1 Das Erste HD 2 ZDF HD 3 RTL 4 SAT 1 5 kabel eins 6 ProSieben 7 RTL2 8 VOX 9 SUPER RTL 10 SPORT1 11 arte HD Favourites List Favourites1 Select list Delete Then use the buttons above the list to select one of the favourites lists FAVOURITES 1 4 Here you can use the yellow button SELECT LIST to mark channels and move them to another position or...

Page 31: ...ogramme guide for the next day is displayed VIEW DETAILS Displays a detailed description of the selected programme if available Press the yellow button again to hide the description If the description is longer use the P buttons to scroll within the text FILTERTYP If you are looking for a specific programme you can use a filter to restrict the selection This function allows you to schedule recordi...

Page 32: ... HDMI3 HDMI input 3 HDMI4 HDMI input 4 An input source that you want to select must be marked as visible in the SETTINGS DEVICE PREFERENCES INPUTS menu If the CEC function is enabled the HDMI source could be renamed from the external player if necessary The remote control of the TV set controls the connected devices If the 0 button on the remote control is pressed for several seconds this controls...

Page 33: ...d 14 9 Wide screen Display mode Depending on the programme the pictures are transmitted in the formats 4 3 or 16 9 As soon as the DISPLAY MODE menu is selected using the buttons the aspect ratio settings are displayed and you can adjust the picture format Menu option Setting AUTOMATIC The format displayed is automatically adjusted to match the input sig nal FULL Only in HDMI mode and with HD TV ch...

Page 34: ...ion is used to zoom a widescreen image picture format 16 9 to the upper and lower edges of the screen WIDE SCREEN This function is used to zoom a widescreen image picture format 16 9 to full screen size 11 2 4 Speaker menu TV speakers External audio system Speakers Here you can specify whether the internal speakers of your TV set or an external audio system should be used for audio playback Select...

Page 35: ...t your TV to enter sleep mode automatically PICTURE OFF Here you can switch off the screen Select this option and press OK If you now press OK again when the screen is black the picture display is activated again NO SIGNAL POWER OFF Define a time after which you want your TV to turn itself off if it does not receive an input signal These settings can also be made under the menu SETTINGS DEVICE PRE...

Page 36: ...te only insert or remove the CI module after you have disconnected the device from the power supply NOTICE Risk of damage The CI module or the television could be damaged if you attempt to insert the CI module by force The CI module must be inserted correctly it cannot be inserted if it is the wrong way round Connect the television to the power supply switch it on and wait for a moment until the c...

Page 37: ...NNELS that will be called up by default when the de vice is switched on INTERACTION CHANNEL optional Activate deactivate the interaction channel MHEG PIN PROTECTION optional Activate deactivate the MHEG PIN protection function This setting al lows access to some MHEG application menus The deactivated applica tions can be enabled by entering the correct PIN HBBTV SETTINGS optional HBBTV SUPPORT Act...

Page 38: ...r the digital TV subti tles SECOND DIGITAL SUBTITLE LAN GUAGE Select a second language for the digital TV subtitles This language is then used if the first language is not available SUBTITLE TYPE Select NORMAL or HEARING IMPARED If the HEARING IMPARED option is selected it provides subtitle servic es to deaf and hard of hearing viewers with addition al descriptions TELETEXT optional DIGITAL TELE T...

Page 39: ...ONS ADD NEW NET WORK You can use this option to add new networks SCANNING AL WAYS AVAILA BLE Activate this function if you want Google s location services and other apps to search for networks even when WLAN is deactivat ed WOW Activate deactivate the Wake On Wireless LAN function WoW LAN This enables you to switch on the Smart TV via a differ ent device Both devices must be connected to the same ...

Page 40: ...ist UPDATE SCAN only antenna reception type Use this option to search for updates This does not delete any stations Only newly found stations are added to the existing sta tion list ANALOGUE MANUAL SCAN only antenna reception type Use this to start a manual search for analogue channels Enter the START FREQUENCY and then select SCAN UP or SCAN DOWN When a station is found the search is completed an...

Page 41: ...ppropriate channels and press OK to high light them CHANNEL SWAP Replace the positions of the two selected channels in the channel list Select the de sired channels and press OK to select When the second channel is selected the position of this channel will be replaced with the position of the first selected channel The blue but ton GO TO CHANNEL calls up an input screen where you can enter a chan...

Page 42: ...LITE SATELLITE RE SCAN Select this option to start a satellite search If the Preferred Satellite option is selected some search configurations are not available There fore the settings you made during the ini tial installation may not be changed After se lecting this option select the satellite to be searched and press OK SATELLITE STATUS Activate deactivate the satellite status SATELLITE NAME Dis...

Page 43: ...is option to start a manual satellite search CHANNEL SKIP Set channels to be skipped when switching the channels on the remove control Highlight the desired channels in the list and press OK to select or deselect them CHANNEL SWAP Swap the positions of the two selected chan nels in the channel list Highlight the desired channels in the list and press OK to select When the second channel is selecte...

Page 44: ... messages PARENTAL CONTROLS If you confirm this by pressing OK a dialogue box opens The password or lock key is requested Enter the password that was assigned during the initial installation or the master password 1234 If the password is entered correctly the dialogue box for security settings opens CHANNELS BLOCKED Select the channels that you want to block from the channel list Highlight a chann...

Page 45: ...our regis tered account from the TV APPS This option is used to manage your apps DEVICE PREF ERENCES ABOUT Here you will find a range of information about your system in cluding your Netflix ESN number The ESN number is a unique ID number created to identify your TV set You can also check for system updates under SYSTEM UPDATE change the name of your TV set under DEVICE NAME and restart the TV by ...

Page 46: ... or by assigning a name HDMI CONTROL Enable this function to allow all devices that are connected via HDMI to communicate with each other In this way you can for example control the basic functions of all devices in an HDMI network using only one remote control Activate this function if you want to configure additional settings under SETTINGS DE VICE PREFERENCES SOUND SPEAKERS First select the HDM...

Page 47: ...tch off the screen Select this option and press OK If you now press OK again when the screen is black the pic ture display is activated again NO SIGNAL AUTO POWER OFF Define a time after which you want your TV to turn itself off if it does not receive an input signal PICTURE Depending on the input source selected some menu options may not be available PICTURE MODE Select picture mode USER STANDARD...

Page 48: ...following options are available here DNR The dynamic noise reduction function reduc es picture noise and improves picture quality when the analogue signal is weak Select be tween OFF LOW MEDIUM STRONG and AUTO MPEG NR MPEG noise reduction removes image noise in MPEG compressed video data for enhanced picture quality Select between OFF LOW MEDI UM and STRONG ADAPTIVE LUMA CON TROL This function adj...

Page 49: ...US function is not avail able PC MODE In PC mode some of the picture processing al gorithms are reduced to keep the signal type as it is It can be used especially for RGB inputs HDMI RGB RANGE optional Select this setting according to the input RGB signal range of the HDMI source The range can be limited 16 235 or full 0 255 Select FULL LIMIT or AUTO This option is only available when the input so...

Page 50: ... quency range of 120 HZ 500 HZ 1500 HZ 5000 HZ and 10000 HZ You can only access this function if DOLBY AUDIO PROCESSING has previously been deactivated SPEAKER The default setting for the speakers is TV SPEAKERS so that only the internal speakers are used to output the sound It is also pos sible to select the EXTERNAL AUDIO SYSTEM setting and integrate an external amplifier into a CEC ARC network ...

Page 51: ...ously been deactivated DOWNMIX MODE Select the desired downmix mode STEREO or SURROUND DOLBY AUDIO PROCESSING Activate deactivate Dolby Audio sound processing here When activated you can choose under SOUND MODE from the settings SMART MOVIE MUSIC and NEWS When this function is activated many options in the TON menu cannot be edited RESET TO DEFAULT Use this function to restore the factory settings...

Page 52: ...ore apps games here OPEN SOURCE LICENCES ANDROID TV HOME Displays the open source licences of the Android TV home page ANDROID TV CORE SERVICES Displays the open source licences of the Android TV main servic es STORE MODE Activate deactivate demo mode GOOGLE AS SISTANT ACCOUNTS Select your active account SEARCHABLE APPS Determine which apps should be included in the search results SAFESEARCH FILTE...

Page 53: ...lly impaired users you can activate this function to receive these signals VISUALLY IMPAIRED Once the AUDIO DESCRIPTION option is activated you can make the following settings in this menu SPEAKER Activate this option if you want to listen to the audio description via the speakers HEADPHONE Activate this option if you want to listen to the audio description via the headphones VOLUME Adjust the vol...

Page 54: ...tles of a programme to be audible The relevant information must be provided by the respective station AC4 DIALOGUE ENHANCEMENT You can select settings to enhance dialogue here OFF LOW ME DIUM HIGH This function emphasises the clarity of the dialogue signal to achieve better speech quality CAPTIONS Select the display options and subtitle style here HIGH CONTRAST TEXT Activate this function if you w...

Page 55: ...dings on the data medium Select a recording and press OK to start Press the or button to stop the record ing The following options are available in the recording list Menu option Settings PAGE UP red button This option takes you to the recording at the top of the list PAGE DOWN green button This option takes you to the recording at the bottom of the list DELETE yellow but ton This option can be us...

Page 56: ...e timeshift recording function SET PVR Specify whether the selected USB storage device is to be used for the PVR re cording function FORMAT Select the FORMATN menu item The notice FORMATTING WILL ERASE ALL DATA ARE YOU SURE appears Select YES if you want to start the formatting or NO to cancel the process Press OK to confirm Formatting deletes ALL data stored on the USB storage device and converts...

Page 57: ...ter the end time here SCHEDULE TYPE Select the type of timer here REMINDER or RECORD REPEAT TYPE Specify here the type of repetition ONCE DAILY or WEEK If you select the weekly option you then have the option of setting the desired weekdays for the timer Select ADD and press OK to save the new timer The timer is now listed in the schedule list Existing timer programmes can also be edited or delete...

Page 58: ... x1 2 x1 4 x2 x4 x8 x16 x32 Press the button to return to normal playback Timeshift recording To use the timeshift recording function the timeshift mode option must be activated in the RE CORD TIME SHIFT MODE menu You can start a timeshift recording in TV mode to view the current channel after a delay To do so proceed as follows Press this button during the current programme The programme stops th...

Page 59: ...page When this button is pressed again you move up through the channel list in steps of 11 PAGE DOWN green but ton This option takes you to the programme at the bottom of the displayed page When this button is pressed again you move down through the channel list in steps of 11 SELECT MORE yellow but ton The following options can be edited here SELECT TYPE Filter the display of channels using the f...

Page 60: ...can delete favourites with the blue button DELETE Highlight channels with the yellow button SELECT LIST to move them 13 Multi Media Player MMP If you connect a USB storage device to the TV you can play back the photos music videos or text stored on it Select Multi Media Player MMP on the home page and press OK to open it and browse the connected USB devices or media servers and play or view conten...

Page 61: ...ate through the folders and find the desired media files The following button func tions are available here Direction but tons Navigate through the folder structure OK Selecting the folders and starting the files EXIT Exit the media player Blue button Calling up the list view MENU The following options appear here SORT Choose how you want the files to be sorted MEDIA TYPE Select which files are to...

Page 62: ...d at various speeds with this button x2 x4 x8 x16 x32 Press the button to return to normal playback If you press the MENU button during playback the following options appear PLAY PAUSE Start stop playback REPEAT Repeat the video SHOW INFO Shows information about the displayed video file PICTURE SET TINGS You can change the settings in the PICTURE menu here These are the same as in the menu SETTING...

Page 63: ...you press the MENU button during playback the following options appear PLAY PAUSE Start stop playback REPEAT Repeat a series of photos SHUFFLE ON OFF Activate deactivate the random function ROTATE Rotates the selected image by 90 degrees clockwise If you press the green but ton during playback you can rotate the photo in the same way ZOOM Magnifies the displayed image in three steps 1 X 2 X or 4 X...

Page 64: ...nd Fast forward If you press the MENU button during playback the following options appear PLAY PAUSE Start stop playback REPEAT Repeat the track SHUFFLE ON OFF Activate deactivate the random function SHOW INFO Shows information about the displayed music file HIDE SPEC TRUM Activate deactivate the frequency spectrum display LYRIC OPTIONS If available you can access song text options here PICTURE OF...

Page 65: ...device via the media player of the TV set Proceed as follows Make sure that your mobile device is connected to the same network as the TV set Open the Multi Media Player MMP on the home page Select the desired media type Press the blue button in the next screen to display the folder structure in the list view Then press the button The DMR Digital Media Renderer option is now displayed under the me...

Page 66: ...ection and activate the option Wireless projection Available devices are listed Select the TV you want to mirror your screen to Alternatively Slide the notification box down Tap on Wireless projection Select the TV you want to mirror your screen to If the mobile app is enabled for streaming e g YouTube Netflix etc you can stream the content to your TV Look for the Google Cast icon in the app and t...

Page 67: ...ou have access to open Internet content Your device checks automatically via this route whether new software versions are available for your device When doing so your device sends out the IP address the software version and the MAC address of the device to ensure software updates run correctly This data is required to make use of the software update service Access to applications in the portal or ...

Page 68: ...ight be poor Check if the antenna is connected prop erly The picture is not clear The reception might be poor Check if the antenna is connected properly The picture is too bright or too dark Check the contrast and brightness settings The picture is not sharp The reception might be poor Check if the antenna is connected properly Check the sharpness and noise reduction settings in the BILD menu Ther...

Page 69: ... menu cannot be opened This is not a defect In some cases the menu of the device connected via HDMI2 opens This is dependent on the playback de vice and must be supported accordingly Change the input source No Bluetooth con nection Ensure that all settings on the device are correct and that the Blue tooth function has been activated Check whether the device to be connected is switched on and is in...

Page 70: ...160 pixels which are each made up of four sub pixels red green blue white there are a total of approx 33 2 mil lion control elements in use Occasionally pixels or indi vidual sub pixels can fail or become incorrectly controlled because of this very high number of transistors and the ex tremely complex manufacturing process used in this con text Pixel defect class Defect type 1 Continuously lit pix...

Page 71: ... off the dust first or wipe the high gloss finish too vigorously you could scratch the high gloss finish Do not use solvents or corrosive or gaseous cleaning agents Clean the display screen with a soft lint free cloth Take care to ensure that no water droplets remain on the Smart TV Water can cause permanent discolouration To avoid damage to the device water must not penetrate into the interior of...

Page 72: ...ake them to a separate collection point for used batteries Contact your local waste disposal company or your local authority for more information on this subject Batteries Proper disposal of used batteries protects the environment and your personal health Do not dispose of used batteries with normal household rubbish Batteries must be disposed of correctly For this purpose retailers that sell batt...

Page 73: ...for satellite con nection 13 V 18 V 300 mA max Screen size 125 7 cm 50 LCD 16 9 display Power consumption Max 135 watt Power consumption in standby mode 0 50 W Power consumption in networked standby mode WAKE ON mode 2 00 W Speaker output 2 x 10 watt RMS Physical resolution 3840 x 2160 TV system Pal Channel positions 199 ATV 10 000 DTV Smart TV X15520 MD 33982 Device name X15520 MD 33982 Rated vol...

Page 74: ...AND CABLE TV S1 S20 S21 S41 HD DVB T DVB T2 HD H 265 HD DVB C DVB S2 Connections Antenna connection analogue TV DVB T DVB T2 or DVB C Satellite connection DVB S S2 2 x USB connection 1 x LAN RJ 45 Video 4 x HDMI 2 0 with HDCP 2 2 decoding 1 x VGA 15 pin D Sub YUV YPbPr AV In cinch Audio Stereo audio in for AV YUV VGA cinch Headphone output 3 5 mm jack Digital Audio Out SPDIF optical Drives storage...

Page 75: ... with feet Approx 10 2 kg Mounting on the wall Vesa standard hole spacing 200 x 200 mm4 Dimensions weight X15520 MD 33982 Dimensions without feet W x H x D Approx 1245 x 725 x 82 mm Dimensions with feet W x H x D Approx 1245 x 788 x 250 mm Weight without feet Approx 13 2 kg Weight with feet Approx 13 5 kg Mounting on the wall Vesa standard hole spacing 200 x 200 mm4 Dimensions weight X16505 MD 339...

Page 76: ...nufactured under licence of Dolby Laboratories Dolby and the double D symbol are registered trademarks of Dolby Laboratories The Bluetooth word mark and logos are registered trademarks of Bluetooth SIG Inc and are used by MEDION under licence The Android word mark and logos are registered trademarks of Google LLC and are used by MEDI ON under license The USB word mark and logos are registered trad...

Page 77: ...i od of three years in order to fulfil your legal warranty rights You have the right to be informed of the personal data concerned as well as the right to rectifica tion erasure restriction of processing the right to object to processing and the right to data porta bility In the case of the right to be informed and the right to erasure restrictions apply according to para graphs 34 and 35 of the B...

Page 78: ... 120 Faraday Park Faraday Road Dorcan Swindon SN3 5JF Wiltshire United Kingdom You can download this and many other sets of operating instructions from our ser vice portal at www medion com gb service start You will also find drivers and other software for a wide range of devices there You can also scan the QR code on the side of the screen to download the operating instructions onto your mobile d...

Page 79: ...connections AV 24 HDMI 24 HDMI ARC 24 HDMI CEC 24 LAN 25 SPDIF 25 USB 25 VGA PC 25 VGA YPbPr 25 Multi Media Player MMP 60 Music 74 O Operating safety 7 Operation 26 P Package contents 6 Photo 74 Pixel faults 70 Power supply 10 35 73 Connecting the power supply 18 Programme selection 26 R Recording 55 Remote control 15 Repairs 9 S Safety information 7 Connection 10 Operating safety 7 Power supply 1...

Page 80: ......

Reviews: