Medion LIFE P13161 Instruction Manual Download Page 5

A


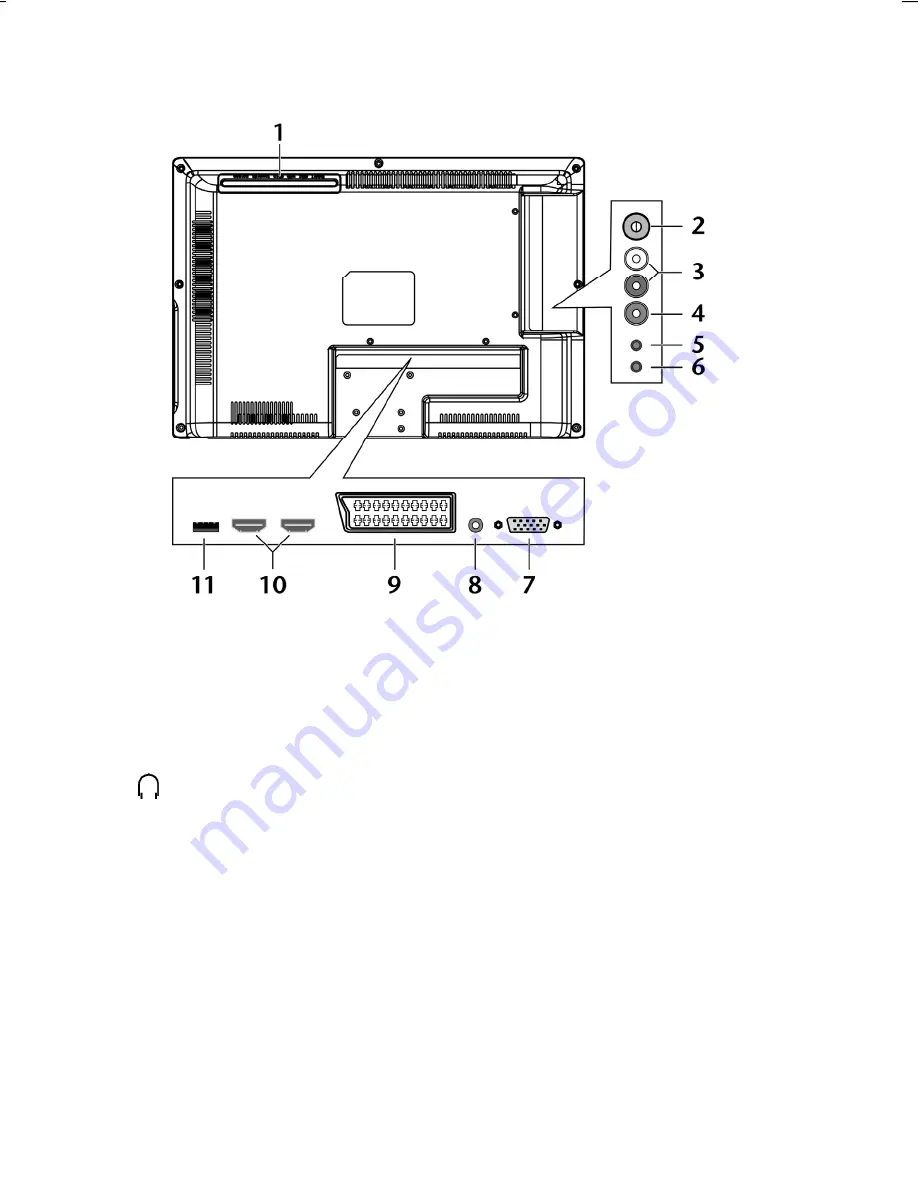
Rear View / Connectivity 


1.


DVD-Player 

2.


ANT. 

Connection using an antenna (analogue or DVB-T) 

3.


AUDIO L R 

Audio inputs (red/white) for AV and Component IN 

4.


AV1 

Video input 1 (yellow) 

5.


Component IN 

3.5 mm jack component input for the connection 


of devices with a component output 

6.


Connectivity for headphones  with 3.5mm jack 

7.


VGA  

VGA connection: to connect a PC or Notebook 

8.


VGA AUDIO 

Audio input for PC or Notebook 

9.


SCART/AV2 SCART 

input 


Video input 2 (via SCART to AV adapter) 

10.


HDMI 1-2 

HDMI connection: to connect a device with HDMI out 

11.


USB 

USB interface for MP3 and JPG 

Summary of Contents for LIFE P13161

Page 1: ...LED Backlight TV 47 cm 18 5 Instruction Manual 47 cm 18 5 LED LCD TV with inbuilt DVD Player and HD DVB T Tuner MEDION LIFE P13161 MD 21097...

Page 2: ...our discretion The benefits conferred by this warranty are in addition to all rights and remedies in respect of the product that the consumer has under the Competition and Consumer Act 2010 and simil...

Page 3: ...a USB memory stick during the process of repair some or all of your stored data may be lost We recommend you save this data elsewhere prior to sending the product for repair You should also be aware t...

Page 4: ...frared sensor reception field for the infrared TV signals 4 EJECT Eject the disk 5 Disk Start or pause replay 6 VOL VOL Adjust the volume or navigate in the menu 7 CH CH Channel up down or navigate in...

Page 5: ...nt IN 3 5 mm jack component input for the connection of devices with a component output 6 Connectivity for headphones with 3 5mm jack 7 VGA VGA connection to connect a PC or Notebook 8 VGA AUDIO Audio...

Page 6: ...A 3 Remote Control...

Page 7: ...close menu 11 P MODE Choose picture mode 12 S MODE Choose sound mode 13 INDEX Go to the root directory of USB media player 14 SIZE DVD Play button Start playback Pause button Pause playback 15 SUBTITL...

Page 8: ...ct camera position angle in DVD playback 31 SUBPAGE DVD Fast forward 32 REVEAL DVD Fast rewind 33 DVD Next title next section 34 DVD Previous title previous section 35 D DISP DVD Displays information...

Page 9: ...12 Intended Environment 13 Power Supply 14 Battery Handling 15 Information about Conformity 16 Start of Operation 17 Unpacking 17 Installation 17 Inserting the batteries in the remote control 18 Conne...

Page 10: ...ata media 27 SETUP menu in DVD mode 28 Navigating in the menus 28 Menu General Setup 28 Menu Audio Setup 29 Menu Digital Setup 29 Menu Preferences Page 30 Operation through the Remote Control 32 Media...

Page 11: ...bleshooting 52 Do You Need More Help 53 LCD TV pixel faults 54 Cleaning 55 Disposal 56 FCC Compliance Statement 56 Technical Specifications 57 Copyright 2011 All rights reserved This manual is protect...

Page 12: ...ed only for receiving and playing back TV programmes The range of connections supplied makes it possible to expand the input and output sources e g receiver DVD player DVD recorder video recorder PC e...

Page 13: ...ected Caution Do not let children play with the plastic film There is a risk of suffocation You should receive the following items LED LCD 18 5 with DVD Player 1 x Remote Control incl Batteries 2 x R0...

Page 14: ...these openings overheating fire risk Do not put any pressure on the display There is a risk that the screen may break The remote control has a class 1M infrared diode Never use optical devices to loo...

Page 15: ...ear water and do not set it up near a wash hand basin or bath etc Do not place any exposed sources of ignition candles or similar on or near the device Make sure that there is enough clearance in the...

Page 16: ...ence television loudspeaker boxes mobile telephones etc to avoid malfunctioning After transporting the LCD TV wait until the device has reached ambient temperature before switching it on Large changes...

Page 17: ...ssible In order to disconnect the power to your LCD TV or to completely isolate the device from voltage sources remove the mains plug from the mains socket Always grab the plug firmly when unplugging...

Page 18: ...eyes or onto your skin If this should happen then rinse the affected areas immediately with a large amount of clean water and contact your doctor immediately Avoid heavy impacts and vibrations Always...

Page 19: ...nts Your device complies with the basic requirements and the relevant Australian EMC guidelines electromagnetic compatibility and the Australian electrical safety guidelines This device fulfils the ba...

Page 20: ...ed if you use a knife with a long blade to open the box The box contains a number of small items including batteries Keep these items out of reach of children the parts are easy to swallow Store the p...

Page 21: ...of receiving DVB T by means of a corresponding aerial if it is offered at your location An additional receiver will not be necessary to receive DVB T channels Connecting a DVB T aerial Plug the conne...

Page 22: ...e on for the first time You can always access the first time installation screen again via Functions First Time Installation and go through the settings again See also page 42 Select a language with t...

Page 23: ...ed Setting the volume You can increase or decrease the volume by pressing the volume buttons on the remote control or on the device Use the button to switch the volume fully off and on again Use the A...

Page 24: ...cture format Auto The format displayed is automatically adjusted to match the input signal 4 3 For undistorted screen display in 4 3 format 16 9 A 16 9 picture letterbox is zoomed to the full screen s...

Page 25: ...te channels Use the direction buttons or the buttons FAV FAV to select a channel Input Source Selection Use INPUT to call up the source selection list The following sources are available ATV TV mode a...

Page 26: ...t insert any media with a smaller or a larger diameter in the DVD slot to avoid damage Note The DVD must be aligned with the printed side towards the back back of the LED LCD TV Note The LED LCD TV mu...

Page 27: ...or key to skip backwards or forwards for DVDs from chapter to chapter for CDs from track to track Note Please note on many DVDs it is not possible to skip the track chapter before the actual film sta...

Page 28: ...GOTO once Enter the desired title three digits put 0 or 00 in front if required You may also enter the track number directly without using the GOTO button Press GOTO twice enter the desired time withi...

Page 29: ...d PROGRAM button A table with spaces for programs appears on the screen The number of tracks is shown at the top of the table Use the remote control buttons to enter the number of the desired track TT...

Page 30: ...s to which requests open which menus Navigating on MP3 and JPEG data media The music tracks on MP3 and JPEG data media may be organised into folders just like on other data storage media Insert an MP3...

Page 31: ...menu is shaded orange Use to select menu items and the items you choose appear on the right side The active setting is highlighted in brown To change a setting use to go to the right side and use to...

Page 32: ...ay surround sound Stereo This option produces stereo sound Choose this setting if the sound is played through two speakers only Menu Digital Setup Dual Mono Choose between four different audio outputs...

Page 33: ...tal control here Some DVDs and CDs are encoded with encryption signals in line with the authorisation classes established by the Motion Picture Association The eight authorisation classes are 1 Kid su...

Page 34: ...fault password is valid 0000 The next entry field becomes active when you enter the correct password New Password Enter a four digit password using the number keys on the remote control The bar moves...

Page 35: ...A 32 Operation through the Remote Control The following functions of the DVD player are available to you through the remote...

Page 36: ......

Page 37: ...o select drive with directional pad on the remote control C D etc Press ok to format You can select to format the USB device into FAT32 file system or High Speed FS system by using directional pad on...

Page 38: ...e recording mode The options are AUTO Mode The time will be fixed according to the selected program Only the selected program will be recorded from start time to end time ONCE Mode Allows setting the...

Page 39: ...ng session to allow that your program has been fully recorded The scheduled recording can be checked via the EPG interface any time For this please press the Yellow button schedule button on the remot...

Page 40: ...or DTV depending on the type of signal Media Menu System As soon as you have connected an external USB device to the TV and have switched the source to Media you can choose between the following four...

Page 41: ...menu not every menu has a sub menu option Press MENU to return to the next higher menu Use the direction buttons to enter a desired value or make another selection Press MENU to close the menu and als...

Page 42: ...set to PAL Sound System BG DK L I For Australia the sound system is set to BG Fine Tune Press to carry out the fine adjustment AFC Set the automatic fine adjustment to On if this is your continuous ch...

Page 43: ...e channel you would like to skip while scrolling through the channels using the buttons CH and then press the blue button A B You can still select this channel by using the number buttons Fav To save...

Page 44: ...ncrease or decrease colour on a scale of 0 100 Tint Hue settings only available for NTSC reception Sharpness Increase or decrease sharpness on a scale of 0 10 Colour Temp Select colour temperature Col...

Page 45: ...100 Bass Increase or decrease bass on a scale of 0 100 Balance Set the balance between the left and right speakers Auto Volume The function AVL Automatic Volume Limiting compensates for the various vo...

Page 46: ...ption is only available in DTV mode Sleep Timer Select a time after which the device should switch itself off automatically Select Off to end the function Auto Standby Set the time by which the LED LC...

Page 47: ...assword Enter a new four digit password Confirm new password Enter the new password again The appropriate message will appear Information Note the new password It will not be set back at the recreatio...

Page 48: ...You will be able to record on a USB storage medium through the USB connection with your LED LCD TV The USB storage medium will have to be formatted before you can start the recording Carry out the for...

Page 49: ...GUIDE Button Entry Function Red Button PROGRAM Record Set the start and end of the recording on the external storage medium here You will be able to make the following settings under Mode Auto The ti...

Page 50: ...nto the timetable The device will switch to the program set automatically as soon as the time programmed is reached It will not be possible to store the current program in the memory Move View Move wi...

Page 51: ...gh volumes for an extended period can damage your hearing Connecting an External DVD Player There are a number of options for connecting a DVD player 1 With a SCART Adapter If the external DVD Player...

Page 52: ...xclusively Connect a stereo RCA cable red and white jacks to the AUDIO L R inputs to transmit audio 4 HDMI Cable If your device has a HDMI output connect a HDMI cable not supplied to the HDMI input of...

Page 53: ...Switch both devices off Connect a HDMI cable monitor cable not supplied to the HDMI input of the LED LCD TV and to the HDMI output of the external device Switch the LED LCD TV on when the HDMI device...

Page 54: ...PC or Notebook Tighten up the screws of the monitor cable with your fingers so that the plug is correctly seated in the socket If you want to transmit a sound signal connect an audio cable from the PC...

Page 55: ...cted properly Check to ensure you have selected the correct AV source There is no sound Ensure that the volume has not been set to the minimum level Ensure the mute setting is not active There is no p...

Page 56: ...ugh PLAY is being pressed or stops again at once Has the disk been inserted with the written side to the front Check whether the disk is damaged by inserting another disk Wipe the disk carefully from...

Page 57: ...incorrectly controlled because of this very high number of transistors and the associated extremely complex manufacturing processes used Description Accepted number Bright sub pixel 1 sub pixel 1 Two...

Page 58: ...If you do not wipe off the dust first or if you apply too much pressure when wiping down the high gloss finish you could scratch the high gloss finish Do not use solvents corrosive or aerosol detergen...

Page 59: ...d can radiate radio frequency energy and if not installed and used in accordance with the instructions may cause harmful interference to radio communications However there is no guarantee that interfe...

Page 60: ...alogue digital 1 x USB In 1 x VGA In 1 x VGA Audio In 2 x HDMI In with HDCP Decoding 1 x Component In Adapter 3 5 mm YPbPr YUV 1 x SCART to AV Adapter 1 x AV In 1 x RCA Audio In AV component shared au...

Page 61: ...eight with Stand 3 9 Kg Weight without Stand 3 7 Kg Remote Control Transmission type Infrared LED classification 1 Battery type 2 x 1 5V AAA R03 LR03 Pleae note If as a result of an unforeseeable comb...

Page 62: ...I 12 2011 MEDION Australia Pty Ltd St Leonards NSW 2065 Australia Hotline 1300 884 987 Opening hours Mon Fri 08 30AM to 06 00PM EST Internet www medion com au E mail Support australia medion com 4 w M...

Reviews: