background image

46 of 54

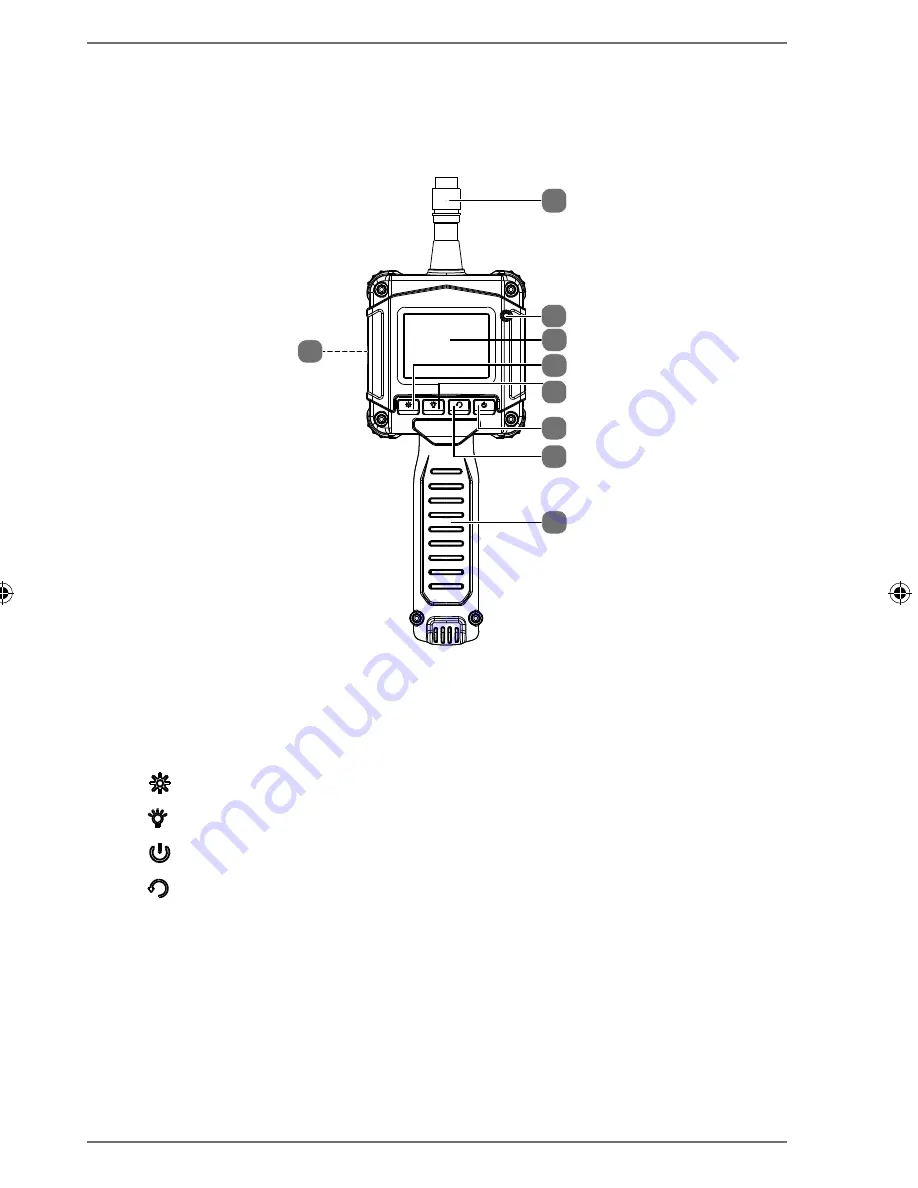
5.  Overview of the device

5.1. Front

1

3
4

5

6
7

8

9

2

1) 

Connection for the flexible swan neck

2) Operating 

LED

3) Display

4) 

 Contrast setting

5) 

 LED brightness

6) 


ON/OFF

: Camera on/off switch

7) 

 Rotate image

8) Handle
9) 

Video output 3.5 mm jack socket (on the left side)

Summary of Contents for LIFE E49020

Page 1: ...C mara de inspecci n Inspektions Kamera Inspection camera MEDION LIFE E49020 MD 87120 Manual de instrucciones Bedienungsanleitung Instruction Manual...

Page 2: ...aciones por su cuenta 10 4 Volumen de suministro 10 5 Esquema del aparato 11 5 1 Parte frontal 11 5 2 Parte inferior 12 5 3 Cuello de cisne 12 6 Puesta en funcionamiento 13 6 1 Colocaci n de las pilas...

Page 3: ...sin falta tambi n este manual de instrucciones 1 1 S mbolos y palabras de advertencia utilizados en este manual de instrucciones PELIGRO Advertencia de peligro de muerte inminente ADVERTENCIA Adverte...

Page 4: ...ice solo accesorios y piezas de repuesto que hayan sido autorizados o sumi nistrados por nuestra parte Tenga en cuenta toda la informaci n contenida en este manual de instrucciones especialmente las i...

Page 5: ...los ni os utilicen el aparato sin vigi lancia El aparato y los accesorios se deben guardar en un lugar fuera del alcance de los ni os PELIGRO Peligro de asfixia Los embalajes de pl stico se pueden tra...

Page 6: ...lejos de humedad sal y polvo Quite la sal y el polvo con un pa o suave ligeramente h me do si ha utilizado la c mara en la playa o en el mar A conti nuaci n seque la c mara cuidadosamente Mantener lej...

Page 7: ...oria la desconexi n del fluido el ctrico puede causar una p rdida de datos o da ar el circuito interno o la memoria Tratar la lente y todos los componentes m viles con sumo cuidado No toque la lente n...

Page 8: ...est n descargadas o derramen l quido y elim nelas de forma respetuosa con el medio ambiente La vida til de las pilas var a seg n la temperatu ra ambiente Con temperaturas bajas puede ser m s corta Cam...

Page 9: ...ali zado 4 Volumen de suministro Compruebe que el suministro est completo y si no fuera este el caso av senos dentro de un plazo de 14 d as despu s de su compra Con el producto adquirido ha recibido C...

Page 10: ...7 8 9 2 1 Conexi n para el cuello de cisne flexible 2 LED de funcionamiento 3 Pantalla 4 Ajuste del contraste 5 Luminosidad de los LED 6 ON OFF Encender o apagar la c mara 7 Girar imagen 8 Empu adura...

Page 11: ...inferior 10 Similar a la imagen 10 Compartimento de las pilas 5 3 Cuello de cisne 11 13 14 15 12 11 Rosca 12 Saliente de enganche 13 Espiral 14 Ojal para la sujeci n de accesorios 15 C mara sumergibl...

Page 12: ...de las pilas Abra la tapa del compartimento de las pilas Similar a la imagen Coloque cuatro pilas de tipo AA de 1 5 V teniendo en cuenta la polaridad co rrecta Similar a la imagen Sujete la tapa del c...

Page 13: ...mara se encender el LED de funcionamiento se iluminar en verde y la pantalla se encender 6 4 Apagado de la c mara Vuelva a pulsar la tecla ON OFF durante unos 3 segundos La c mara el LED de funcionami...

Page 14: ...suministro accesorio de espejo accesorio de im n accesorio de gancho en la cavidad de la c mara y f jelo con las arandelas suministradas Similar a la imagen Con la ayuda de los accesorios puede p ej...

Page 15: ...la c mara y seleccione el canal AV del televisor La imagen de la c mara se mostrar ahora en el televisor 9 B squeda de fallos Si la c mara no funciona perfectamente compruebe los siguientes puntos Si...

Page 16: ...reciclaje Aparato Los aparatos usados no deben desecharse con la basura dom stica nor mal Seg n la directiva 2012 19 UE se deber eliminar el aparato al final de su vida til de forma adecuada seg n las...

Page 17: ...o aprox 322 g incl cuello de cisne sin accesorios ni pilas Pilas 4 pilas de 1 5 V de tipo AA LR6 Autonom a aprox 6 horas depende del tipo de uso Nos reservamos el derecho a efectuar modificaciones t c...

Page 18: ...consentimiento por escrito del fabricante El copyright pertenece a la empresa Medion AG Am Zehnthof 77 45307 Essen Alemania Las instrucciones pueden solicitarse a trav s de la l nea de atenci n al cl...

Page 19: ...20 de 54...

Page 20: ...mit Batterien 26 3 5 Niemals selbst reparieren 27 4 Lieferumfang 28 5 Ger te bersicht 29 5 1 Vorderseite 29 5 2 Unterseite 30 5 3 Schwanenhals 30 6 Inbetriebnahme 31 6 1 Batterien einlegen 31 6 2 Schw...

Page 21: ...n h ndigen Sie unbedingt auch diese Bedienungsanleitung aus 1 1 In dieser Anleitung verwendete Symbole und Signalw rter GEFAHR Warnung vor unmittelbarer Lebensgefahr WARNUNG Warnung vor m glicher Lebe...

Page 22: ...plosionsgef hrdeten Bereichen Hierzu z hlen z B Tankanlagen Kraftstofflagerbereiche oder Bereiche in denen L sungsmit tel verarbeitet werden Auch in Bereichen mit teilchenbelasteter Luft z B Mehl oder...

Page 23: ...nderungen und Reparaturen d rfen nur von Fachkr ften vorgenommen werden Bringen Sie das Produkt zur Pr fung zu einem autori sierten Service Center Wenn Sie die Kamera ber einen l ngeren Zeitraum hinwe...

Page 24: ...Eine solche Belas tung kann zum Auslaufen des Akkus oder zur Verformung des Geh uses f hren Starke Temperaturschwankungen vermeiden Wenn Sie das Ger t schnell aus einer kalten Umgebung in eine warme...

Page 25: ...ie nicht die Batterien mit Gewalt einzusetzen Nur vorgeschriebene Batterien verwenden Ausschlie lich Batterien gleichen Typs einsetzen Batterien vor Kindern fernhalten Verschluckungsge fahr Bei Versch...

Page 26: ...Heizk rpern auf Es besteht erh hte Auslaufgefahr Nehmen Sie ausgelaufene Batterien sofort aus dem Ge r t Reinigen Sie die Kontakte bevor Sie neue Batterien einlegen Es bestehtVer tzungsgefahr durch B...

Page 27: ...st Mit dem von Ihnen erworbenen Produkt haben Sie erhalten Inspektions Kamera MD 87120 Videoausgangskabel Aufs tze Haken Magnet Spiegel Aufbewahrungskoffer Dokumentation GEFAHR Erstickungsgefahr Verpa...

Page 28: ...ite 1 3 4 5 6 7 8 9 2 1 Anschluss f r den flexiblen Schwanenhals 2 Betriebs LED 3 Display 4 Kontrasteinstellung 5 LED Helligkeit 6 ON O FF Kamera ein oder ausschalten 7 Bild drehen 8 Handgriff 9 Video...

Page 29: ...von 54 5 2 Unterseite 10 Abbildung hnlich 10 Batteriefach 5 3 Schwanenhals 11 13 14 15 12 11 Schraubgewinde 12 Rastnase 13 Spirale 14 Befestigungs se f r Aufs tze 15 Wasserdichte Kamera mit 4 LED Lamp...

Page 30: ...tterien einlegen L sen Sie die Batteriefachabdeckung Abbildung hnlich Legen Sie vier Batterien Typ AA 1 5 V ein und achten Sie dabei auf die richtige Polarit t Abbildung hnlich Befestigen Sie die Batt...

Page 31: ...altet sich einn die Betriebs LED leuchtet gr n und der Monitor schaltet sich ein 6 4 Kamera ausschalten Dr cken Sie die Taste O N O FF erneut f r etwa 3 Sekunden Die Kamera so wie die Betriebs LED sch...

Page 32: ...gelaufsatz Mag netaufsatz Hakenaufsatz auf die Vertiefung an der Kamera und fixieren Sie die sen mit Hilfe der mitgelieferten Ringe Abbildung hnlich Unter Verwendung der Aufs tze haben Sie zum Beispie...

Page 33: ...e Kamera wieder ein und stellen Sie den AV Kanal des Fernsehers ein Die Bildausgabe der Kamera erfolgt nun auf dem Fernseher 9 Fehlersuche Wenn die Kamera nicht einwandfrei funktioniert berpr fen Sie...

Page 34: ...ltscho nend entsorgt und einem fachgerechten Recycling zugef hrt werden k nnen Ger t Altger te d rfen nicht im normalen Hausm ll entsorgt werden Entsprechend Richtlinie 2012 19 EU ist das Ger t am End...

Page 35: ...x H x T ohne Schwanen hals Gewicht ca 322 g inkl Schwanenhals ohne Aufs tze und Batterien Batterien 4 x 1 5V Batterien Typ AA LR6 Betriebsdauer ca 6 Stunden abh ngig von der Art der Nutzung Technische...

Page 36: ...e die schriftliche Genehmigung des Herstel lers ist verboten Das Copyright liegt bei der Firma Medion AG Am Zehnthof 77 45307 Essen Deutschland Die Anleitung kann ber die Service Hotline nachbestellt...

Page 37: ...38 von 54...

Page 38: ...irs yourself 45 4 Package contents 45 5 Overview of the device 46 5 1 Front 46 5 2 Bottom 47 5 3 Swan neck 47 6 Using the device for the first time 48 6 1 Inserting batteries 48 6 2 Fitting the swan n...

Page 39: ...give it away please ensure that you also pass on these instructions 1 1 Symbols and key words used in these instructions DANGER Warning of immediate mortal danger WARNING Warning of possible risk of f...

Page 40: ...xplosion e g tank systems fuel storage depots or areas in which solvents are being used It is also not permitted to use this device in areas where the air is contaminated with fine particles e g flour...

Page 41: ...long period of time remove the batteries to prevent leakage The camera head is waterproof but the main device must not be exposed to water in drip or spray form Do not place any objects filled with li...

Page 42: ...e has reached ambient temperature before switching it on Using a carrying case or plastic case offers a certain amount of protection against fluctuations in temperature Do not drop the device Jarring...

Page 43: ...ve flat or leaking batteries from the product immediately Avoid contact with skin eyes and mucous membranes In the event of contact rinse the affected areas with plenty of clean water and consult a do...

Page 44: ...t carried out by qualified personnel Never try to open or repair the product yourself In the event of a fault please contact the Service Centre or an approved repair specialist 4 Package contents Plea...

Page 45: ...5 1 Front 1 3 4 5 6 7 8 9 2 1 Connection for the flexible swan neck 2 Operating LED 3 Display 4 Contrast setting 5 LED brightness 6 ON OFF Camera on off switch 7 Rotate image 8 Handle 9 Video output 3...

Page 46: ...47 of 54 5 2 Bottom 10 similar to image 10 Battery compartment 5 3 Swan neck 11 13 14 15 12 11 Screw thread 12 Locking pin 13 Spiral tube 14 Eyelet for the attachments 15 Waterproof camera with 4 LED...

Page 47: ...1 Inserting batteries Remove the battery compartment cover similar to image Insert four 1 5 V batteries of type AA and ensure that the polarity is correct similar to image Fit the battery compartment...

Page 48: ...ing LED lights up in green and the monitor switches on 6 4 Switching o the camera Press the ON OFF button again for around 3 seconds The camera and the operating LED switch off and the display goes ou...

Page 49: ...era and fix it in place with the aid of the supplied band Similar to image The attachments can be used for example to pick up small objects e g with the magnet or hook attachments 7 2 Set contrast The...

Page 50: ...ly The batteries are dead Insert new ones The battery compartment cover is not completely closed The image is blurred The camera was moved during the shot The subject was outside the camera s focal ra...

Page 51: ...ny impact on the environment Take old devices to a collection point for electrical scrap or a recycling centre Remove the batteries from the device in advance and take them separately to a collection...

Page 52: ...92 x 44 mm W x H x D without swan neck Weight approx 322 g incl swan neck without attachments and batteries Batteries 4 x 1 5V batteries type AA LR6 Operating time approx 6 hours depending on the type...

Page 53: ...ut the written permission of the manufacturer Copyright is owned by the company Medion AG Am Zehnthof 77 45307 Essen Germany The operating manual can be reordered via the service hotline and is availa...

Page 54: ...I 01 17 Regenersis Spain CTDI Europe Avda Leonardo da Vinci 13 28906 Getafe Madrid Espa a Hotline 90 219 6437 Fax 91 460 4772 Utilice el formulario de contacto en www medion com contact www medion es...

Reviews: