background image

Quick Installation Guide

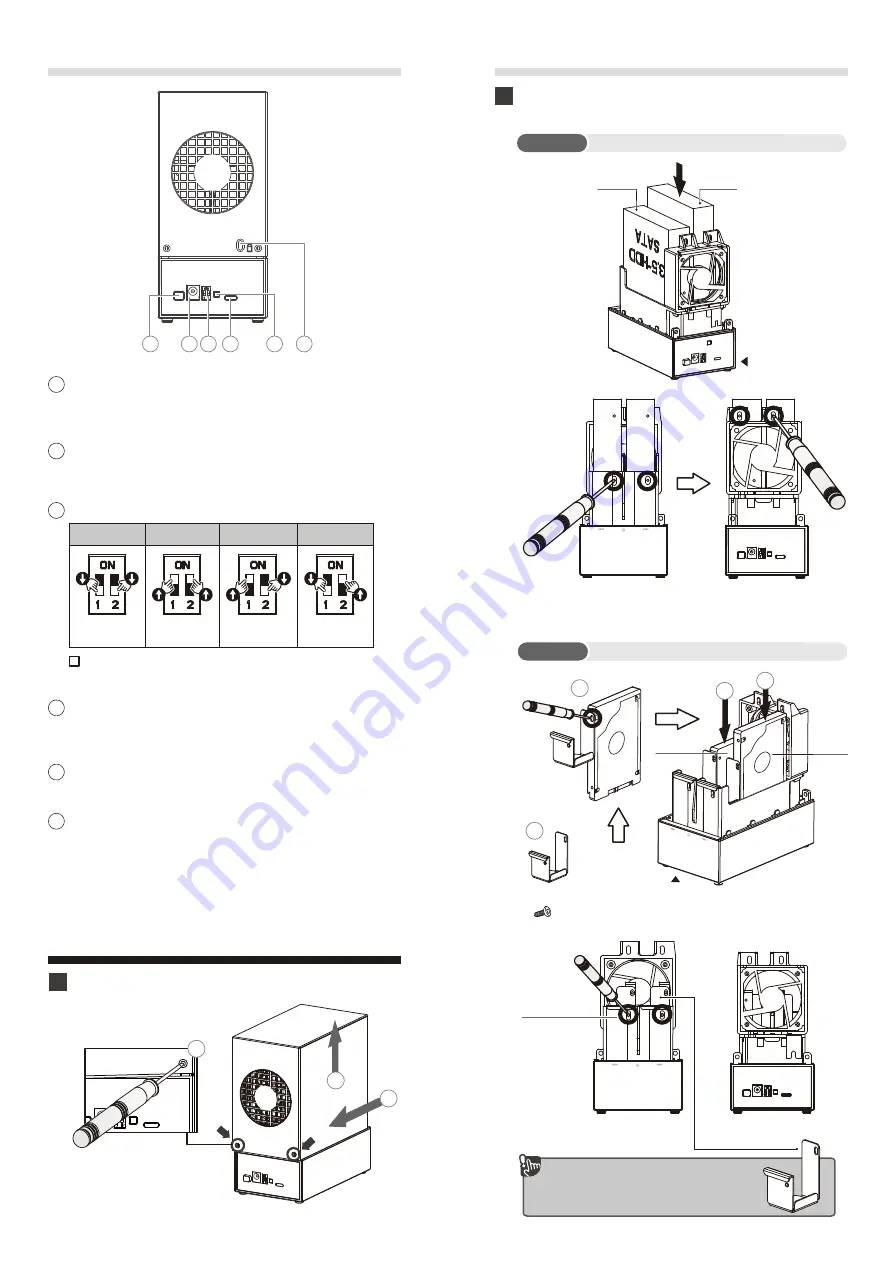
Detach the screws, slide the upper lid forward first

and backward horizontally

1

2

3

1

3

Power Button

Press to Power ON or Power OFF

the device

4

DC/IN

Main Power Socket

6

USB-C port

Connect with PC / Mac

7

Confirmation Button(CFM BTN)

8

Security lock

Button

5

RAID Mode Selection

Single

JBOD

1 OFF

2 OFF

1 ON

2 ON

RAID 1

RAID 0

1 ON

2 OFF

1 OFF

2 ON

3

7

8

4

5

6

Install hard drives gently into HDD slot 

Make sure hard drives are installed properly.

2

(Front)

(Back)

(Front)

(Back)

2.5 "bracket must be installed

on the hard disk and then

into the main body

Screws for

3.5" HDD x 2

2.5 HDD

HDD 1

Front

HDD 2

4

3

2

1

HDD Bracket

Screw

HDD 1

HDD 2

Back

3.5 HDD

Summary of Contents for HUR5-SU31C

Page 1: ...s 8 1 Windows 10 Mac OS X 10 12 5 or later Hot plug for USB C interface USB 2 0 3 0 3 1 compatible Note 1 Power On Power Off Power on Blue 2 HDD 1 HDD 2 Status Link Access Error Rebuild Blue Purple Red Steady Red Blinking Front Panel Rear Panel 1 1 2 Overview Cautions Main Device x 1 Quick installation guide x 1 USB 3 1 Gen II type C to C Cable x 1 External Power Adapter x 1 2 5 to 3 5 SATA HDD Br...

Page 2: ...irmation Button CFM BTN 8 Security lock Button 5 RAID Mode Selection Single JBOD 1 OFF 2 OFF 1 ON 2 ON RAID 1 RAID 0 1 ON 2 OFF 1 OFF 2 ON 3 7 8 4 5 6 Install hard drives gently into HDD slot Make sure hard drives are installed properly 2 Front Back Front Back 2 5 bracket must be installed on the hard disk and then into the main body Screws for 3 5 HDD x 2 2 5 HDD HDD 1 Front HDD 2 4 3 2 1 HDD Bra...

Page 3: ...le to the PC 3 Connect the DC power cable to the device 2 Then connect the other side of the USB cable to the device 4 Connect the cables in order 5 A Make sure the enclosure is connected to a computer that is ON The setup procedures are as follows HDD indicator Blue HDD indicator HDD purple indicator begins to flash B Set the dip switch at the back of the enclosure to the Mode RAID Mode you want ...

Page 4: ...management in S3 is strongly recommended please refer to user guide of motherboard BIOS setting Reminder 6 Take out the fan 5 Pull the pin 3 Pull up 4 Remove the screws Back Bottom 1 2 Remove the screws Pull backwards Back Note Red cable Positive electrode Black cable Negative electrode Smart Fan 1 If there is noise with the fan unscrew and take out the fan pull out the power cord clean the fan an...

Page 5: ... to user Please contact Mediasonic Store at support mediasonicusa com 3 User need to connect this device to computer s USB port then press the power ON button in order to turn ON the device If the USB cable is not connected the device may not power On 4 Mediasonic recommend user to connect the power adapter to the power surged protected outlet Please contact Mediasonic Support for any warranty and...

Reviews: