


USER`S MANUAL
ME-TUN
File: ME-TUN Manual E.DOC
MEDIA ENGINEERING
page 7/29
A.2. INSTALLATION PROCEDURE
Place the ME-TUN professional FM tuner in a horizontal position, and do not place anything
heavy on it. Never bring a magnet or magnetized objects near the tuner, because such will
adversely affect the performance of the ME-TUN.
Should it be necessary to change the sampling rate of the digital audio output to another
value than the factory set 48kHz please refer to chapter A3.
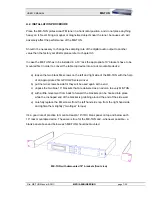
In case the ME-TUN has to be installed in a 19” rack the appropriate 19” brackets have to be
mounted first in order to convert the table top device into a rack mountable device:
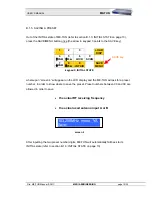
a) loosen the two black M4 screws on the left and right side of the ME-TUN with the help
of an appropriate 2.5mm PHILIPS screw driver
b) put the two screws beside for they will be used again at the end
c) unpack the two blue 19” brackets that are delivered as an add-on to every ME-TUN
d) with a little movement from back to forward the brackets can be hooked into place
while the U-shaped end of the bracket is grabbing around the end of the side wall.
e) carefully replace the M4 screws from the left hand side rsp. from the right hand side
and tighten them slightly (“two finger” torque)
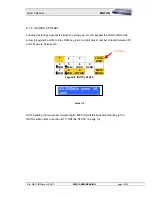
It’s a good rule of practice to mount at least a 19”/1RU blank panel on top and below each
19” rack mountable device. The same is true for the ME-TUN and - whenever possible - a
blank panel above and below each ME-TUN should be mounted.
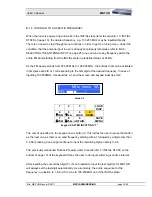
ME-TUN with demounted 19” brackets (front view)