background image


Mecmesin


Assembly and Installation of –

i

 System Test Stands 

3.6.1


Limits after connection to the PC, with the software running 

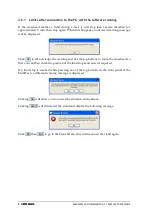
If  the  crosshead  reaches  a  limit  during  a  test,  it  will  stop  then  reverse  direction  for 

approximately 5 mm, then stop again. When this happens an onscreen warning message 

will be displayed: 


Click 

 OK 

 to acknowledge the warning and use the Jog buttons to move the crosshead so 

that you can then check the position of the limit stops and re-set if required. 

If a limit stop is reached while pressing one of the Jog buttons on the front panel of the 

MultiTest-

i

 a different warning message is displayed. 


Clicking 

 OK 

 will allow you to correct the situation and continue. 

Clicking 

 Abort 

 will disconnect the stand and display the following message: 


Click 

 OK 

 then 

 Exit 

 to go to the Front Screen, this will reconnect the stand again. 

Summary of Contents for MultiTest 0.5-i

Page 1: ...Assembly and Installation of MultiTest i and Vortex i System Test Stands 431 393 07 December 2018 ...

Page 2: ...ate your MultiTest i or Vortex i Test System Scope This reference manual covers the following products and their derivatives example Force testing stands Single column stands MultiTest 0 5 i MultiTest 1 i MultiTest 2 5 i MultiTest 5 i Twin column stands MultiTest 10 i MultiTest 25 i MultiTest 50 i Torque testing stand Vortex i Torque cell capacities 0 3 1 5 3 6 10 Nm 2016 Mecmesin Ltd supplied wit...

Page 3: ...4 3 4 Swapping loadcells 6 3 5 Attaching grips and fixtures 6 3 6 Setting the limit stops 6 3 6 1 Limits after connection to the PC with the software running 8 4 Vortex i Assembly and Installation 9 4 1 Fitting the crosshead to the Vortex i 9 4 2 Connecting the intelligent torque cell 9 4 3 Swapping intelligent torque cells 10 5 Connecting the PC MultiTest i and Vortex i 11 5 1 Connecting the powe...

Page 4: ...iv Mecmesin Assembly and Installation of i System Test Stands ...

Page 5: ...platform with a moving crosshead force testing or rotating platen torque testing The Intelligent Loadcell measures the force developed and the Intelligent Torque cell measures the torque applied A desktop PC or laptop computer is used to run the Emperor software that provides the control of the moving part of the stand and records stores and displays the information provided by the measuring cell ...

Page 6: ... contact Mecmesin or your authorised distributor if any items are missing or damaged 2 2 Lifting the test stand The unpackaged weight of the test stand is given in the Specification table at the back of this manual Do not try to lift heavy loads unaided Use suitable lifting equipment if necessary 2 3 Locating the stand The test stand should be positioned on a suitable level stable work surface 2 4...

Page 7: ...est stands MultiTest 0 5 i and MultiTest 1 i are supplied with base anchoring brackets to allow the test stands to be bolted to a bench Screw the anchoring brackets to the four positions on the base plate of the MultiTest 0 5 i or 1 i using the M6 screws provided Secure the test stand to the bench using suitable fastenings MultiTest 0 5 i and 1 i are supplied with anchoring brackets For additional...

Page 8: ...to the base of the stand 3 3 Fitting the loadcell to the crosshead Single column stands Ensure the stand is switched off Screw the adjustable handle lever with the red button into the crosshead dovetail This lever is designed to tighten without full rotation Hold the button on the top to raise and disengage the lever and turn it away from the direction required Release and turn and repeat as requi...

Page 9: ... is some additional adjustment available by moving the anvil plate Use a 3 mm Allen key to slacken the four retaining screws reposition the anvil plate and re tighten the screws Align the electrical connector of the ILC with the socket on the test stand Gently push the connector to locate then tighten the knurled locking ring in a clockwise direction Slide the loadcell onto the dovetail tighten se...

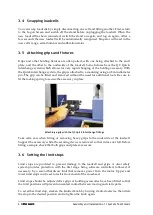
Page 10: ...ted and removed without the need for additional tools Be sure to fit the locking spring to secure the accessory in place Attaching a grip with the QC Quick Interchange fittings Take extra care when fitting or removing heavy grips to the underside of the loadcell Support the accessory while the securing device is removed so that it does not fall Before fitting a sample check that both grips and pla...

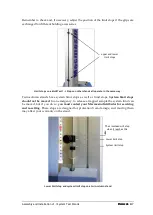
Page 11: ...stops as well as limit stops System limit stops should not be moved In an emergency to release a trapped sample the system limit can be moved but if you do so you must contact your Mecmesin distributor for servicing and re setting These stops are designed for protection from damage and moving them may affect your warranty on the stand Lower limit stop and system limit stop on a twin column stand u...

Page 12: ...K to acknowledge the warning and use the Jog buttons to move the crosshead so that you can then check the position of the limit stops and re set if required If a limit stop is reached while pressing one of the Jog buttons on the front panel of the MultiTest i a different warning message is displayed Clicking OK will allow you to correct the situation and continue Clicking Abort will disconnect the...

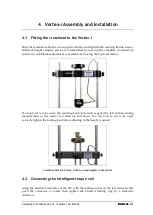
Page 13: ...moving the top load carrier If a top load is to be used the securing knob arrowed is generally left undone during measurement so the carrier can slide up and down If a top load is not to be used securely tighten the locking knob after adjusting to the height required Crosshead fitted to Vortex i with top load weights in the carrier 4 2 Connecting the intelligent torque cell Align the electrical co...

Page 14: ...he crosshead and then fitting another First log out of Emperor and then switch off the stand before unplugging the torque cell When the new torque cell has been connected switch the stand on again log on and after a few seconds the new torque cell will be automatically recognised Emperor will read in the new cell s range serial number and calibration status ITC connector ...

Page 15: ...olumn MultiTest stand Rear panels of a Vortex i left and MultiTest i right Plug the USB cable into the circled PC socket 5 2 Emergency stop button The emergency stop button will stop all movement of the crosshead Pushing the button will override all other controls When pressed the button stays latched down preventing any movement of the MultiTest crosshead or the Vortex platen To re set the button...

Page 16: ...physical jog buttons on the stand and another pair of similar buttons on the Emperor screen The two sets of buttons function in different ways The physical buttons move the crosshead or platen at a factory set fixed rate Emperor allows you to set either a fixed or variable rate A variable rate means the jog speed increments gets faster or decrements gets slower each time an on screen jog button is...

Page 17: ...ettings All Users Application Data Mecmesin Emperor Force Emperor Torque C Documents and Settings All Users Application Data Mecmesin Emperor Torque Windows Vista or Windows 7 User Data location Emperor Force C ProgramData Mecmesin Emperor Force Emperor Torque C ProgramData Mecmesin Emperor Torque All Windows versions Program files location Emperor Force C Program Files Emperor Force Emperor Torqu...

Page 18: ... be assigned to each user account Masters have full access to all the functions of the Emperor system The master user has control over which users are operators and masters Logon with a Master level username and password If this is the first time you have started the program you can use Default Username supervisor Default Password supervisor Note both the username and password are case sensitive O...

Page 19: ...or loadcells from 5 kN to 50 kN Loadcell resolution 1 6 500 Speed Speed range mm min in min 1 1000 0 04 40 1 1000 0 04 40 1 1000 0 04 40 1 500 0 04 20 1 1000 0 04 40 1 1000 0 04 40 1 400 0 04 15 Crosshead speed accuracy 0 2 of indicated speed Displacement Crosshead travel 1200 mm 47 3 1000 mm 39 4 500 mm 19 7 590 mm 23 2 950 mm 37 4 950 mm 37 4 1100 mm 43 3 Positional accuracy per 300 mm 11 81 of ...

Page 20: ...n min above 2 kN 25 kN recommended maximum speed 500mm min 20in min above 10 kN 50 kN recommended maximum speed 250mm min 10in min above 25 kN Measured on centreline of loadcell Measured without loadcell or grips Note See Technical Datasheet 431 390 for dimension drawings Common specifications Operating temperature 10ºC 35ºC 50ºF 95ºF Humidity range Normal industry and laboratory conditions Sampli...

Page 21: ... accuracy 1 of indicated speed Speed resolution 0 1 rev min Displacement Maximum displacement 2440 revs Displacement accuracy 0 2º per 36 000º Displayed resolution 0 001 revs 0 2º Dimensions Max travel of adjustable transducer carriage 182 mm 7 2 Maximum headroom 505 mm 19 9 448 mm 17 6 Width between columns 208 mm 11 02 Weight 19 5 kg 43 lbs Capacity of lower mounting table 10 190 mm 0 39 7 5 Cap...

Page 22: ...sation for system movement Yes Loadholding Yes Digital display of Load Position Speed Yes Output of test results to PC Printer Datalogger Yes via USB network ports RS232 via USB network converter in ASCII format Communication with PLC Digital Control Interface Yes via programmable digital ports 6 inputs 6 outputs Options available on request Safety guard Mecmesin reserves the right to alter equipm...

Page 23: ...Assembly and Installation of i System Test Stands Mecmesin 19 EC Declaration of Conformance ...

Page 24: ...Italy Japan Korea South Kosovo Kuwait Laos Latvia Lebanon Lithuania Macedonia Malaysia Mexico Morocco Myanmar Burma Netherlands New Zealand Norway Paraguay Peru Philippines Poland Portugal Romania Russia Saudi Arabia Serbia Singapore Slovakia Slovenia South Africa Spain Sri Lanka Sweden Switzerland Syria Taiwan Thailand Tunisia Turkey UK United Arab Emirates Uruguay USA Vietnam The Mecmesin global...

Reviews: