


GB
ADF-510 | ENGLISH
12
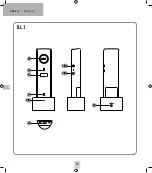
INNENSTATION
INDOOR STATION
BOÎTIER INTÉRIEUR
BINNENSTATION
Acknowledgement tone on the outdoor station
The outdoor station is delivered ex works with the acknowledgement
tone switched on. To switch this acknowledgement tone off the outdoor
station casing must be opened and the switch on the board moved to
the ‘OFF’ position.
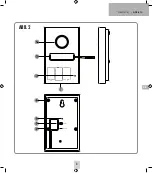
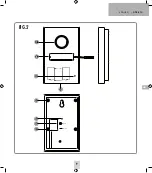
1) Remove the screw (10) on the outdoor station in order to be
able to lift the front casing section from the lower section.
2) Carefully lever off the four rubber covers (13) on the back with
a screwdriver in order to reach the screws below them.
3) Remove the 4 and carefully open the casing.
4) Slide the switch on the PCB to the left.
5) To change the volume, both buttons can be used. Briefly pressing
the right-hand button will increase the volume by one level and
briefly pressing the left-hand button will decrease it by one level.
6) Repeat steps 3) to 1) to reassemble the housing.
7) To activate the chime again later, slide the switch to the right.
Changing the coding
(important: only necessary in case of malfunction)
1. Power up remote station.
2. Press and hold the button at the back (by using a paper clip,
for example).
3. Briefly press the call button. The remote station will beep
to confirm this.
4. Press and hold the talk button of the handset and activate it.
5. Release the talk button when the LED (2) lights up green.
6. Briefly press the talk button.
7. Both the remote station and the handset will beep to confirm
the successful code input.
If you have a second remote station, please repeat points 1 through 5
with that second station and finish by briefly pressing the button for
decreasing the volume (5.2). Both the second remote station and the
handset will beep to confirm the successful code input.
Attention
: If there is a second handset, this must be initiated again
after the code has been changed (see ‘Pairing the second base unit’).
Pairing a second internal unit
(available as an accessory, mod. ADF-501 EX)
To set up an additional receiver, proceed as follows:
At the second
(new) internal unit
1) Switch the internal unit to „OFF“ via the switch (5).
2) Press the button (5.2) to reduce the volume and hold it down.
3) Switch the internal unit on again via the switch (5) while still
holding down the button (5.2).
4) The bottom LED (4) now lights up.
At the first internal unit
(which is already paired with the external station)
1) Switch the internal unit to „OFF“ via the switch (5).
2) Press and hold down the talk button.
3) Switch the internal unit on again via the switch (5) while still
holding down the talk button. The Power LED now lights up green.
4) Release the talk button.
5) Press the button (5.2 to reduce the volume) once; the internal
unit emits a beep if pairing has been completed successfully.
5. INFORMATION
Information regarding CE - Conformity
The functionality of the unit can be affected by the influence of strong
static, electrical or high frequency fields (discharging, mobile phones,
radios, microwaves).
Cleaning and maintenance
Always disconnect mains powered units from the mains supply before
cleaning (disconnect the plug). The unit housing can be cleaned using
a soapy soft cloth. Do not use any abrasive materials or chemicals.
Remove dust build-up from ventilation slits using a brush and clean up
using a vacuum cleaner. Do not hold the vacuum cleaner nozzle directly
against the unit.
Safety instructions
In the event of damage to the housing, connectors, power cables or
isolation shielding, switch off the device immediately and disconnect
from the mains power. ELECTRIC SHOCK – DANGER OF LOSS OF LIFE.
(Unplug the mains connector from the socket!). Damage should be
repaired immediately by a specialist!
Never carry out repairs yourself!
The warranty will be null and void in case of damages arising from
violations of these operating instructions. We are not liable for
consequential damages!
We accept no liability for material damages or injuries arising from
inappropriate use or violation of the safety instructions. In such cases
all warranty claims are null and void!
Do not use this product in hospitals or other medical facilities. Although
this device transmits only relatively weak radio signals, the signals may
Summary of Contents for ADF-501 EX
Page 1: ...ADF 510 ADF 501 EX BETRIEBSANLEITUNG OPERATING INSTRUCTIONS MODE D EMPLOI GEBRUIKSAANWIJZING...
Page 3: ...DE DEUTSCH ADF 510 3 ABB 2...
Page 8: ...GB ADF 510 ENGLISH 8 8 FIG 1...
Page 9: ...GB ENGLISH ADF 510 9 FIG 2...
Page 14: ...FR ADF 510 FRAN AIS 14 ILL 1...
Page 15: ...FR FRAN AIS ADF 510 15 ILL 2...
Page 20: ...ADF 510 NEDERLANDS NL 20 AFB 1...
Page 21: ...NL NEDERLANDS ADF 510 21 AFB 2...
Page 26: ......
Page 27: ......


