background image

Page 17

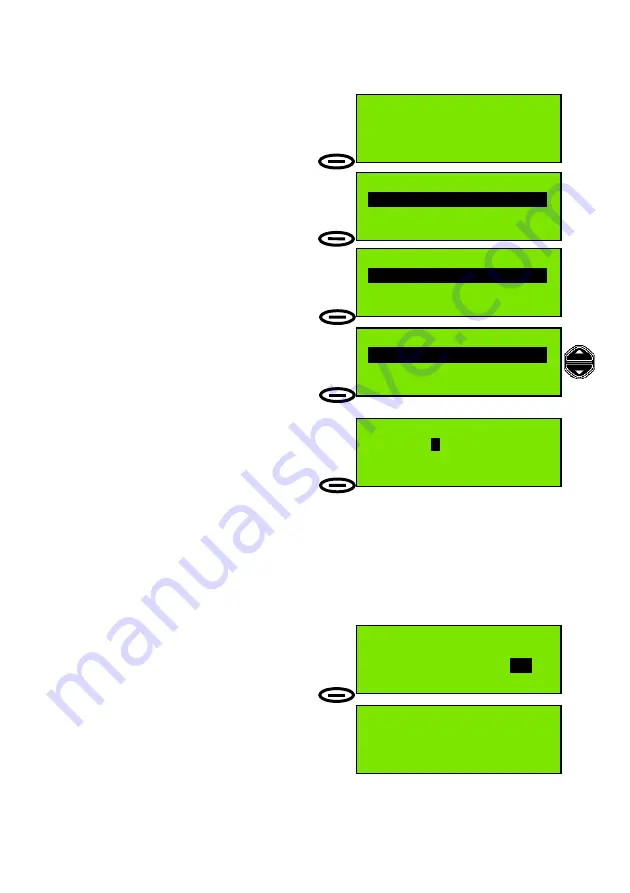
Transmitting an Individual DSC Call Using Called Station Name

To Transmit an Individual Call Using Station
Name:

1

. Press 

Menu

 action key  to  display top level 

menu selection; (

Send DSC messages

).

2

. Press 

Select

 action key to display the 

Send DSC Messages

 menu.

3

. The first (default) option displayed in the 

Send DSC Messages

 menu is 

Individual or group

This call is to an individual station so press 

Select

 to display the 

Individual or group

 menu.

4

. The first option displayed in the 

Individual or group

 menu is 

Called stn MMSI

.

Use the Scroll keys to change the option to  

Called stn Name

  then press 

Select

.

5

. The display shows 

Called stn Name

  and 

a station name. The example here is 

SeaMist

. Use the Scroll keys to move through

the directory and change the station name. 
The numeric keys also have an alternate
function, allowing characters to be entered. Using this feature it is possible to enter
the initial character for the station name, which causes the F1 radio to search for
that name. If the F1 finds the name it will display the station name and MMSI ready
for a DSC transmission. If not it will attempt to display the closest alphabetically
matched name from the directory. For more details on this feature see the ‘Directory
: Adding a Directory Entry’ section of this manual.
When the desired station name is displayed press 

Select

.

6

. Now the radio prompts for a working

channel 
number to include in the DSC message. If the 
current channel is OK press 

Send

, otherwise 

use the scroll keys or numeric keys to 
change the channel, then press 

Send

.

The message is now transmitted and the radio 

display shows 

Wait for Acknowledge

. The

radio will remain in this state waiting for acknowledge for 5 minutes or until 

Reset

 is

pressed. 
If acknowledgement is received the radio switches to the specified working channel 

50

°

56'N        at:08:41

001

°

34'E     UTC

Menu       

16

      Pos

  Send DSC Messages  

Select  


Exit

  Send DSC Messages

Individual or group 

Select   


Back

Individual or group

   Called stn Name


Select  


Back


Called stn Name

   Name:

S

eaMist

Select   


Back


Individual Call

Call stn: SeaMist
Working Channel:

 6

Send    


Back


Individual Call

Call stn: SeaMist

Wait for Acknowledge

Reset   


Back

Summary of Contents for F1 DSC

Page 1: ...McMurdo F1 DSC Marine VHF Radio with DSC Operation Manual ...

Page 2: ...aims any liability for consequences arising from omissions or inaccuracies in the manuals and documentation provided with this product 2002 McMurdo Ltd IMPORTANT Before you use this transceiver read and understand all the instructions in this manual Power switch Distress cover PTT switch Left action key Right action key Indicators Scroll keys ...

Page 3: ...ion keep pressing the Distress Button Do not release the button until you see this screen 4 Wait approximately 15 seconds for an acknowledgement 5 When the acknowledgement is received the radio switches automatically to Channel 16 Pick up the microphone press the PTT TALK button and call for help MAYDAY MAYDAY MAYDAY This is Ship name Ship name Ship name MAYDAY This is Ship name Callsign Position ...

Page 4: ...DSC messages VHF DSC Radios VHF radios communicate on fixed frequency bands called channels There are 57 public channels numbered 1 to 28 and 60 to 88 The system is different in US waters setting the radio to US changes to that system Some channels are reserved for particular functions Channel 16 is reserved for verbal distress calls and for All Stations calls This channel must NOT be used for oth...

Page 5: ...alling is a system for establishing communication to a specified address to a group a pre defined set of addresses or to all parties for a digital distress call The key feature of the DSC system is the use of the vessel s MMSI Maritime Mobile Station Identity number to identify each vessel This number is treated as the vessel s DSC telephone number Consequently before a DSC call can be made the or...

Page 6: ...Instruction to take particular care when performing an action that may have serious consequences such as personal injury electric shock or fire hazard Advice or information to prevent equipment damage Highly relevant information Possible safety implications example position information could be omitted from a DSC Distress transmission if instruction disregarded Inconvenience may occur if advice di...

Page 7: ...n a position where a the controls of your vessel may be obstructed b it may obstruct your normal movement around your vessel c it may cause bodily injury d it cannot be easily accessed in an emergency Use WARNING Certain parts of the chassis can become hot during extended periods of operation notably the rear panel connectors and radiator fins Avoid touching these areas when the radio is operating...

Page 8: ...s channel False alarms cost lives and money Do not make unjustified Distress Calls Information you overhear but not intended for you must remain private and should not be used or repeated Do not use profane or indecent language IMPORTANT In most countries the operator of the transceiver must possess a current radio telephone licence and the equipment must be registered Call Sign and MMSI number Pl...

Page 9: ...ming 14 Auto Dim 14 Basic DSC Operations 15 Receiving an Individual DSC Call 15 Transmitting a DSC Call to a Ship Station 16 Transmitting an Individual DSC Call Using Called Station Name 17 Transmitting a Call to a Coast Shore Station 18 Transmitting a Call to a Group 20 Full Telephony Operations 21 Changing the Priority Channel 21 Dual watch 22 Channel scanning 23 Scan program 23 Incoming DSC Cal...

Page 10: ...Key Beep 41 Channel Mode 41 Speaker Settings 42 Notify Beep Volume Alarm Volume 42 Auto Dim 43 Software Version 44 Position Indication 44 Time Date and Offset 45 Radio Test 46 APPENDICES 1 Appendix A Character Entry 1 Appendix B Menu Hierarchy 2 Appendix C Error messages Troubleshooting 4 Appendix D Channel Specifications 9 International 9 US Channels 10 BI Channels 11 OTHER INFORMATION 1 Line of ...

Page 11: ...a standard rotary control It controls the volume of both the internal and external speakers Squelch The Squelch knob sets the level at which signals become audible It is used to suppress the background noise and should be set at the point where the noise is just inaudible Setting Squelch at too high a level may suppress weak signals Power switch Distress cover PTT switch Left action key Right acti...

Page 12: ...l alternately display the selected channel number and channel 16 at a rate which is controlled by the scan dwell time refer to the Setting Profiles section for information on this parameter Pressing the dual watch button again cancels the dual watch and returns the radio to a listening watch on the selected channel light This button controls the backlighting of the display and keyboard When the bu...

Page 13: ...s displays the positional data if any last acquired by the radio either from numeric entry or from the electronic NMEA interface and allows these data to be changed manually PTT key PTT switch Press to Talk key Press and hold the PTT key to make a voice telephony call Release the PTT key when you stop talking Indicators US This indicator lights to show that the radio is operating with the US speci...

Page 14: ...n the standby screen the left action key function indicator is associated with the button to the lower left corner of the display and the right action key function indicator with the lower right button see example above so if the user pushes the button labelled Pos the display will change to the Position screen and the Pos key will have a different function it will become the Exit key Standby scre...

Page 15: ...selection of the desired option left Action key again Once the desired option has been selected or the user decides not to effect a change then the right Action key normally labelled Back or Exit is pressed to return to previous menu levels and ultimately to the standby screen This example shows the effect of pressing Menu followed by a single press of the Scroll Up key Subsequently pressing the L...

Page 16: ...te information is represented on the display by blanks The screen now appears as follows Time date and position information can now be entered manually using the Update Action key Note until the user enters time date and position information the radio will emit a beep every minute as a warning that important safety data will not automatically be sent with DSC messages Entering Time Date and Positi...

Page 17: ... will not update the radio clock time 3 It is a static time which should be updated every 4 hours as a minimum where no GPS data source is available Clock time and date is set in Profiles 4 accessible via the Menu Action key 3 The radio internal clock operates only when power is available to the radio and must be manually set or the clock sets itself using a GPS data source 4 Please refer to the S...

Page 18: ... channel is required press the scroll keys or to increase or decrease the channel number or use the numeric keys to set the channel directly See also Private Channels 3 Set volume control to a comfortable level A suitable starting level is with the volume control rotated fully anti counter clockwise and then rotated a few degrees clockwise 4 a Rotate the squelch control fully clockwise to squelch ...

Page 19: ...Page 9 See also Setting Channel Numbers on page 9 ...

Page 20: ...anged using the scroll keys or by entering the channel number from the keyboard when in standby mode To change a channel using the keyboard press a numeric key example 2 The existing channel setting clears and 2 appears channel indication section of the display If no other numeric key is pressed within 2 seconds then the F1 radio is set to channel 2 If another numeric key is pressed example 3 then...

Page 21: ...Page 11 See also Private Channels on page 8 ...

Page 22: ... this is incorrect Returning to Channel 16 To return to channel 16 5 simply press the dedicated key This will immediately return the radio to the standby mode from any other mode example menu mode and set channel 16 5 Channel 16 is the internationally agreed channel for initial contact only 6 TX indicator is lit when the PTT key is pressed If PTT is pressed for more than 5 minutes the F1 radio sto...

Page 23: ... Settings Press Select 6 Scroll to the desired speaker mute option Int Ext on off Int Ext on on Int Ext off off Int Ext off on Then press Select 7 In the example both speakers will be unmuted Press Select action key to execute the change and return to standby mode NOTE Alarm tones will not be muted 50 56 N at 08 41 001 34 E UTC Menu 68 Pos Send DSC Messages Select Exit Profiles Select Exit Profile...

Page 24: ...inutes with no activity the display backlight will be set to Dim To switch off the Auto Dim feature 1 Press Menu then use the Scroll keys to highlight Profiles then press Select Now use the Scroll keys to highlight Display settings in the Profiles menu then press Select 2 In the Display Settings menu use the Scroll keys to highlight Automatic Dim On Off then press Select 3 The Automatic Dim On Off...

Page 25: ...ge the message press Select 4 You now have a choice Transmit Acknowledge Yes default No Use the scroll keys to change the option to acknowledge the received message 5 Press Select to transmit a DSC acknowledgement A DSC Acknowledge message is transmitted and the display briefly shows Acknowledge sent and the MMSI of the called station The radio now switches to the caller proposed channel ready for...

Page 26: ...entered then press Select 6 Now the radio prompts for a working channel number to include in the DSC message If the current channel is OK press Send otherwise use the scroll keys or numeric keys to change the channel then press Send 7 The message is now transmitted and the radio display now shows Wait for Acknowledge The radio will remain in this state waiting for acknowledgement for 5 minutes or ...

Page 27: ...rch for that name If the F1 finds the name it will display the station name and MMSI ready for a DSC transmission If not it will attempt to display the closest alphabetically matched name from the directory For more details on this feature see the Directory Adding a Directory Entry section of this manual When the desired station name is displayed press Select 6 Now the radio prompts for a working ...

Page 28: ...n the Individual or group menu is Called stn MMSI If you know the MMSI of the Coast Station press Select to display the Called stn MMSI entry screen 7 7 If you want to make a Station Name Call to the Coast Station follow the procedure outlined in Transmitting an Individual DSC Call Using Called Station Name page 17 steps 4 5 and select a station name associated with a coast station MMSI then proce...

Page 29: ...ect to Send Press Send 8 The message is now transmitted and the radio display now shows Wait for Acknowledge The radio will remain on this state waiting for acknowledge for 5 minutes or until Reset is pressed If acknowledgement is received the calling station acknowledge message includes the channel for verbal communication The F1 radio will then switch to that channel In this example the Coast St...

Page 30: ...d Clear to backspace and correct any error Ensure 9 digits are entered then press Select 6 The radio recognises the 0 prefix as a group call the display changes to Group Call and the radio prompts for a working channel number to include in the DSC message If the working channel is not OK use the Scroll keys or numeric keys to change the channel then press Send 7 The message is now transmitted to t...

Page 31: ...irst option displayed in the Profiles menu is Scan dwell time Press the down scroll key 3 times until the option displayed is Channel mode then press Select 5 The first option in the Profiles menu is Channel mode Press Select 6 The option setting displayed in the Channel mode menu is either International or US Press Select 7 The radio prompts for the Priority Channel number highlighted Use the scr...

Page 32: ... detail The Additional Channel can be any available channel Dual Watch starts by watching the Additional Channel for 850 milliseconds ms then sampling the Priority Channel for 150ms and returning to the Additional Channel for 850ms This sequence continues until activity is detected on one of the channels If activity is detected on the Priority Channel the scanning sequence will be stopped for the ...

Page 33: ...0 milliseconds ms to 1 8 seconds in steps of 50 ms The Channel Dwell Time can only be varied for the channels in the Scan Program The dwell time for the Priority Channel remains 150 ms To setup the radio for scanning refer to the Scanning All Channels Creating and Editing a Scan Program section Incoming DSC Call During Scanning and Dual Watch During Scan or Dual Watch incoming DSC calls will be di...

Page 34: ...ormally Channel 16 is monitored for activity If activity is detected on any channel the radio will stop scanning and channel on which activity was selected will remain selected After 5 seconds of no activity on the channel the radio will resume scanning NOTE During channel scan channels with a 1W maximum transmission power requirement cause the radio to select 1W power for those channels This is t...

Page 35: ...ps 1 and 2 above To restore the original Scan All state all channels scanned press the Back key then the Select key Scanning is then resumed for all channels Running a Scan Program 1 9 To Run a Scan Program Scan Program 1 to Scan Program 9 1 In standby screen press Menu then scroll to Channel scanning and press Select 2 Scroll to Run scan program and press Select 3 Display shows Scan ALL Scroll to...

Page 36: ...s to highlight a Scan Program to create or edit Scan programs 01 to 09 are available Press Select 6 Scan Program 01 is used in this example Press Select to begin editing the program 7 Edit screen for Scan Program 01 is displayed No channels entries have been found in this Scan program so the first channel entry number 1 of a possible 30 entries is shown with the channel number field displayed as x...

Page 37: ...ry use the Scroll Up key to highlight and re edit the entry then continue adding entries as normal If the entry you re edited was several entries further up the list use Scroll Down to move past the correct entries until the first vacant entry position is again highlighted 10 Continue to enter channel numbers into the remaining entries 3 to 5 Press Store to save the Scan Program 11 Display confirm...

Page 38: ...ossible wait 15 seconds for any DSC acknowledgement before transmitting Pick up the microphone press the PTT TALK button and call for help MAYDAY MAYDAY MAYDAY This is Ship name Ship name Ship name MAYDAY This is Ship name Callsign Position Nature of distress Help needed any other information OVER Ò Distress Call Undesignated Wait for Acknowledge Reset 16 DISTRESS IMPORTANT To send a Distress Call...

Page 39: ...The display now shows the Nature of Distress menu Undesignated distress is the first option To select a different Nature of Distress option use the Scroll keys to scroll through the list of options 5 When you see the Distress option you need press Select Example Collision Distress Call Hold for 5 seconds or quit for options Options Back Nature of Distress Collision Select Back Ò NOTE This sequence...

Page 40: ... 11 If no acknowledgement received the F1 radio will wait for a random time between 3 5 and 4 5 minutes then automatically retransmit the Distress alert The radio will continue to retransmit the Distress message every 3 5 to 4 5 minutes until acknowledgement is received or Reset is pressed Distress Call Hold for 5 seconds or quit for options Ò Distress Call Hold for 4 seconds or quit for options D...

Page 41: ...ement or if Reset is pressed In the Distress in progress state the distress message is not re transmitted 14 Wait approximately 15 seconds for an acknowledgement before transmitting a voice MAYDAY as described on Page 26 step 4 Distress in progress Reset 16 Distress acknowledge received IMPORTANT Do NOT make a distress call unless there is grave and imminent danger It is an offence to make any unj...

Page 42: ...nformation is now valid You can choose not to send a Distress Message press Back or to enter your position use numeric and scroll keys then press Done or to continue to the Distress Options press Options or to override the position entry prompt to continue to the Distress Options keep pressing and holding Distress Button Now apply steps 4 14 in the section To make a Distress Call including Nature ...

Page 43: ...fter a Safety message is prefixed SECURITÉ SECURITÉ SECURITÉ To transmit an All Ships call 1 Press Menu action key to display top level menu selection Send DSC messages 2 Press Select action key to display the Send DSC Messages menu 3 The first default option displayed in the Send DSC Messages menu is Individual or group so use the Scroll keys to change the option to All Ships then press Select 4 ...

Page 44: ... 7 The message is now transmitted to All Ships If acknowledgement is received the radio channel changes to the working channel and the left action key now has the function Reset The radio will remain on this state for 30 seconds or until Reset or PTT is pressed then it will revert to a listening watch standby screen All Ships Call Safety Working Channel 6 Send Back 50 56 N at 08 42 001 35 E UTC Re...

Page 45: ...press Select otherwise as in this example use the scroll keys to highlight Ordinary Messages 5 Press Select If no messages are stored the display shows Log empty 6 The number of messages are listed maximum 20 together with an indication of the message to select and the time and date that message was received Press Read 7 The details of the call are now displayed In this example an Individual call ...

Page 46: ...s are treated in exactly the same way but are stored and accessed from the Distress Log Note While a call is being displayed the left Action key shows Select if no acknowledgement has been sent and the message is of the type which can be acknowledged or Reset if the message has been acknowledged In the first case pressing Select produces a prompt to acknowledge the message It is thus possible to d...

Page 47: ...ing d wait two seconds after the key was last pressed for the cursor to move to the next character position In the example screen the first 2 characters of the name Seamist are entered for upper case followed by 4 presses of the key the again lowercase then 2 presses of the key 5 If an incorrect character is entered the Clear key deletes the last character If an error is noticed in the middle of a...

Page 48: ...of names or enter the first character using the character entry method described in Adding a Directory Entry steps 4 and 5 to find the desired entry wait until the first name starting with that letter is displayed then the other names which also start with the same letter can then be accessed by scrolling This method is much faster for finding names towards the end of the alphabet particularly if ...

Page 49: ...radio can transmit in DSC mode 1 From the standby screen press the Menu key 2 Scroll through the options to find Profiles Press the Select key 3 Scroll to MMSI number and press Select 4 The first option displayed in the MMSI number menu is Ship MMSI number Press Select 5 The MMSI number appears as 000000000 this must first be cleared Press the Clear key repeatedly until the number is blank Careful...

Page 50: ...n showing the group MMSI is then displayed and it is possible to Edit the number again or use the Back Exit key to return to the standby screen Unlike the individual MMSI number Group MMSIs can be edited and deleted Scan Dwell Time The Scan Dwell Time is the length of time the radio monitors each channel when in Scan mode To set the Scan Dwell Time 1 In standby screen press Menu then scroll to Pro...

Page 51: ... the scroll keys Additionally Priority Channel can be changed in this menu To set Channel Mode 1 In standby screen press Menu then scroll to Profiles and press Select 2 Scroll to Channel mode and press Select 3 Scroll between the options International and US When the desired option is displayed press Select 4 International mode is selected in this example Scanning priority channel may now be set U...

Page 52: ...Telephony Operations Notify Beep Volume Alarm Volume This control sets the volume of the alarm used to attract the attention of the operator The scroll keys change the volume level To set Notify Beep Volume 1 In standby screen press Menu then scroll to Profiles and press Select 2 Scroll to Notify beep and press Select 3 Scroll through volume levels 10 30 The Notify beep is heard for each scroll ac...

Page 53: ...ous setting Auto Dim The F1 radio provides an Auto Dim feature The default state is Auto Dim On In this state if the display backlight is set to Full after 5 minutes with no activity the display backlight will be set to Dim To change the settings of this feature 1 In standby screen press Menu then scroll to Profiles and press Select 2 Scroll to Display settings and press Select 3 Scroll to Automat...

Page 54: ...ge the settings of this feature 1 In standby screen press Menu then scroll to Profiles and press Select 2 Scroll to Position indication and press Select 3 Scroll between the options Display On Off and Enhanced position When the desired option appears press Select 4 Scroll between On and Off states for Display On Off or Enhanced position When the desired state is shown press Select The enhanced pos...

Page 55: ... mm field Use the numeric keys to change the time 5 To complete the change and move to the date entry screen press Done 6 Use the scroll keys to move the cursor position in the DD MM YYYY field Use the numeric keys to change the date To set Time Offset 1 In standby screen press Menu then scroll to Profiles and press Select 2 Scroll to Time Date and Offset and press Select 3 Scroll to Set Time offs...

Page 56: ...ly one test option in this radio version With Self test highlighted press Select 4 Observe the progress of the test display shows Self test running and watch the indicator LEDs flash progress bar on display advance and hear the beeps which track progress 5 When the test is complete you should see the message No errors found If the display shows anything else please refer to Appendix C Error Messag...

Page 57: ... 1 to 5 presses until the desired character is displayed as shown in the table below First press Second press Third press Fourth press Fifth press SPC 0 1 a A b B c C 2 d D e E f F 3 g G h H i I 4 j J k K l L 5 m M n N o O 6 p P q Q r R s S 7 t T u U v V 8 w W x X y Y z Z 9 Toggles upper and lower case character entry 1 2abc 3def 4ghi 5jkl 6mno 7pqrs 8tuv 9wxyz 0 1 2abc 3def 4ghi 5jkl 6mno 7pqrs 8...

Page 58: ...Appendix Page 2 Appendix B Menu Hierarchy ...

Page 59: ...Appendix Page 3 ...

Page 60: ...ution This may be caused by a checksum error or other internal fault If the error is still present after the radio is switched off and on again then it will be necessary to consult a Service Agent because the radio may be using incorrect information and may try to operate outside its design limits When the radio switches on it tries to find a source of GPS derived positional information via the NM...

Page 61: ...t the error s This is a non critical error and the radio can be used as normal press OK If the error persists or recurs it is advisable to contact a Service Agent Checksum of Profiles is invalid The radio will reset all Profiles to the default state when OK is pressed Checksum of Scan Programs is invalid The radio will clear Scan Programs to default when OK is pressed Checksum of DSC Log data is i...

Page 62: ...ty reasons you should re enter your position or if GPS is available connect your GPS unit The radio synthesiser lock could not be confirmed This can cause problems with transmission and reception Operation of the radio is inhibited If the fault persists after the radio is switched off and on again then it will be necessary to consult a Service Agent A fault was found when checking data in the proc...

Page 63: ...rect value Out of range possible messages Invalid character Latitude Degrees Latitude Minutes Latitude Seconds Longitude Degrees Longitude Minutes Longitude Seconds Please re enter correct value Scan Program empty An attempt was made to run an empty Scan Program Please use Edit Scan Program to enter channels into the Scan Program Scan Program full An attempt was made to add more than 30 channels i...

Page 64: ...ry Message Log No messages were received Busy DSC Channel If not sending a Distress message and if the DSC Channel is not free then a message Sending is displayed while the channel is busy radio not squelched Busy DSC Channel If the radio is squelched it will look for a free DSC Channel after 1 10 seconds random After 4 5 minutes without a free DSC Channel or after Reset is pressed the display sho...

Page 65: ...100 161 700 23 157 150 161 750 24 157 200 161 800 25 157 250 161 850 26 157 300 161 900 27 157 350 161 950 28 157 400 162 000 Channel Tx MHz Rx MHz SIMPLEX Intership Port DUPLEX Port Public 60 156 025 160 625 61 156 075 160 675 62 156 125 160 725 63 156 175 160 775 64 156 225 160 825 65 156 275 160 875 66 156 325 160 925 67 156 375 156 375 68 156 425 156 425 69 156 475 156 475 70 156 525 156 525 D...

Page 66: ... 157 400 162 000 Channel Tx MHz Rx MHz SIMPLEX DUPLEX 60 61 156 075 160 675 62 63 156 175 160 775 64 156 225 160 825 65 156 275 160 875 66 156 325 160 925 67 156 375 156 375 68 156 425 156 425 69 156 475 156 475 70 156 525 156 525 DSC 71 156 575 156 575 72 156 625 156 625 73 156 675 156 675 74 156 725 156 725 75 156 775 156 775 76 156 825 156 825 77 156 875 156 875 78 156 925 156 925 79 156 975 15...

Page 67: ... 150 161 750 24 157 200 161 800 25 157 250 161 850 26 157 300 161 900 27 157 350 161 950 28 157 400 162 000 Channel Tx MHz Rx MHz SIMPLEX Intership Port DUPLEX Port Public 60 156 025 160 625 61 156 075 160 675 62 156 125 160 725 63 156 175 160 775 64 156 225 160 825 65 156 275 160 875 66 156 325 160 925 67 156 375 156 375 68 156 425 156 425 69 156 475 156 475 70 156 525 156 525 DSC DSC 71 156 575 ...

Page 68: ......

Page 69: ...6 6 8 6 13 8 1 3 8 4 5 6 1 7 2 9 3 14 4 3 5 4 6 1 7 7 8 8 10 9 16 1 5 6 6 7 2 8 8 10 0 12 0 17 2 10 8 6 9 2 10 9 12 0 14 1 19 3 Ship antenna height metres 30 13 8 14 4 16 1 17 2 19 3 24 4 Distances are nautical miles The illustration shows the line of sight the curvature of the Earth is exaggerated for clarity ...

Page 70: ...s must be made under the above warranty in writing as soon as practicable after discovery of the defect or failure and within the warranty period referred to above Proof of purchase will be required The claim should be sent together with the product in question to the address set out below or to an Approved Service Agent Following a valid warranty claim McMurdo Limited shall be entitled to repair ...

Page 71: ...Declaration of Conformity The Declaration of Conformity is provided as a separate document ...

Page 72: ......

Page 73: ...Notes ...

Page 74: ...cord Serial No MMSI Date of Purchase Dealer Stamp McMurdo Ltd Silver Point Airport Service Road Portsmouth Hampshire United Kingdom PO3 5PB A member of Chemring Group PLC www mcmurdo co uk 84 697 Issue 1 ...

Reviews: