11
settings
- Geofence Setup
settings
- Geofence Setup
12
|
settinGs continued
Geofence functionality will alert the carer when the wearer (person wearing watch)
has exited a pre-defined perimeter. Tap on different areas to create connected
points. After creating the shape you may modify the fence directly by Tapping and
dragging perimeter.
Alerts will be sent immediately when wearer moves out of area. Carer will receive
one more alert every hour as long as it is in the set time period and still outside
Geofence area. This will also appear in the History Records under Geofence.
NOTE:
GPS and WiFi will locate a position once every five minutes and report
location, if wearer is not in safe zone then it will trigger an alert. Only alert
notification will be sent to carer then they can send an On-Demand Location
request to locate the wearer.
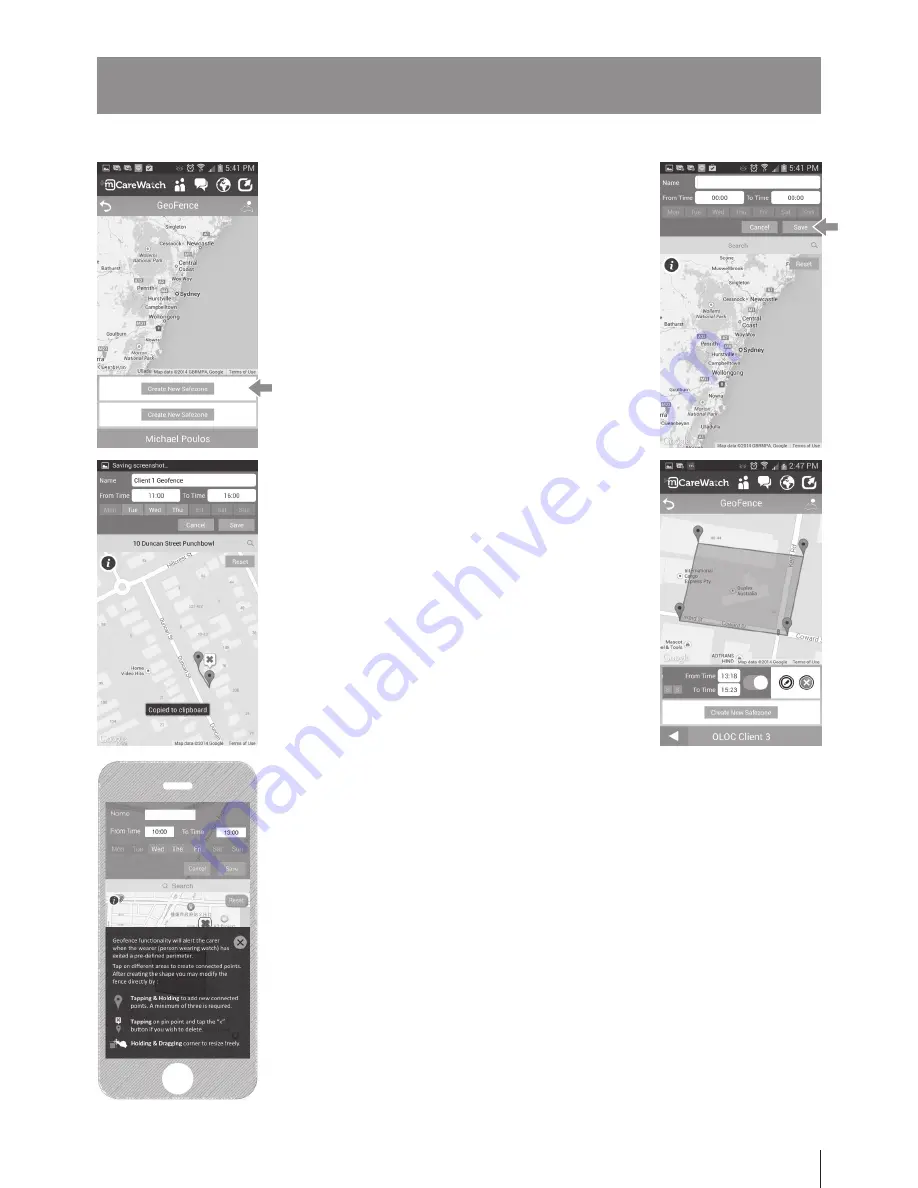
Tap onto Geofence button under Settings Menu.
Carers can setup a safe zone perimeter for the wearer
and receive an alert once wearer moves outside that
Geofence area.
- Tap on create new Safe Zone.
- Then enter the Geofence details such as name,
time period and days included.
- Define safe zone by either drilling down map
by pinching the screen to open up and select a
location. Or in the search field type the address
you are looking for and press search.
- Once you have location address, Carer can
create safezone then tap screen to drop pins
and create Geofence.
- Carer can delete any pins displayed just by
tapping on it and an “X” shows up on top of pin.
Press “X” to delete.
- Then press Save button
- If you need to edit a created Safe zone
(Geofence) then swipe finger across the created
record displayed (right to left). This will display
the Edit and Delete buttons.
ALSO NOTE THAT THE GEOFENCE FEATURE USES DATA BASED ON HOW
OFTEN THE WATCH PINGS/REPORTS TO SOFTWARE PLATFORM. TO
ENSURE YOU DO NOT GO OVER YOUR ALLOCATED DATA PLAN PLEASE
RESTRICT TO APPROPRIATE REPORTING INTERVALS,
IE. WEARER IS PRONE TO WANDER BETWEEN 10AM AND 3PM.


