background image

15

Oven Cooking

Oven Racks

Lower Oven

• Is equipped with two regular flat racks.

To remove oven racks:

• Pull rack straight out until it stops at the lock-stop position;

lift up on the front of the rack and pull out.

To replace oven racks:

• Place rack on the rack support in

the oven; tilt the front end up
slightly; slide rack back until it clears
the lock-stop position; lower front
and slide back into the oven.

CAUTION

Do not

 attempt to change the rack position when the oven

is hot.

Do not

 use the oven for storing food or cookware.

All racks are designed with a lock-stop edge.

Upper Oven

• Is equipped with one rack and rack

position.

• When pulling the upper oven rack out to

remove or check food, grasp the 

top edge

of the rack.

Rack Positions 

(lower oven)

RACK 5:

  (highest position)

Use for toasting bread or broiling very thin foods and
two-rack baking.

RACK 4:

Use for two-rack baking and for broiling.

5

4

3

2

1

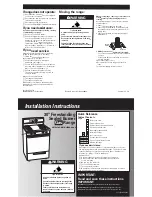
Baking Layer Cakes on Two Racks

For best results when baking cakes on two racks, use racks 2
and 4.

Place the cakes on the rack as shown.

RACK 3:

Use for most baked goods on a cookie sheet or jelly roll
pan, layer cakes, fruit pies, or frozen convenience foods,
and for broiling.

RACK 2:

Use for roasting small cuts of meat, casseroles, baking
loaves of bread, bundt cakes or custard pies, and two-rack
baking.

RACK 1:

Use for roasting large cuts of meat and poultry, frozen
pies, dessert souffles or angel food cake, and two-rack
baking.

Multiple Rack Cooking:

Two rack: 

Use rack positions 2 and 4, 1 and 4, or 2 and 5.

Summary of Contents for Precision Touch 500 Series

Page 1: ...trol Manual Clean Lower Oven Control Self Clean Baking Cook Hold Delay Bake Keep Warm Broiling Lower Oven Only Oven Racks Table of Contents Care Cleaning 16 19 Self Clean Oven Lower Oven Only Cleaning...

Page 2: ...n doors the appliance must be secured by a properly installed anti tip device Read and follow all instructions before using this appliance to prevent the potential risk of fire electric shock personal...

Page 3: ...plied to a hot surface If a wet sponge cloth or paper towel is used on a hot cooking area be careful to avoid steam burn If appliance is installed near a window precautions should be taken to prevent...

Page 4: ...round the doors and oven windows Deep Fat Fryers Use extreme caution when moving the grease pan or disposing of hot grease Allow grease to cool before attempting to move pan CAUTION Before self cleani...

Page 5: ...the appliance is located during the self clean cycle IMPORTANT NOTICE REGARDING PET BIRDS Never keep pet birds in the kitchen or in rooms where the fumes from the kitchen could reach Birds have a very...

Page 6: ...abinet storage is provided directly above cooking surface limit it to items that are infrequently used and can be safely stored in an area subjected to heat Temperatures may be unsafe for items such a...

Page 7: ...hen the surface cools Smoothtop Surface Cooking Areas The cooking areas on your range are identified by permanent circles on the smoothtop surface For most efficient cooking fit the pan size to the el...

Page 8: ...re turning on to prevent scratches To prevent scratching or damage to the glass ceramic top do not leave sugar salt or fats on the cooking area Wipe the cooktop surface with a clean cloth or paper tow...

Page 9: ...ing The oven vent is located below the backguard vent shield on your range OVEN VENT LOCATION Do not place plastics near the vent opening as heat from the vent could distort or melt the plastic Upper...

Page 10: ...seconds after pressing the More or Less pad the time or temperature will automatically be entered If more than 30 seconds elapse between touching a function pad and the More or Less pad the function...

Page 11: ...om the display Fault Codes BAKE or LOCK may flash rapidly in the display to alert you if there is an error or a problem If BAKE or LOCK flash in the display press CANCEL pad If BAKE or LOCK continue t...

Page 12: ...nutes 11 59 BAKE and HOLD light in the display The baking time will light in the display The baking time will start counting down Baking Differences Between Your Old and New Oven It is normal to notic...

Page 13: ...nd place in oven press Keep Warm and More pads to set 170 F warm for 12 15 minutes To warm plates place 2 stacks of up to four plates each in the oven press Keep Warm and More pads to set 170 F warm f...

Page 14: ...ures are carefully tested for accuracy at the factory It is normal to notice some baking or browning differences between a new oven and an old one As ranges get older the oven temperature can shift Yo...

Page 15: ...Broil Broil times may be longer when the lower broiling temperature is selected Most foods should be turned halfway through broiling time 4 For optimum browning preheat broil element for 3 4 minutes...

Page 16: ...oven rack out to remove or check food grasp the top edge of the rack Rack Positions lower oven RACK 5 highest position Use for toasting bread or broiling very thin foods and two rack baking RACK 4 Us...

Page 17: ...he gasket around the oven door The gasket is designed to seal in heat during the clean cycle 5 Wipe up excess grease or spillovers from the oven bottom This prevents excessive smoking flare ups or fla...

Page 18: ...To prevent damage to the door do not force the door open when LOCK is displayed Smoke and Smells You may see some smoke and smell an odor the first few times the oven is cleaned This is normal and wil...

Page 19: ...ever use oven cleaners chlorine bleach ammonia or glass cleaners with ammonia Note Call Glass Ceramic an authorized servicer if the glass ceramic top should crack break or if metal or aluminum foil Sm...

Page 20: ...Manual Clean Clean frequently using mild abrasive cleaners and a plastic pad Do not use metallic scouring pads because they will scratch the surface When using commercial oven cleaners follow the manu...

Page 21: ...in the door with the hinge arms on the range 3 Slide the door down onto the hinge arms until the door is completely seated on the hinges Push down on the top corners of the door to completely seat do...

Page 22: ...ven temperature often drifts and may become hotter or cooler See page 13 for instructions on adjusting the oven temperature Note It is not recommended to adjust the temperature if only one or two reci...

Page 23: ...rn off the odors more quickly Turning on a ventilation fan will help remove the smoke and or odor Excessive food soils on the oven bottom Use a self clean cycle Fault Codes BAKE or LOCK may flash rapi...

Page 24: ...e of your major appliance for repairs This major appliance is designed to be repaired in the home and only in home service is covered by this warranty 8 Repairs to parts or systems resulting from unau...

Reviews: