


20
Lubrication
Lubrication Points
Grease bearings and seals with a grease gun slowly, not faster
than 5 strokes per minute. This avoids seal deformation and
leakage. Do not operate the grease gun faster, even if the
grease contains air gaps. Too much lubrication can cause the
same damage as too little.
Always make sure the grease gun is in perfect condition. Also,
if you change lubricants, make sure the new one is compatible
with the old one; failure to do so can lead to bearing failure.
For example, lithium lubricants are compatible with calcareous
lubricants but not with sodium ones.
NOTE:
Do not mix
petroleum lubricants with silicone lubricants.
■
Lubricant:
Use a multipurpose lithium lubricant containing
high-pressure additives with NLGI 2 consistency, such as
SKF-LGEP 2 or ESSO-BEACON EP 2.
■
Lubricators:
Main bearings and seals are located on the
rear cabinet. Press the lubricant in slowly and let the drum
rotate with the same speed as during washing.
■
Quantity of Lubricant:
2 cm
3
(2 strokes) once a month or
every 200 working hours, whichever comes first.
1. Rubber seal lubricator
2. Front-bearing lubricator
3. Rear-bearing lubricator
Once every 6 months or when needed, grease spring
suspension eyes (see illustration in “Spring Unit”), guide rods
(3), the door handle sleeve (see the illustration in “Thrust of
Door Seal” [2]), and the sleeves in the door brackets (2).
The motor bearings are maintenance-free (do not lubricate).
Pneumatic Lubricator (Models MFS180/230/275 only)
Fill the lubricaor pot with approximately 23 cm
3
of oil. It is
recommended to use non-detergent oil without aggressive
additives and with viscosity of VG32 (ISO 3448), for example,
oil for pneumatic devices or hydraulic oil.
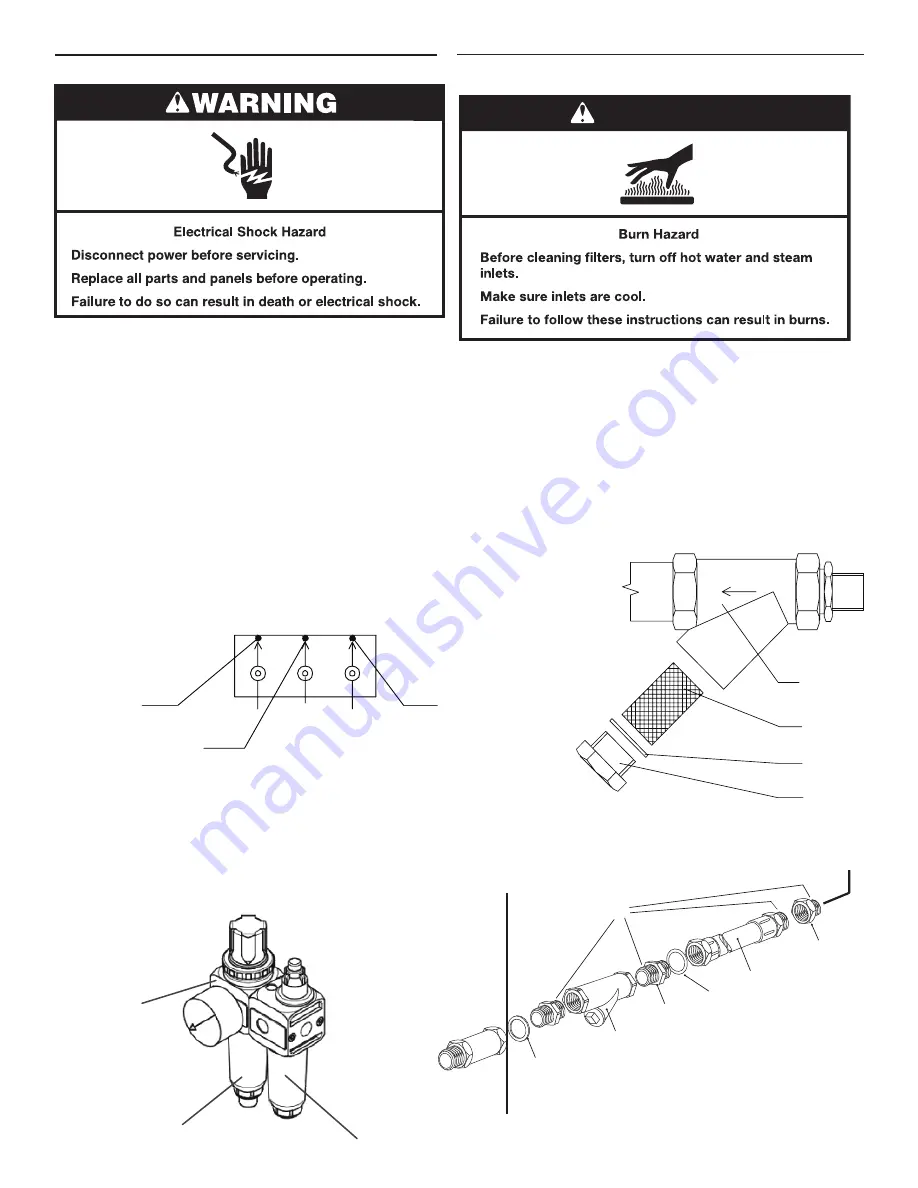
Water and Steam Filters
The washer
is equipped with filters on water and steam inlets
(models with steam heating) (Models MFS180/230/275 only have
a filter for steam). Filters should be cleaned occasionally to avoid
longer water filling times. Cleaning frequency depends on the
quantity of foreign particles in the water line.
Cleaning the Filter:
1.
Turn off the water (steam) inlet.
2.
Unscrew the filter plug and remove the filter sieve (2).
3.
Clean the sieve with running water or with compressed air.
4.
Put the sieve (2) and gasket (3) back on the filter body (1) and
tighten the plug (4).
1. Filter body
2. Filter sieve
3. Gasket
4. Plug
Water Supply Connection
1. Galvanized iron washer
2. Filter
3. Coupler
4. Rubber washer
5. Steel-braided fill hose
6. Adapter BSP to NPT
7. Fixed thread sealant
– Hennep
– PTFE tape
– Loctite 55
Filter
1
2
3
4
1
2
3
6
5
4
3
2
1
7
Rear Bridge of
Wa
sher
To Customer
Installation
1
2
3
1. Pressure regulator
2. Lubricator pot
3. Condensation trap
WARNING