background image

Clip

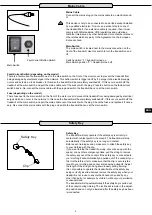
Safety Key

9

ENG

Mains Cable

Safety Key

Mains Cable

Connect the mains plug on the mains cable to an electrical sock-

et.

This device is only to be connected to an earthed socket installed 

by a qualified electrician. Do not use a socket strip to connect 

the treadmill belt. If an extension cable is required, then it must 

comply with DIN standards, VDE regulations and guidelines, 

technical rules issued by other European Union member states or 

other states which are party to the Agreement on the European 

Economic Area.

Main Switch

The main switch is located next to the mains connection on the 

front of the treadmill. Use this switch to turn the treadmill on and 

off. 

Switch position “I” = treadmill turned on. 

Main Switch position “0” = treadmill turned off 

Fault-Current Button Switch

Main Switch

Fault-Current Switch (depending on the model)

There is a fault-current button-switch next to the main switch on the front of the motor cover to prevent the treadmill from 

being damaged by electrical surges in the network. This button-switch is triggered off by if a surge in the electrical supply 

occurs and acts as a circuit breaker. In this case the treadmill will be completely switched off. If this occurs, switch off the 

treadmill at the main switch, and pull the mains cable out of the socket with the plug. Press the button on the fault-current 

switch back in. Re-connect the mains cable with the plug and switch the treadmill back on at the main switch.   

Fuse (depending on the model)

There fuse next to the main switch on the front of the motor cover to prevent the treadmill from being damaged by electrical 

surges which can occur in the network. In this case the treadmill will be completely switched off. If this occurs, switch off the 

treadmill at the main switch, and pull the mains cable out of the socket with the plug. Check the fuse and replace it if neces-

sary. Re-connect the mains cable with the plug and switch the treadmill back on at the main switch.

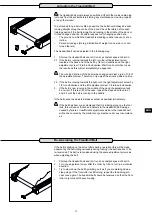
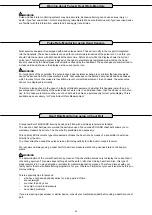
Safety Key

The treadmill will only operate if the safety key is correctly in 

contact with contact point in the cockpit. The treadmill will stop 

automatically if the safety key is no longer in contact.

Before each training session make sure to attach the safety key 

to your clothing with the clip.

If you want to stop the treadmill quickly, cannot keep up with the 

speed, or any other emergency arises, pull the string to remove 

the safety key out of the cockpit. If the safety key is connected to 

your clothing it will automatically be pulled out of the cockpit if you 

fall. It is therefore vital to make sure that the clip is securely fas-

tened to your clothing and cannot somehow be pulled off. Adjust 

the length of the string to hang down loosely during training. 

It is not possible to operate the treadmill without the safety key 

being correctly inserted. Always remove the safety key when your 

treadmill is not in use to ensure that it cannot be used by any 

other third party, for example by children, without your permission 

or unsupervised. 

The treadmill will stop automatically if the safety key is pulled out 

of the cockpit during training. The incline will remain in the adjust-

ed position and can only be lowered after the safety key has been 

re-connected. 

Summary of Contents for 6.4

Page 1: ...1 ENG MAXXUS 6 4 Treadmill I N S TA L L AT I O N O P E R AT I N G M A N U A L...

Page 2: ...a Chest Belt 22 Training Recommendations 23 24 Technical Details 25 Disposal 25 Recommended Accessories 25 Exploded Drawing 26 Parts List 27 Warranty 28 Repairs Contract Notification of a Damage Clai...

Page 3: ...enness in the ground must be re moved or compensated To protect delicate floors such as wood lamina tiles etc and from damage such as scratches it is recommended to put a floor protection carpet piece...

Page 4: ...ng Running Deck Safety Key Hand pulse sensor Base frame Cockpit Side frame Covers Safety Key Lubricating oil Screw set M 8X 65 M 8X 65 M 8X 65 M 8X 65 M8X15 Holder for Tablet PC 4 Tools may be supplem...

Page 5: ...clean and free from obstructions Carry out the assembly with two people Only start using your training device after completely finishing installatio Step 1 Connect the cable that protrudes down from t...

Page 6: ...inders The key component of the folding mechanism is the hydraulic cylinder This is filled with oil under high pressure Should a cylinder be damaged safety in folding the tread is no longer guaranteed...

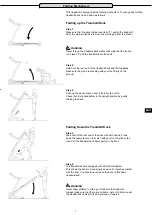
Page 7: ...he ground Step 3 Push up the deck until you hear it lock into the catch Check that it is locked safely in the upright position by gently shaking the deck Folding Down the Treadmill Deck Step 1 Take ho...

Page 8: ...k is resting on the transport rollers Make sure that you are standing with your feet firmly on the ground Step 2 The treadmill can now be moved easily and without much effort Make sure that there are...

Page 9: ...itch on the front of the motor cover to prevent the treadmill from being damaged by electrical surges which can occur in the network In this case the treadmill will be completely switched off If this...

Page 10: ...nother emergency situation arises immediately pull the safety key to trigger the emergency stop Hold onto the handrails with both hands and place both feet on the side treads If you trip during exerci...

Page 11: ...switched off and the power plug is re moved Vacuum the visible dust with the small nozzle of a vacuum cleaner Never use detergent or compressed air under any circumstances Checking the mounting mater...

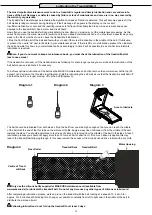
Page 12: ...mains folded up for some longer period you must check the lubrication of the belt before use and lubricate it if necessary To achieve optimum lubrication of the belt use the MAXXUS maintenance oil bot...

Page 13: ...towards the right turn the right adjustment screw by 1 8 turn clockwise and the left adjustment screw 1 8 turn anti clockwise 3 If the belt is now running in the middle of the deck the adjustment will...

Page 14: ...eral formula It is not possible to determine an individual energy consump tion exactly because a large amount of personal data is required The energy consumption displayed is a generally calculated va...

Page 15: ...ble chest belt A chest belt is available as an accessory Hand pulse sensors Used for short term pulse control Please do not touch the hand sensors when wearing a chest belt otherwise incorrect measure...

Page 16: ...buttons for incline or speed Please note that you can only specify one value as the target value Step 3 Training start After entering the desired workout values press the START button The display will...

Page 17: ...get heart rate the treadmill automatically increases the speed If the value is higher the treadmill reduces it The main requirement for using these programmes is a continuous and accurate transmission...

Page 18: ...User Weight The display shows F4 Now enter the user weight by pressing the buttons for speed Entries up to 150 kilo grams are possible Confirm your entry by pressing the M key Step 6 Program start The...

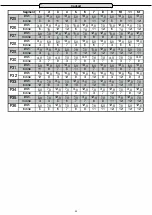
Page 19: ...0 7 0 10 0 10 0 10 0 7 0 7 0 10 0 10 0 Incline 3 8 8 6 9 9 5 5 8 8 8 4 P13 km h 4 0 12 0 4 0 12 0 4 0 12 0 4 0 12 0 4 0 12 0 4 0 12 0 Incline 4 8 10 12 4 8 10 12 4 8 10 12 P14 km h 2 0 3 0 3 0 6 0 9...

Page 20: ...2 12 12 12 12 12 11 P30 km h 4 0 7 0 4 0 7 0 7 0 4 0 7 0 7 0 4 0 7 0 7 0 4 0 Incline 3 7 9 3 7 9 3 7 9 3 7 9 P31 km h 5 0 13 0 5 0 13 0 5 0 13 0 5 0 13 0 5 0 13 0 5 0 13 0 Incline 11 9 7 5 11 9 7 5 11...

Page 21: ...fat 25 carbohydrate and 5 protein Fat burning target zone 60 to 70 of the maximum heart rate This training zone is suitable for athletes and sports people who aim to lose weight Training in this zone...

Page 22: ...defec tive In this case we recommend the use of a chest belt to achieve a permanently correct pulse display This is available as an accessory for Pulse Heart Rate Measurement A large number of MAXXUS...

Page 23: ...ning Do not just get off your training device immediately the training session is finished Like with the warm up stage you should continue for 3 5 minutes at minimum resistance to cool down After trai...

Page 24: ...e most people have training goals such as weight reduction cardiac exercise training improvement of physical con dition stress reduction etc to strive for training intensity to meet these goals should...

Page 25: ...scratches and dirt due to sweat liquids and movement Noises are greatly minimized Available in following sizes 160 x 100 cm 210 x 100 cm MAXXUS silicone Optimal lubricant and cleaning agent for runni...

Page 26: ...26 Exploded drawing...

Page 27: ...33 Spring 1 34 Siderail 2 35 End cap 1 36 Bottle 1 37 Consolehousing 1 38 IPAD pallets 1 39 Screenboard 1 40 Safetykey 1 49 Siderail guider 10 50 Wheel 4 51 AllenC K S half threadscrew M8 40 20 2 52 S...

Page 28: ...ased direct ly from the MAXXUS Group GmbH Co KG or one of the MAXXUS Group GmbH Co KG direct and authorised distribution partners The warranty covers defects caused by production or material faults an...

Page 29: ...29 ENG Notes...

Page 30: ...30 Notes...

Page 31: ...al The remaining fields are mandatory fields that must be completed Fault Description Please enter a short description of the error as precisely as possible below For example when where and how does t...

Page 32: ...Maxxus Group GmbH Co KG Zeppelinstr 2 D 64331 Weiterstadt Germany E Mail info maxxus de www maxxus de...

Reviews: