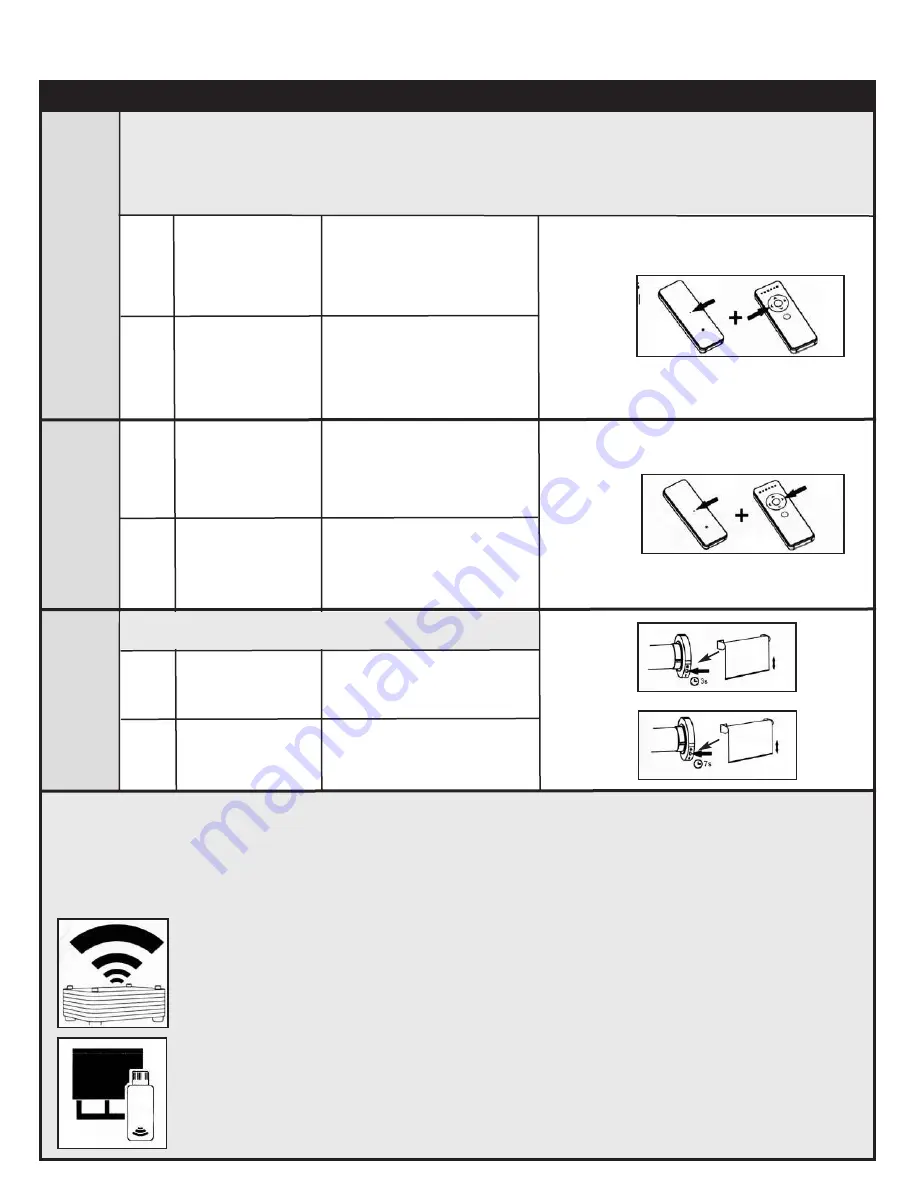
background image

Command

Item

Key Combination

Description

Illustration

Setting 
Favourite
Position 1

Setting 
Favourite
Position 2

Delete all
Remote
Controls

1

2

Use 

UP, STOP and

DOWN

buttons 

The motor will move 
up, down or stop accordingly 
to go to desired favourite 
Position 1

Press the 

SET +

LEFT 

buttons at the

same time for 3 
seconds

2

The motor will move up and 
down to confirm the favourite
Position 1 was saved

Basic Operation - 1 and 5 Channel Remote Controls Continued

Note: 

Once the upper and lower limits are set, the motor can store two favourite positions. After setting the
favourite positions, hold the 

LEFT 

or

RIGHT

button to send the motor to favourite position 1 or 2. 

If you also use the 

Neo Smart Blinds app 

or the 

Neo Smart Blinds Blue app 

to control your blinds,

please read the related topic in the bottom of this page first.

2

1

1

2

Use 

UP, STOP and

DOWN

buttons

Hold the 

HEAD

button for 

3 seconds

Hold the 

HEAD

button for 

7 seconds

The motor will move 
up, down or stop accordingly 
to go to desired favourite 
Position 2

The motor will move up and
down 

The motor will move up and
down 

Press the 

SET +

RIGHT 

buttons at

the same time for 3 
seconds

2

The motor will move up and 
down to confirm the favourite
Position 2 was saved

Favourite Position in the MaxxLink and Bluetooth   

Only the favorite position 1(left button) is accessible to the 

Smart Controller app

. None of the favorite positions set via 

remote control are accessible to the

Blue Link app

, however, you can easily set up a favorite position in the app.

Compatible Products to Automate your Home

MaxxLink

Control your blinds from anywhere using your phone or tablet. Voice commands are available if 
integrated with 

Amazon Alexa or Google Home (Google Assistant).

Bluetooth

Local control of your motorized blinds using your phone or tablet. Set schedules to auto mate 
your home. No need to connect to your Wi-fi or router. 
For more information about our motors, remote controls  and compatible products please visit our   
website: 

neosmartblinds.com

To buy one of these products, please contact your dealer.

1

2

Attention: 

this procedure does not delete upper and lower

limits or the favourite Positions 1 and 2.

Summary of Contents for Cool Motion

Page 1: ...vourite Position 1 Go to Favourite Position 2 Next Channel2 Move the motor to favourite position number 2 Cycle to the next channel or group of channels on the remote making it active 1 The motor will...

Page 2: ...th the motor The motor will move up and down 1 2 Using a previously programmed remote control A hold the SET button on the back of the remote control for 3 seconds Using the new remote control B press...

Page 3: ...move up and down to indicate the process to set up the lower limit has started 1 Use UP STOP and DOWN buttons 2 To go to the desired lower position Press SET button on the back of the remote control...

Page 4: ...gly to go to desired favourite Position 2 The motor will move up and down The motor will move up and down Press the SET RIGHT buttons at the same time for 3 seconds 2 The motor will move up and down t...

Page 5: ...motor to favourite position number 1 Basic Operation 15 and 30 Channel Remote Controls Go Down Stop Step Up Step Down Go to Favourite Position 1 Go to Favourite Position 2 Previous Channel2 Move the m...

Page 6: ...l to pair with the motor The motor will move up and down 1 2 Using a previously programmed remote control A hold the SET button on the back of the remote control for 3 seconds Using the new remote con...

Page 7: ...l move up and down to indicate the process to set up the lower limit has started 1 Use UP STOP and DOWN buttons 2 To go to the desired lower position Just press SET button on the back of the remote co...

Page 8: ...the HEAD button for 3 seconds Hold the HEAD button for 7 seconds The motor will move up down or stop accordingly to go to desired favourite Position 2 The motor will move up and down The motor will mo...

Page 9: ...rgy upon availability Caution Excessive Energy Use If daily motor activations exceed recommended cycles per day as stated in the Solar Pack Performance Chart the solar panel will not be able to replen...

Page 10: ...step to add the MaxxLink Have in hand the home WiFi password It will be necessary to connect the MaxxLink to the Internet Note Some Android users won t be connected quickly to the hotspot If it is th...

Page 11: ...your device may be turned off you just need to turn it on If you need help to enable the Bluetooth in your device please check the links below ENABLE THE BLUETOOTH IN AN ANDROID DEVICE ENABLE THE BLU...

Page 12: ...150 Bartor Road Toronto Ontario M9M 1H1 Tel 416 742 6299 Toll Free 1 866 916 6299 Fax 416 742 1772 www maxxmar com...

Page 13: ...ration Go Up Hold UP for 1 second Move all the way to the upper limit1 Press Up Press UP or Down Move all the way to the lower limit1 Stop ongoing motion Press DOWN Double press UP Double press DOWN M...

Page 14: ...wer limit of the blind 5 6 Press the UP button on the wand Press the SET button on the back of the wand The blind will jog Keep pressing until the blind reaches the upper limit This sets the upper lim...

Page 15: ...tor will move up and down to confirm that favourite Position 2 was saved Favourite Position in Neo Smart Blinds Blue App None of the favourite positions set via wand are accessible to the Neo Smart Bl...

Page 16: ...ll not be able to replenish the battery as designed If the motorized shade does not operate due to an excessively diminished battery the battery may require a full recharge Note 10 000 Lux are require...

Page 17: ...nd the home WiFi password It will be necessary to connect the MaxxLink to the Internet Note Some Android users won t be connected quickly to the hotspot If it is the case please wait about 10 seconds...

Page 18: ...ust need to turn it on If you need help to enable the Bluetooth in your device please check the links below ENABLE THE BLUETOOTH IN AN ANDROID DEVICE ENABLE THE BLUETOOTH IN AN APPLE DEVICE Do I need...

Page 19: ...MaxxMotor NEW GEN Solo A1 Instructions_Layout 1 20 02 06 2 59 PM Page 7...

Page 20: ...150 x Road Toronto Ontario M9M 1H1 Tel 416 742 6299 Toll Free 1 866 916 6299 Fax 416 742 1772 www maxxmar com MaxxMotor NEW GEN Solo A1 Instructions_Layout 1 20 02 06 2 59 PM Page 8...

Page 21: ...ription Illustration Change Motor Rotation Direction Lower Limit Setting 1 Press UP button If motor goes up please do nothing If motor goes down please do next step 1 Press and hold SETTING button on...

Page 22: ...otor goes to the favourite position and stops Press SETTINGS button on switch 3 times the working mode has been changed from Roller to Horizontal or from Horizontal to Roller Note The original factory...

Page 23: ...delivery 2 Press the CONFIRM button on transmitter Press SETTING button on motor head for 3 seconds Release button when motor jogs 1 2 3 The blind is in program mode If motor goes up do nothing more I...

Page 24: ...nsmitter A then press CONFIRM button If nothing works please check that the battery is fully charged If the motor keeps running in the same direction continually the setup limit needs to be re set The...

Page 25: ...Link Have in hand the home WiFi password It will be necessary to connect the MaxxLink to the Internet Note Some Android users won t be connected quickly to the hotspot If it is the case please wait ab...

Page 26: ...essive Energy Use If daily motor activations exceed recommended cycles per day as stated in the Solar Pack Performance Chart the solar panel will not be able to replenish the battery as designed If th...

Page 27: ...MaxxMotor Original Instructions_Layout 1 20 02 06 10 30 AM Page 7...

Page 28: ...150 Bartor Road Toronto Ontario M9M 1H1 Tel 416 742 6299 Toll Free 1 866 916 6299 Fax 416 742 1772 www maxxmar com MaxxMotor Original Instructions_Layout 1 20 02 06 10 30 AM Page 8...

Reviews: